Anvil User Guide
Purdue University is the home of Anvil, a powerful new supercomputer that provides advanced computing capabilities to support a wide range of computational and data-intensive research spanning from traditional high-performance computing to modern artificial intelligence applications.
Overview of Anvil
Purdue University is the home of Anvil, a powerful new supercomputer that provides advanced computing capabilities to support a wide range of computational and data-intensive research spanning from traditional high-performance computing to modern artificial intelligence applications.
Anvil, which is funded by a $10 million award from the National Science Foundation, significantly increases the capacity available to the NSF's Advanced Cyberinfrastructure Coordination Ecosystem: Services & Support (ACCESS) program, which serves tens of thousands of researchers across the U.S.. Anvil enters production in 2021 and serves researchers for five years. Additional funding from the NSF supports Anvil's operations and user support.
The name "Anvil" reflects the Purdue Boilermakers' strength and workmanlike focus on producing results, and the Anvil supercomputer enables important discoveries across many different areas of science and engineering. Anvil also serves as an experiential learning laboratory for students to gain real-world experience using computing for their science, and for student interns to work with the Anvil team for construction and operation. We will be training the research computing practitioners of the future.
Anvil is built in partnership with Dell and AMD and consists of 1,000 nodes with two 64-core AMD Epyc "Milan" processors each and will deliver over 1 billion CPU core hours to ACCESS each year, with a peak performance of 5.3 petaflops. Anvil's nodes are interconnected with 100 Gbps Mellanox HDR InfiniBand. The supercomputer ecosystem also includes 32 large memory nodes, each with 1 TB of RAM, and 16 nodes each with four NVIDIA A100 Tensor Core GPUs providing 1.5 PF of single-precision performance to support machine learning and artificial intelligence applications.
Anvil is funded under NSF award number 2005632. Carol Song is the principal investigator and project director. Preston Smith, executive director of the Rosen Center for Advanced Computing, Xiao Zhu, computational scientist and senior research scientist, and Rajesh Kalyanam, data scientist, software engineer, and research scientist, are all co-PIs on the project.
Link to section 'Anvil Specifications' of 'Overview of Anvil' Anvil Specifications
All Anvil nodes have 128 processor cores, 256 GB to 1 TB of RAM, and 100 Gbps Infiniband interconnects.
| Login | Number of Nodes | Processors per Node | Cores per Node | Memory per Node |
|---|---|---|---|---|
| 8 | Two Milan CPUs @ 2.45GHz | 32 | 512 GB |
| Sub-Cluster | Number of Nodes | Processors per Node | Cores per Node | Memory per Node |
|---|---|---|---|---|
| A | 1,000 | Two Milan CPUs @ 2.45GHz | 128 | 256 GB |
| B | 32 | Two Milan CPUs @ 2.45GHz | 128 | 1 TB |
| G | 16 | Two Milan CPUs @ 2.45GHz + Four NVIDIA A100 GPUs | 128 | 512 GB |
Anvil nodes run CentOS 8 and use Slurm (Simple Linux Utility for Resource Management) as the batch scheduler for resource and job management. The application of operating system patches will occur as security needs dictate. All nodes allow for unlimited stack usage, as well as unlimited core dump size (though disk space and server quotas may still be a limiting factor).
Link to section 'Software catalog' of 'Overview of Anvil' Software catalog
Accessing the System
Link to section 'Accounts on Anvil' of 'Accessing the System' Accounts on Anvil
Obtaining an Account
As an ACCESS computing resource, Anvil is accessible to ACCESS users who receive an allocation on the system. To obtain an account, users may submit a proposal through the ACCESS Allocation Request System.
For details on how to go about requesting an allocation, refer to How do I get onto Anvil through ACCESS.
Interested parties may contact the ACCESS Help Desk for help with an Anvil proposal.
How do I get onto Anvil through ACCESS
Link to section 'What is ACCESS?' of 'How do I get onto Anvil through ACCESS' What is ACCESS?
Advanced Cyberinfrastructure Coordination Ecosystem: Services & Support (ACCESS) is an NSF-funded program that manages access to the national research cyberinfrastructure (CI) resources. Any researcher who seeks to use one of these CI resources must follow ACCESS processes to get onto these resources.
Link to section 'What resources are available via ACCESS?' of 'How do I get onto Anvil through ACCESS' What resources are available via ACCESS?
ACCESS coordinates a diverse set of resources including Anvil and other traditional HPC resources suited for resource-intensive CPU workloads, modern accelerator-based systems (e.g., GPU), as well as cloud resources. Anvil provides both CPU and GPU resources as part of ACCESS. A comprehensive list of all the ACCESS-managed resources can be found here along with their descriptions and ideal workloads: https://allocations.access-ci.org/resources
Link to section 'How do I request access to a resource?' of 'How do I get onto Anvil through ACCESS' How do I request access to a resource?
The process of getting onto these resources is broadly:
- Sign up for an ACCESS account (if you don’t have one already) at https://allocations.access-ci.org.
- Prepare an allocation request with details of your proposed computational workflows (science, software needs), resource requirements, and a short CV. See the individual “Preparing Your … Request” pages for details on what documents are required: https://allocations.access-ci.org/prepare-requests.
- Decide on which allocation tier you want to apply to (more on that below) and submit the request.
Link to section 'Which ACCESS tier should I choose?' of 'How do I get onto Anvil through ACCESS' Which ACCESS tier should I choose?
As you can gather from https://allocations.access-ci.org/project-types, there are four different tiers in ACCESS. Broadly, these tiers provide increasing computational resources with corresponding stringent documentation and resource justification requirements. Furthermore, while Explore and Discover tier requests are reviewed on a rolling basis as they are submitted, Accelerate requests will be reviewed monthly and Maximize will be reviewed twice a year. The review period reflects the level of resources provided, and Explore and Discover applications are generally reviewed within a week. An important point to note is that ACCESS does not award you time on a specific computational resource (except for the Maximize tier). Users are awarded a certain number of ACCESS credits which they then exchange for time on a particular resource. Here are some guidelines on how to choose between the tiers:- If you are a graduate student, you may apply for the Explore tier with a letter from your advisor on institutional letterhead stating that the proposed work is being performed primarily by the graduate student and is separate from other funded grants or the advisor's own research.
- If you would just like to test out a resource and gather some performance data before making a large request, Explore or Discover is again the appropriate option.
- If you would like to run simulations across multiple resources to identify the one best suited for you, Discover will provide you with sufficient credits to exchange across multiple systems.
- One way of determining the appropriate tier is to determine what the credits would translate to in terms of computational resources. The exchange calculator (https://allocations.access-ci.org/exchange_calculator) can be used to calculate what a certain number of ACCESS credits translates to in terms of “core-hours” or “GPU-hours” or “node-hours” on an ACCESS resource. For example: the maximum 400,000 ACCESS credits that you may be awarded in the Explore tier translates to ~334,000 CPU core hours or ~6000 GPU hours on Anvil. Based on the scale of simulations you would like to run, you may need to choose one tier or the other.
Link to section 'What else should I know?' of 'How do I get onto Anvil through ACCESS' What else should I know?
- You may request a separate allocation for each of your research grants and the allocation can last the duration of the grant (except for the Maximize tier which only lasts for 12 months). Allocations that do not cite a grant will last for 12 months.
- Supplements are not allowed (for Explore, Discover, and Accelerate tiers), instead you will need to move to a different tier if you require more resources.
- As noted above, the exchange rates for Anvil CPU and Anvil GPU are different so be sure to check the exchange calculator.
- Be sure to include details of the simulations you would like to run and what software you would like to use. This avoids back and forth with the reviewers and also helps Anvil staff determine if your workloads are well suited to Anvil.
- When your request is approved, you only get ACCESS credits awarded. You still need to go through the step of exchanging these credits for time on Anvil. You need not use up all your credits and may also use part of your credits for time on other ACCESS resources.
- You will also need to go to the allocations page and add any users you would like to have access to these resources. Note that they will need to sign up for ACCESS accounts as well before you can add them.
- For other questions you may have, take a look at ACCESS policies here: (https://allocations.access-ci.org/allocations-policy)
Logging In
Anvil supports the SSH (Secure Shell), ThinLinc, and Open OnDemand mechanisms for logging in. The first two of these use SSH keys. If you need help creating or uploading your SSH keys, please see the Managing SSH Public Keys page for that information.
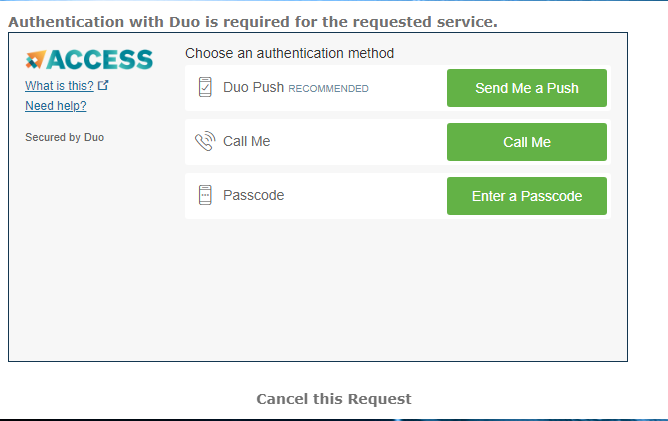
ACCESS requires that you use the ACCESS Duo service for additional authentication, you will be prompted to authenticate yourself further using Duo and your Duo client app, token, or other contact methods. Consult Manage Multi-Factor Authentication with Duo for account setup instructions.
Link to section 'With SSH' of 'Logging In' With SSH
Anvil accepts standard SSH connections with public keys-based authentication to anvil.rcac.purdue.edu using your Anvil username:
localhost$ ssh -l my-x-anvil-username anvil.rcac.purdue.edu
Please note:
- Your Anvil username is not the same as your ACCESS username (although it is derived from it). Anvil usernames look like
x-ACCESSusernameor similar, starting with anx-. - Password-based authentication is not supported on Anvil (in favor of SSH keys). There is no "Anvil password", and your ACCESS password will not be accepted by Anvil's SSH either. SSH keys can be set up from the Open OnDemand interface on Anvil
ondemand.anvil.rcac.purdue.edu. Please follow the steps in Setting up SSH keys to add your SSH key on Anvil.
When reporting SSH problems to the help desk, please execute the ssh command with the -vvv option and include the verbose output in your problem description.
Link to section 'Additional Services and Instructions' of 'Logging In' Additional Services and Instructions
Open OnDemand
Open OnDemand is an open-source HPC portal developed by the Ohio Supercomputing Center. Open OnDemand allows one to interact with HPC resources through a web browser and easily manage files, submit jobs, and interact with graphical applications directly in a browser, all with no software to install. Anvil has an instance of OnDemand available that can be accessed via ondemand.anvil.rcac.purdue.edu.
Link to section 'Logging In' of 'Open OnDemand' Logging In
To log into the Anvil OnDemand portal:
- Navigate to ondemand.anvil.rcac.purdue.edu
- Log in using your ACCESS username and password

- ACCESS Duo authentication is required to login to OnDemand. Consult Manage Multi-Factor Authentication with Duo for account setup instructions
The Anvil team continues to refine the user interface, please reach out to us in case of any queries regarding the use of OnDemand.
SSH Keys
Link to section 'General overview' of 'SSH Keys' General overview
To connect to Anvil using SSH keys, you must follow three high-level steps:
- Generate a key pair consisting of a private and a public key on your local machine.
- Copy the public key to the cluster and append it to
$HOME/.ssh/authorized_keysfile in your account. - Test if you can ssh from your local computer to the cluster directly.
Detailed steps for different operating systems and specific SSH client software are given below.
Link to section 'Mac and Linux:' of 'SSH Keys' Mac and Linux:
-
Run
ssh-keygenin a terminal on your local machine.localhost >$ ssh-keygen Generating public/private rsa key pair. Enter file in which to save the key (localhost/.ssh/id_rsa):You may supply a filename and a passphrase for protecting your private key, but it is not mandatory. To accept the default settings, press Enter without specifying a filename.
Note: If you do not protect your private key with a passphrase, anyone with access to your computer could SSH to your account on Anvil.Created directory 'localhost/.ssh'. Enter passphrase (empty for no passphrase): Enter same passphrase again: Your identification has been saved in localhost/.ssh/id_rsa. Your public key has been saved in localhost/.ssh/id_rsa.pub. The key fingerprint is: ... The key's randomart image is: ...By default, the key files will be stored in
~/.ssh/id_rsaand~/.ssh/id_rsa.pubon your local machine. -
Go to the
~/.sshfolder in your local machine andcatthe key information in theid_rsa.pub file.localhost/.ssh>$ cat id_rsa.pub ssh-rsa XXXXXXXXXXXXXXXXXXXXXXXXXXXXXXXXXXXXXXXXXXXXXXXXXXXXXXXXXXXXXXXXXXXXXXXXXXXXXXXXXXXXXXXXXXXXXXXXXXXXXXXXXXXXXXXX XXXXXXXXXXXXXXXXXXXXXXXXXXXXXXXXXXXXXXXXXXXXXXXXXXXXXXXXXXXXXXXXXXXXXX= localhost-username@localhost -
For your first time login to Anvil, please log in to Open OnDemand ondemand.anvil.rcac.purdue.edu using your ACCESS username and password.
-
Once logged on to OnDemand, go to the
Clusterson the top toolbar. ClickAnvil Shell Accessand you will be able to see the terminal.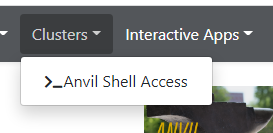
============================================================================= == Welcome to the Anvil Cluster == …… ============================================================================= ** DID YOU KNOW? ** …… ***************************************************************************** x-anvilusername@login04.anvil:[~] $ pwd /home/x-anvilusername -
Under the home directory on Anvil, make a
.sshdirectory usingmkdir -p ~/.sshif it does not exist.
Create a file~/.ssh/authorized_keyson the Anvil cluster and copy the contents of the public keyid_rsa.pubin your local machine into~/.ssh/authorized_keys.x-anvilusername@login04.anvil:[~] $ pwd /home/x-anvilusername x-anvilusername@login04.anvil:[~] $ cd ~/.ssh x-anvilusername@login04.anvil:[.ssh] $ vi authorized_keys # copy-paste the contents of the public key id_rsa.pub in your local machine (as shown in step 2) to authorized_keys here and save the change of authorized_keys file. Then it is all set! # -
Test the new key by SSH-ing to the server. The login should now complete without asking for a password.
localhost>$ ssh x-anvilusername@anvil.rcac.purdue.edu ============================================================================= == Welcome to the Anvil Cluster == ... ============================================================================= x-anvilusername@login06.anvil:[~] $ -
If the private key has a non-default name or location, you need to specify the key by
ssh -i my_private_key_name x-anvilusername@anvil.rcac.purdue.edu.
Link to section 'Windows:' of 'SSH Keys' Windows:
| Programs | Instructions |
|---|---|
| MobaXterm | Open a local terminal and follow Linux steps |
| Git Bash | Follow Linux steps |
| Windows 10 PowerShell | Follow Linux steps |
| Windows 10 Subsystem for Linux | Follow Linux steps |
| PuTTY | Follow steps below |
PuTTY:
-
Launch PuTTYgen, keep the default key type (RSA) and length (2048-bits) and click Generate button.
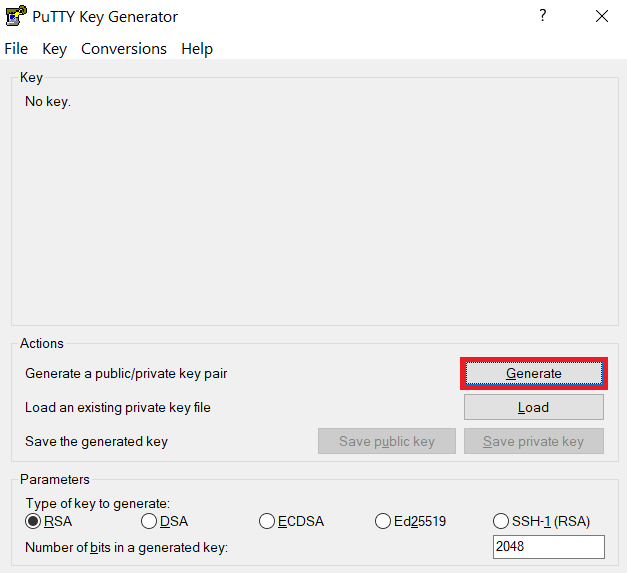
The "Generate" button can be found under the "Actions" section of the PuTTY Key Generator interface. -
Once the key pair is generated:
Use the Save public key button to save the public key, e.g.
Documents\SSH_Keys\mylaptop_public_key.pubUse the Save private key button to save the private key, e.g.
Documents\SSH_Keys\mylaptop_private_key.ppk. When saving the private key, you can also choose a reminder comment, as well as an optional passphrase to protect your key, as shown in the image below. Note: If you do not protect your private key with a passphrase, anyone with access to your computer could SSH to your account on Anvil.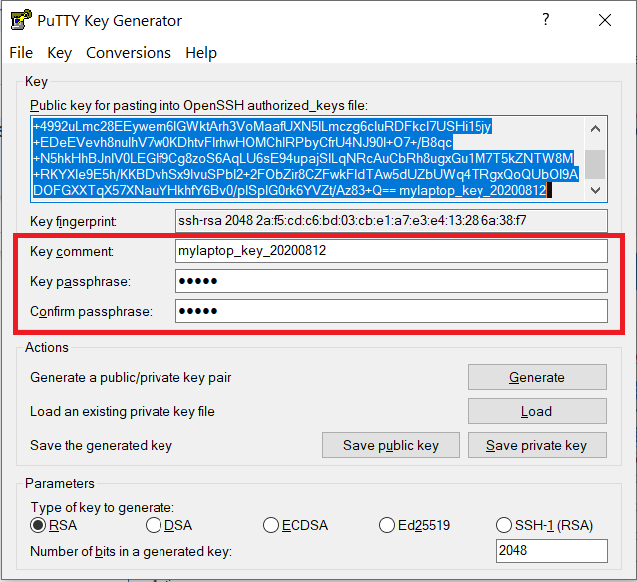
The PuTTY Key Generator form has inputs for the Key passphrase and optional reminder comment. From the menu of PuTTYgen, use the "Conversion -> Export OpenSSH key" tool to convert the private key into openssh format, e.g.
Documents\SSH_Keys\mylaptop_private_key.opensshto be used later for Thinlinc. -
Configure PuTTY to use key-based authentication:
Launch PuTTY and navigate to "Connection -> SSH ->Auth" on the left panel, click Browse button under the "Authentication parameters" section and choose your private key, e.g. mylaptop_private_key.ppk
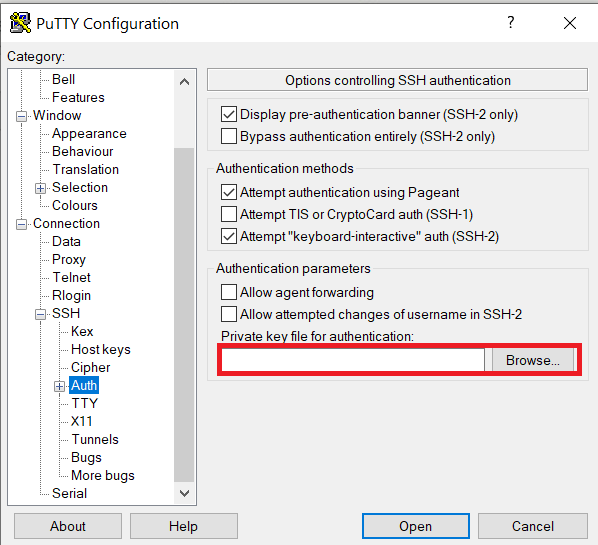
After clicking Connection -> SSH ->Auth panel, the "Browse" option can be found at the bottom of the resulting panel. Navigate back to "Session" on the left panel. Highlight "Default Settings" and click the "Save" button to ensure the change is in place.
-
For your first time login to Anvil, please log in to Open OnDemand ondemand.anvil.rcac.purdue.edu using your ACCESS username and password.
-
Once logged on to OnDemand, go to the
Clusterson the top toolbar. ClickAnvil Shell Accessand you will be able to see the terminal.============================================================================= == Welcome to the Anvil Cluster == …… ============================================================================= ** DID YOU KNOW? ** …… ***************************************************************************** x-anvilusername@login04.anvil:[~] $ pwd /home/x-anvilusername -
Under the home directory on Anvil, make a
.sshdirectory usingmkdir -p ~/.sshif it does not exist.
Create a file~/.ssh/authorized_keyson the Anvil cluster and copy the contents of the public keyid_rsa.pubin your local machine into~/.ssh/authorized_keys.
and copy the contents of public key from PuTTYgen as shown below and paste it intox-anvilusername@login04.anvil:[~] $ pwd /home/x-anvilusername x-anvilusername@login04.anvil:[~] $ cd ~/.ssh x-anvilusername@login04.anvil:[.ssh] $ vi authorized_keys # copy-paste the contents of the public key id_rsa.pub in your local machine (as shown in step 2) to authorized_keys here and save the change of authorized_keys file. Then it is all set! #~/.ssh/authorized_keys. Please double-check that your text editor did not wrap or fold the pasted value (it should be one very long line).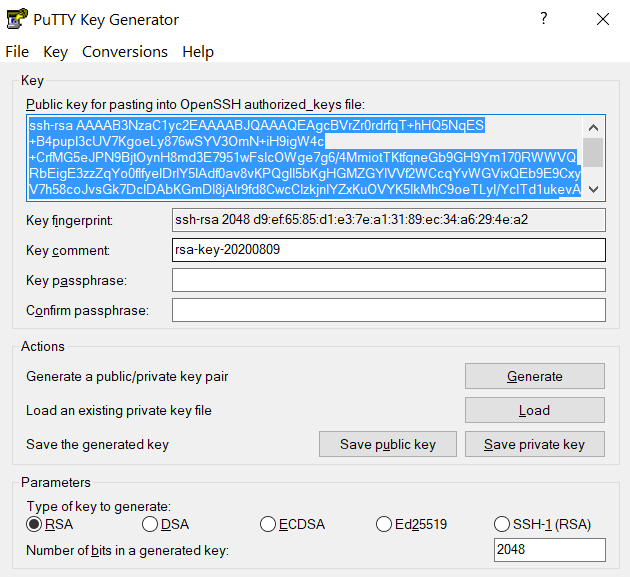
The "Public key" will look like a long string of random letters and numbers in a text box at the top of the window. - Test by connecting to the cluster and the login should now complete without asking for a password. If you chose to protect your private key with a passphrase in step 2, you will be prompted to enter the passphrase when connecting.
ThinLinc
For your first time accessing Anvil using ThinLinc client, your desktop might be locked after it has been idle for more than 5 minutes. It is because in the default settings, the "screensaver" and "lock screen" are turned on. To solve this issue, please refer to the FAQs Page.
Anvil provides Cendio's ThinLinc as an alternative to running an X11 server directly on your computer. It allows you to run graphical applications or graphical interactive jobs directly on Anvil through a persistent remote graphical desktop session.
ThinLinc is a service that allows you to connect to a persistent remote graphical desktop session. This service works very well over a high latency, low bandwidth, or off-campus connection compared to running an X11 server locally. It is also very helpful for Windows users who do not have an easy to use local X11 server, as little to no setup is required on your computer.
There are two ways in which to use ThinLinc: preferably through the native client or through a web browser.
Browser-based Thinlinc access is not supported on Anvil at this moment. Please use native Thinlinc client with SSH keys.
Link to section 'Installing the ThinLinc native client' of 'ThinLinc' Installing the ThinLinc native client
The native ThinLinc client will offer the best experience especially over off-campus connections and is the recommended method for using ThinLinc. It is compatible with Windows, Mac OS X, and Linux.
- Download the ThinLinc client from the ThinLinc website.
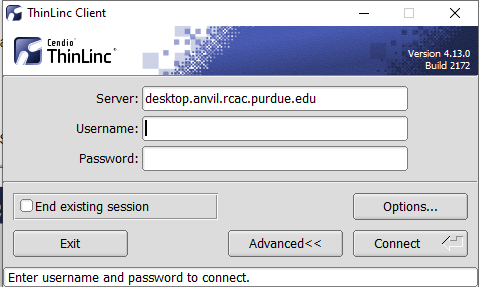
- Start the ThinLinc client on your computer.
- In the client's login window, use desktop.anvil.rcac.purdue.edu as the Server and use your Anvil username
x-anvilusername. - At this moment, an SSH key is required to login to ThinLinc client. For help generating and uploading keys to the cluster, see SSH Keys section in our user guide for details.
Link to section 'Configure ThinLinc to use SSH Keys' of 'ThinLinc' Configure ThinLinc to use SSH Keys
-
To set up SSH key authentication on the ThinLinc client:
-
Open the Options panel, and select Public key as your authentication method on the Security tab.
The "Options..." button in the ThinLinc Client can be found towards the bottom left, above the "Connect" button. -
In the options dialog, switch to the "Security" tab and select the "Public key" radio button:
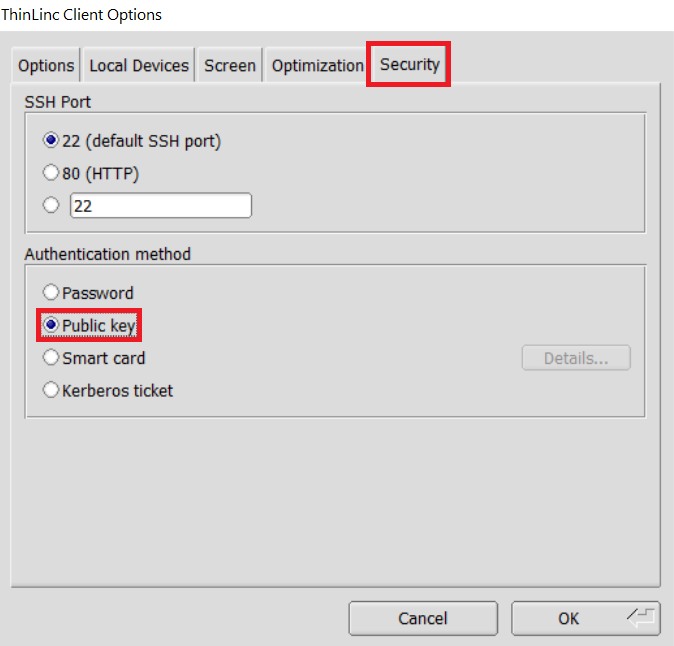
The "Security" tab found in the options dialog, will be the last of available tabs. The "Public key" option can be found in the "Authentication method" options group. - Click OK to return to the ThinLinc Client login window. You should now see a Key field in place of the Password field.
-
In the Key field, type the path to your locally stored private key or click the ... button to locate and select the key on your local system. Note: If PuTTY is used to generate the SSH Key pairs, please choose the private key in the openssh format.
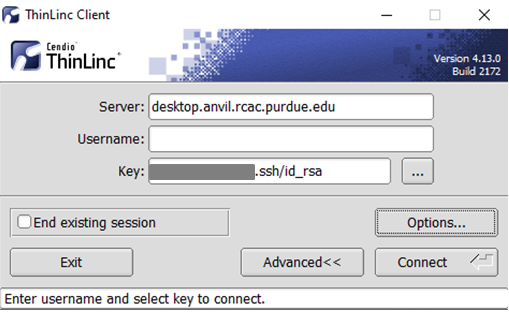
The ThinLinc Client login window will now display key field instead of a password field.
-
- Click the Connect button.
- Continue to following section on connecting to Anvil from ThinLinc.
Link to section 'Connecting to Anvil from ThinLinc' of 'ThinLinc' Connecting to Anvil from ThinLinc
- Once logged in, you will be presented with a remote Linux desktop running directly on a cluster login node.
- Open the terminal application on the remote desktop.
- Once logged in to the Anvil login node, you may use graphical editors, debuggers, software like Matlab, or run graphical interactive jobs. For example, to test the X forwarding connection issue the following command to launch the graphical editor geany:
$ geany - This session will remain persistent even if you disconnect from the session. Any interactive jobs or applications you left running will continue running even if you are not connected to the session.
Link to section 'Tips for using ThinLinc native client' of 'ThinLinc' Tips for using ThinLinc native client
- To exit a full-screen ThinLinc session press the F8 key on your keyboard (fn + F8 key for Mac users) and click to disconnect or exit full screen.
- Full-screen mode can be disabled when connecting to a session by clicking the Options button and disabling full-screen mode from the Screen tab.
Check Allocation Usage
To keep track of the usage of the allocation by your project team, you can use mybalance:
x-anvilusername@login01:~ $ mybalance

Allocation          Type  SU Limit   SU Usage  SU Usage  SU Balance
Account                             (account)    (user)
===============  =======  ========  ========= =========  ==========
xxxxxxxxx           CPU    1000.0       95.7       0.0       904.3
You can also check the allocation usage through ACCESS allocations page.
See SU accounting section for detailed description of the way SUs are charged on Anvil.
System Architecture
Link to section 'Compute Nodes' of 'System Architecture' Compute Nodes
| Model: | 3rd Gen AMD EPYC™ CPUs (AMD EPYC 7763) |
|---|---|
| Number of nodes: | 1000 |
| Sockets per node: | 2 |
| Cores per socket: | 64 |
| Cores per node: | 128 |
| Hardware threads per core: | 1 |
| Hardware threads per node: | 128 |
| Clock rate: | 2.45GHz (3.5GHz max boost) |
| RAM: | Regular compute node: 256 GB DDR4-3200 Large memory node: (32 nodes with 1TB DDR4-3200) |
| Cache: | L1d cache: 32K/core L1i cache: 32K/core L2 cache: 512K/core L3 cache: 32768K |
| Local storage: | 480GB local disk |
Link to section 'Login Nodes' of 'System Architecture' Login Nodes
| Number of Nodes | Processors per Node | Cores per Node | Memory per Node |
|---|---|---|---|
| 8 | 3rd Gen AMD EPYC™ 7543 CPU | 32 | 512 GB |
Link to section 'Specialized Nodes' of 'System Architecture' Specialized Nodes
| Sub-Cluster | Number of Nodes | Processors per Node | Cores per Node | Memory per Node |
|---|---|---|---|---|
| B | 32 | Two 3rd Gen AMD EPYC™ 7763 CPUs | 128 | 1 TB |
| G | 16 | Two 3rd Gen AMD EPYC™ 7763 CPUs + Four NVIDIA A100 GPUs | 128 | 512 GB |
Link to section 'Network' of 'System Architecture' Network
All nodes, as well as the scratch storage system are interconnected by an oversubscribed (3:1 fat tree) HDR InfiniBand interconnect. The nominal per-node bandwidth is 100 Gbps, with message latency as low as 0.90 microseconds. The fabric is implemented as a two-stage fat tree. Nodes are directly connected to Mellanox QM8790 switches with 60 HDR100 links down to nodes and 10 links to spine switches.
Running Jobs
Users familiar with the Linux command line may use standard job submission utilities to manage and run jobs on the Anvil compute nodes.
For GPU jobs, make sure to use --gpus-per-node argument, otherwise, your job may not run properly.
Accessing the Compute Nodes
Anvil uses the Slurm Workload Manager for job scheduling and management. With Slurm, a user requests resources and submits a job to a queue. The system takes jobs from queues, allocates the necessary compute nodes, and executes them. While users will typically SSH to an Anvil login node to access the Slurm job scheduler, they should note that Slurm should always be used to submit their work as a job rather than run computationally intensive jobs directly on a login node. All users share the login nodes, and running anything but the smallest test job will negatively impact everyone's ability to use Anvil.
Anvil is designed to serve the moderate-scale computation and data needs of the majority of ACCESS users. Users with allocations can submit to a variety of queues with varying job size and walltime limits. Separate sets of queues are utilized for the CPU, GPU, and large memory nodes. Typically, queues with shorter walltime and smaller job size limits will feature faster turnarounds. Some additional points to be aware of regarding the Anvil queues are:
- Anvil provides a debug queue for testing and debugging codes.
- Anvil supports shared-node jobs (more than one job on a single node). Many applications are serial or can only scale to a few cores. Allowing shared nodes improves job throughput, provides higher overall system utilization and allows more users to run on Anvil.
- Anvil supports long-running jobs - run times can be extended to four days for jobs using up to 16 full nodes.
- The maximum allowable job size on Anvil is 7,168 cores. To run larger jobs, submit a consulting ticket to discuss with Anvil support.
- Shared-node queues will be utilized for managing jobs on the GPU and large memory nodes.
Job Accounting
On Anvil, the CPU nodes and GPU nodes are charged separately.Link to section ' For CPU nodes' of 'Job Accounting' For CPU nodes
The charge unit for Anvil is the Service Unit (SU). This corresponds to the equivalent use of one compute core utilizing less than or equal to approximately 2G of data in memory for one hour.
Keep in mind that your charges are based on the resources that are tied up by your job and do not necessarily reflect how the resources are used.
Charges on jobs submitted to the shared queues are based on the number of cores and the fraction of the memory requested, whichever is larger. Jobs submitted as node-exclusive will be charged for all 128 cores, whether the resources are used or not.
Jobs submitted to the large memory nodes will be charged 4 SU per compute core (4x wholenode node charge).
Link to section ' For GPU nodes' of 'Job Accounting' For GPU nodes
1 SU corresponds to the equivalent use of one GPU utilizing less than or equal to approximately 120G of data in memory for one hour.
Each GPU nodes on Anvil have 4 GPUs and all GPU nodes are shared.
Link to section ' For file system ' of 'Job Accounting' For file system
Filesystem storage is not charged.
You can use mybalance command to check your current allocation usage.
Slurm Partitions (Queues)
Anvil provides different queues with varying job sizes and walltimes. There are also limits on the number of jobs queued and running on a per-user and queue basis. Queues and limits are subject to change based on the evaluation from the Early User Program.
| Queue Name | Node Type | Max Nodes per Job | Max Cores per Job | Max Duration | Max running Jobs in Queue | Max running + submitted Jobs in Queue | Charging factor |
|---|---|---|---|---|---|---|---|
| debug | regular | 2 nodes | 256 cores | 2 hrs | 1 | 2 | 1 |
| gpu-debug | gpu | 1 node | 2 gpus | 0.5 hrs | 1 | 2 | 1 |
| wholenode | regular | 16 nodes | 2,048 cores | 96 hrs | 64 | 2500 | 1 (node-exclusive) |
| wide | regular | 56 nodes | 7,168 cores | 12 hrs | 5 | 10 | 1 (node-exclusive) |
| shared | regular | 1 node | 128 cores | 96 hrs | 6400 cores | - | 1 |
| highmem | large-memory | 1 node | 128 cores | 48 hrs | 2 | 4 | 4 |
| gpu | gpu | - | - | 48 hrs | - | - | 1 |
For gpu queue: max of 12 GPU in use per user and max of 32 GPU in use per allocation.
Make sure to specify the desired partition when submitting your jobs (e.g. -p wholenode). If you do not specify one, the job will be directed into the default partition (shared).
If the partition is node-exclusive (e.g. the wholenode and wide queues), even if you ask for 1 core in your job submission script, your job will get allocated an entire node and would not share this node with any other jobs. Hence, it will be charged for 128 cores' worth and squeue command would show it as 128 cores, too. See SU accounting for more details.
Link to section 'Useful tools' of 'Slurm Partitions (Queues)' Useful tools
- To display all Slurm partitions and their current usage, type
showpartitionsat the command line.x-anvilusername@login03.anvil:[~] $ showpartitions Partition statistics for cluster anvil at CURRENTTIME Partition #Nodes #CPU_cores Cores_pending Job_Nodes MaxJobTime Cores Mem/Node Name State Total Idle Total Idle Resorc Other Min Max Day-hr:mn /node (GB) wholenode up 750 684 96000 92160 0 1408 1 infin infinite 128 257 shared:* up 250 224 32000 30208 0 0 1 infin infinite 128 257 wide up 750 684 96000 92160 0 0 1 infin infinite 128 257 highmem up 32 32 4096 4096 0 0 1 infin infinite 128 1031 debug up 17 5 2176 2176 0 0 1 infin infinite 128 257 gpu up 16 10 2048 1308 0 263 1 infin infinite 128 515 gpu-debug up 16 10 2048 1308 0 0 1 infin infinite 128 515 - To show the list of available constraint feature names for different node types, type
sfeaturesat the command line.x-anvilusername@login03.anvil:[~] $ sfeatures NODELIST CPUS MEMORY AVAIL_FEATURES GRES a[000-999] 128 257526 A,a (null) b[000-031] 128 1031669 B,b (null) g[000-015] 128 515545 G,g,A100 gpu:4
Batch Jobs
Link to section 'Job Submission Script' of 'Batch Jobs' Job Submission Script
To submit work to a Slurm queue, you must first create a job submission file. This job submission file is essentially a simple shell script. It will set any required environment variables, load any necessary modules, create or modify files and directories, and run any applications that you need:
#!/bin/sh -l
# FILENAME:  myjobsubmissionfile

# Loads Matlab and sets the application up
module load matlab

# Change to the directory from which you originally submitted this job.
cd $SLURM_SUBMIT_DIR

# Runs a Matlab script named 'myscript'
matlab -nodisplay -singleCompThread -r myscript
The standard Slurm environment variables that can be used in the job submission file are listed in the table below:
| Name | Description |
|---|---|
| SLURM_SUBMIT_DIR | Absolute path of the current working directory when you submitted this job |
| SLURM_JOBID | Job ID number assigned to this job by the batch system |
| SLURM_JOB_NAME | Job name supplied by the user |
| SLURM_JOB_NODELIST | Names of nodes assigned to this job |
| SLURM_SUBMIT_HOST | Hostname of the system where you submitted this job |
| SLURM_JOB_PARTITION | Name of the original queue to which you submitted this job |
Once your script is prepared, you are ready to submit your job.
Link to section 'Submitting a Job' of 'Batch Jobs' Submitting a Job
Once you have a job submission file, you may submit this script to SLURM using the sbatch command. Slurm will find, or wait for, available resources matching your request and run your job there.
To submit your job to one compute node with one task:
$ sbatch --nodes=1 --ntasks=1 myjobsubmissionfile
By default, each job receives 30 minutes of wall time, or clock time. If you know that your job will not need more than a certain amount of time to run, request less than the maximum wall time, as this may allow your job to run sooner. To request the 1 hour and 30 minutes of wall time:
$ sbatch -t 1:30:00 --nodes=1 --ntasks=1 myjobsubmissionfile
Each compute node in Anvil has 128 processor cores. In some cases, you may want to request multiple nodes. To utilize multiple nodes, you will need to have a program or code that is specifically programmed to use multiple nodes such as with MPI. Simply requesting more nodes will not make your work go faster. Your code must utilize all the cores to support this ability. To request 2 compute nodes with 256 tasks:
$ sbatch --nodes=2 --ntasks=256 myjobsubmissionfile
If more convenient, you may also specify any command line options to sbatch from within your job submission file, using a special form of comment:
#!/bin/sh -l
# FILENAME:  myjobsubmissionfile

#SBATCH -A myallocation
#SBATCH -p queue-name # the default queue is "shared" queue
#SBATCH --nodes=1
#SBATCH --ntasks=1
#SBATCH --time=1:30:00
#SBATCH --job-name myjobname

module purge # Unload all loaded modules and reset everything to original state.
module load ...
...
module list # List currently loaded modules.
# Print the hostname of the compute node on which this job is running.
hostname
If an option is present in both your job submission file and on the command line, the option on the command line will take precedence.
After you submit your job with sbatch, it may wait in the queue for minutes, hours, or even days. How long it takes for a job to start depends on the specific queue, the available resources, and time requested, and other jobs that are already waiting in that queue. It is impossible to say for sure when any given job will start. For best results, request no more resources than your job requires.
Once your job is submitted, you can monitor the job status, wait for the job to complete, and check the job output.
Link to section 'Checking Job Status' of 'Batch Jobs' Checking Job Status
Once a job is submitted there are several commands you can use to monitor the progress of the job. To see your jobs, use the squeue -u command and specify your username.
$ squeue -u myusername
   JOBID   PARTITION   NAME     USER       ST    TIME   NODES   NODELIST(REASON)
   188     wholenode job1   myusername   R     0:14      2    a[010-011]
   189     wholenode job2   myusername   R     0:15      1    a012
To retrieve useful information about your queued or running job, use the scontrol show job command with your job's ID number.
$ scontrol show job 189
JobId=189 JobName=myjobname
   UserId=myusername GroupId=mygroup MCS_label=N/A
   Priority=103076 Nice=0 Account=myacct QOS=normal
   JobState=RUNNING Reason=None Dependency=(null)
   Requeue=1 Restarts=0 BatchFlag=0 Reboot=0 ExitCode=0:0
   RunTime=00:01:28 TimeLimit=00:30:00 TimeMin=N/A
   SubmitTime=2021-10-04T14:59:52 EligibleTime=2021-10-04T14:59:52
   AccrueTime=Unknown
   StartTime=2021-10-04T14:59:52 EndTime=2021-10-04T15:29:52 Deadline=N/A
   SuspendTime=None SecsPreSuspend=0 LastSchedEval=2021-10-04T14:59:52 Scheduler=Main
   Partition=wholenode AllocNode:Sid=login05:1202865
   ReqNodeList=(null) ExcNodeList=(null)
   NodeList=a010
   BatchHost=a010
   NumNodes=1 NumCPUs=1 NumTasks=1 CPUs/Task=1 ReqB:S:C:T=0:0:*:*
   TRES=cpu=1,mem=257526M,node=1,billing=1
   Socks/Node=* NtasksPerN:B:S:C=0:0:*:* CoreSpec=*
   MinCPUsNode=1 MinMemoryNode=257526M MinTmpDiskNode=0
   Features=(null) DelayBoot=00:00:00
   OverSubscribe=OK Contiguous=0 Licenses=(null) Network=(null)
   Command=(null)
   WorkDir=/home/myusername/jobdir
   Power=
JobStatelets you know if the job is Pending, Running, Completed, or Held.RunTime and TimeLimitwill show how long the job has run and its maximum time.SubmitTimeis when the job was submitted to the cluster.- The job's number of Nodes, Tasks, Cores (CPUs) and CPUs per Task are shown.
WorkDiris the job's working directory.StdOutandStderrare the locations of stdout and stderr of the job, respectively.Reasonwill show why aPENDINGjob isn't running.
For historic (completed) jobs, you can use the jobinfo command. While not as detailed as scontrol output, it can also report information on jobs that are no longer active.
Link to section 'Checking Job Output' of 'Batch Jobs' Checking Job Output
Once a job is submitted, and has started, it will write its standard output and standard error to files that you can read.
SLURM catches output written to standard output and standard error - what would be printed to your screen if you ran your program interactively. Unless you specified otherwise, SLURM will put the output in the directory where you submitted the job in a file named slurm- followed by the job id, with the extension out. For example slurm-3509.out. Note that both stdout and stderr will be written into the same file, unless you specify otherwise.
If your program writes its own output files, those files will be created as defined by the program. This may be in the directory where the program was run, or may be defined in a configuration or input file. You will need to check the documentation for your program for more details.
Link to section 'Redirecting Job Output' of 'Batch Jobs' Redirecting Job Output
It is possible to redirect job output to somewhere other than the default location with the --error and --output directives:
#! /bin/sh -l
#SBATCH --output=/path/myjob.out
#SBATCH --error=/path/myjob.out

# This job prints "Hello World" to output and exits
echo "Hello World"
Link to section 'Holding a Job' of 'Batch Jobs' Holding a Job
Sometimes you may want to submit a job but not have it run just yet. You may be wanting to allow lab mates to cut in front of you in the queue - so hold the job until their jobs have started, and then release yours.
To place a hold on a job before it starts running, use the scontrol hold job command:
$ scontrol hold job myjobid
Once a job has started running it can not be placed on hold.
To release a hold on a job, use the scontrol release job command:
$ scontrol release job myjobid
Link to section 'Job Dependencies' of 'Batch Jobs' Job Dependencies
Dependencies are an automated way of holding and releasing jobs. Jobs with a dependency are held until the condition is satisfied. Once the condition is satisfied jobs only then become eligible to run and must still queue as normal.
Job dependencies may be configured to ensure jobs start in a specified order. Jobs can be configured to run after other job state changes, such as when the job starts or the job ends.
These examples illustrate setting dependencies in several ways. Typically dependencies are set by capturing and using the job ID from the last job submitted.
To run a job after job myjobid has started:
$ sbatch --dependency=after:myjobid myjobsubmissionfile
To run a job after job myjobid ends without error:
$ sbatch --dependency=afterok:myjobid myjobsubmissionfile
To run a job after job myjobid ends with errors:
$ sbatch --dependency=afternotok:myjobid myjobsubmissionfile
To run a job after job myjobid ends with or without errors:
$ sbatch --dependency=afterany:myjobid myjobsubmissionfile
To set more complex dependencies on multiple jobs and conditions:
$ sbatch --dependency=after:myjobid1:myjobid2:myjobid3,afterok:myjobid4 myjobsubmissionfile
Link to section 'Canceling a Job' of 'Batch Jobs' Canceling a Job
To stop a job before it finishes or remove it from a queue, use the scancel command:
$ scancel myjobid
Interactive Jobs
In addition to the ThinLinc and OnDemand interfaces, users can also choose to run interactive jobs on compute nodes to obtain a shell that they can interact with. This gives users the ability to type commands or use a graphical interface as if they were on a login node.
To submit an interactive job, use sinteractive to run a login shell on allocated resources.
sinteractive accepts most of the same resource requests as sbatch, so to request a login shell in the compute queue while allocating 2 nodes and 256 total cores, you might do:
$ sinteractive -N2 -n256 -A oneofyourallocations
To quit your interactive job:
exit or Ctrl-D
Example Jobs
A number of example jobs are available for you to look over and adapt to your own needs. The first few are generic examples, and latter ones go into specifics for particular software packages.
Generic SLURM Jobs
The following examples demonstrate the basics of SLURM jobs, and are designed to cover common job request scenarios. These example jobs will need to be modified to run your application or code.
Serial job in shared queue
This shows an example of a job submission file of the serial programs:
#!/bin/bash
# FILENAME:  myjobsubmissionfile

#SBATCH -A myallocation   # Allocation name
#SBATCH --nodes=1         # Total # of nodes (must be 1 for serial job)
#SBATCH --ntasks=1        # Total # of MPI tasks (should be 1 for serial job)
#SBATCH --time=1:30:00    # Total run time limit (hh:mm:ss)
#SBATCH -J myjobname      # Job name
#SBATCH -o myjob.o%j      # Name of stdout output file
#SBATCH -e myjob.e%j      # Name of stderr error file
#SBATCH -p shared  # Queue (partition) name
#SBATCH --mail-user=useremailaddress
#SBATCH --mail-type=all   # Send email to above address at begin and end of job

# Manage processing environment, load compilers and applications.
module purge
module load compilername
module load applicationname
module list

# Launch serial code
./myexecutablefiles
If you would like to submit one serial job at a time, using shared queue will only charge 1 core, instead of charging 128 cores for wholenode queue.
MPI job in wholenode queue
An MPI job is a set of processes that take advantage of multiple compute nodes by communicating with each other. OpenMPI, Intel MPI (IMPI), and MVAPICH2 are implementations of the MPI standard.
This shows an example of a job submission file of the MPI programs:
#!/bin/bash
# FILENAME:  myjobsubmissionfile

#SBATCH -A myallocation  # Allocation name
#SBATCH --nodes=2        # Total # of nodes
#SBATCH --ntasks=256     # Total # of MPI tasks
#SBATCH --time=1:30:00   # Total run time limit (hh:mm:ss)
#SBATCH -J myjobname     # Job name
#SBATCH -o myjob.o%j     # Name of stdout output file
#SBATCH -e myjob.e%j     # Name of stderr error file
#SBATCH -p wholenode     # Queue (partition) name
#SBATCH --mail-user=useremailaddress
#SBATCH--mail-type=all   # Send email to above address at begin and end of job

# Manage processing environment, load compilers and applications.
module purge
module load compilername
module load mpilibrary
module load applicationname
module list

# Launch MPI code
mpirun -np $SLURM_NTASKS ./myexecutablefiles
SLURM can run an MPI program with the srun command. The number of processes is requested with the -n option. If you do not specify the -n option, it will default to the total number of processor cores you request from SLURM.
If the code is built with OpenMPI, it can be run with a simple srun -n command. If it is built with Intel IMPI, then you also need to add the --mpi=pmi2 option: srun --mpi=pmi2 -n 256 ./mycode.exe in this example.
Invoking an MPI program on Anvil with ./myexecutablefiles is typically wrong, since this will use only one MPI process and defeat the purpose of using MPI. Unless that is what you want (rarely the case), you should use srun which is the Slurm analog of mpirun or mpiexec, or use mpirun or mpiexec to invoke an MPI program.
OpenMP job in wholenode queue
A shared-memory job is a single process that takes advantage of a multi-core processor and its shared memory to achieve parallelization.
When running OpenMP programs, all threads must be on the same compute node to take advantage of shared memory. The threads cannot communicate between nodes.
To run an OpenMP program, set the environment variable OMP_NUM_THREADS to the desired number of threads. This should almost always be equal to the number of cores on a compute node. You may want to set to another appropriate value if you are running several processes in parallel in a single job or node.
This example shows how to submit an OpenMP program, this job asked for 2 MPI tasks, each with 64 OpenMP threads for a total of 128 CPU-cores:
#!/bin/bash
# FILENAME:  myjobsubmissionfile

#SBATCH -A myallocation         # Allocation name
#SBATCH --nodes=1               # Total # of nodes (must be 1 for OpenMP job)
#SBATCH --ntasks-per-node=2     # Total # of MPI tasks per node
#SBATCH --cpus-per-task=64      # cpu-cores per task (default value is 1, >1 for multi-threaded tasks)
#SBATCH --time=1:30:00          # Total run time limit (hh:mm:ss)
#SBATCH -J myjobname            # Job name
#SBATCH -o myjob.o%j            # Name of stdout output file
#SBATCH -e myjob.e%j            # Name of stderr error file
#SBATCH -p wholenode            # Queue (partition) name
#SBATCH --mail-user=useremailaddress
#SBATCH --mail-type=all         # Send email to above address at begin and end of job

# Manage processing environment, load compilers and applications.
module purge
module load compilername
module load applicationname
module list

# Set thread count (default value is 1).
export OMP_NUM_THREADS=$SLURM_CPUS_PER_TASK

# Launch OpenMP code
./myexecutablefiles
The ntasks x cpus-per-task should equal to or less than the total number of CPU cores on a node.
If an OpenMP program uses a lot of memory and 128 threads use all of the memory of the compute node, use fewer processor cores (OpenMP threads) on that compute node.
Hybrid job in wholenode queue
A hybrid program combines both MPI and shared-memory to take advantage of compute clusters with multi-core compute nodes. Libraries for OpenMPI, Intel MPI (IMPI), and MVAPICH2 and compilers which include OpenMP for C, C++, and Fortran are available.
This example shows how to submit a hybrid program, this job asked for 4 MPI tasks (with 2 MPI tasks per node), each with 64 OpenMP threads for a total of 256 CPU-cores:
#!/bin/bash
# FILENAME:  myjobsubmissionfile

#SBATCH -A myallocation       # Allocation name
#SBATCH --nodes=2             # Total # of nodes
#SBATCH --ntasks-per-node=2   # Total # of MPI tasks per node
#SBATCH --cpus-per-task=64    # cpu-cores per task (default value is 1, >1 for multi-threaded tasks)
#SBATCH --time=1:30:00        # Total run time limit (hh:mm:ss)
#SBATCH -J myjobname          # Job name
#SBATCH -o myjob.o%j          # Name of stdout output file
#SBATCH -e myjob.e%j          # Name of stderr error file
#SBATCH -p wholenode          # Queue (partition) name
#SBATCH --mail-user=useremailaddress
#SBATCH --mail-type=all       # Send email at begin and end of job

# Manage processing environment, load compilers and applications.
module purge
module load compilername
module load mpilibrary
module load applicationname
module list

# Set thread count (default value is 1).
export OMP_NUM_THREADS=$SLURM_CPUS_PER_TASK

# Launch MPI code
mpirun -np $SLURM_NTASKS ./myexecutablefiles
The ntasks x cpus-per-task should equal to or less than the total number of CPU cores on a node.
GPU job in GPU queue
The Anvil cluster nodes contain GPUs that support CUDA and OpenCL. See the detailed hardware overview for the specifics on the GPUs in Anvil or use sfeatures command to see the detailed hardware overview..
Link to section 'How to use Slurm to submit a SINGLE-node GPU program:' of 'GPU job in GPU queue' How to use Slurm to submit a SINGLE-node GPU program:
#!/bin/bash
# FILENAME:  myjobsubmissionfile

#SBATCH -A myGPUallocation       # allocation name
#SBATCH --nodes=1             # Total # of nodes
#SBATCH --ntasks-per-node=1   # Number of MPI ranks per node (one rank per GPU)
#SBATCH --gpus-per-node=1     # Number of GPUs per node
#SBATCH --time=1:30:00        # Total run time limit (hh:mm:ss)
#SBATCH -J myjobname          # Job name
#SBATCH -o myjob.o%j          # Name of stdout output file
#SBATCH -e myjob.e%j          # Name of stderr error file
#SBATCH -p gpu                # Queue (partition) name
#SBATCH --mail-user=useremailaddress
#SBATCH --mail-type=all       # Send email to above address at begin and end of job

# Manage processing environment, load compilers, and applications.
module purge
module load modtree/gpu
module load applicationname
module list

# Launch GPU code
./myexecutablefiles
Link to section 'How to use Slurm to submit a MULTI-node GPU program:' of 'GPU job in GPU queue' How to use Slurm to submit a MULTI-node GPU program:
#!/bin/bash
# FILENAME:  myjobsubmissionfile

#SBATCH -A myGPUallocation       # allocation name
#SBATCH --nodes=2             # Total # of nodes
#SBATCH --ntasks-per-node=4   # Number of MPI ranks per node (one rank per GPU)
#SBATCH --gpus-per-node=4     # Number of GPUs per node
#SBATCH --time=1:30:00        # Total run time limit (hh:mm:ss)
#SBATCH -J myjobname          # Job name
#SBATCH -o myjob.o%j          # Name of stdout output file
#SBATCH -e myjob.e%j          # Name of stderr error file
#SBATCH -p gpu                # Queue (partition) name
#SBATCH --mail-user=useremailaddress
#SBATCH --mail-type=all       # Send email to above address at begin and end of job

# Manage processing environment, load compilers, and applications.
module purge
module load modtree/gpu
module load applicationname
module list

# Launch GPU code
mpirun -np $SLURM_NTASKS ./myexecutablefiles
Make sure to use --gpus-per-node command, otherwise, your job may not run properly.
NGC GPU container job in GPU queue
Link to section 'What is NGC?' of 'NGC GPU container job in GPU queue' What is NGC?
Nvidia GPU Cloud (NGC) is a GPU-accelerated cloud platform optimized for deep learning and scientific computing. NGC offers a comprehensive catalogue of GPU-accelerated containers, so the application runs quickly and reliably in the high-performance computing environment. Anvil team deployed NGC to extend the cluster capabilities and to enable powerful software and deliver the fastest results. By utilizing Singularity and NGC, users can focus on building lean models, producing optimal solutions, and gathering faster insights. For more information, please visit https://www.nvidia.com/en-us/gpu-cloud and NGC software catalog.
Link to section ' Getting Started ' of 'NGC GPU container job in GPU queue' Getting Started
Users can download containers from the NGC software catalog and run them directly using Singularity instructions from the corresponding container’s catalog page.
In addition, a subset of pre-downloaded NGC containers wrapped into convenient software modules are provided. These modules wrap underlying complexity and provide the same commands that are expected from non-containerized versions of each application.
On Anvil, type the command below to see the lists of NGC containers we deployed.
$ module load modtree/gpu$ module load ngc$ module avail
Once module loaded ngc, you can run your code as with normal non-containerized applications. This section illustrates how to use SLURM to submit a job with a containerized NGC program.
#!/bin/bash
# FILENAME:  myjobsubmissionfile

#SBATCH -A myallocation       # allocation name
#SBATCH --nodes=1             # Total # of nodes
#SBATCH --ntasks-per-node=1   # Number of MPI ranks per node (one rank per GPU)
#SBATCH --gres=gpu:1          # Number of GPUs per node
#SBATCH --time=1:30:00        # Total run time limit (hh:mm:ss)
#SBATCH -J myjobname          # Job name
#SBATCH -o myjob.o%j          # Name of stdout output file
#SBATCH -e myjob.e%j          # Name of stderr error file
#SBATCH -p gpu                # Queue (partition) name
#SBATCH --mail-user=useremailaddress
#SBATCH --mail-type=all       # Send email to above address at begin and end of job

# Manage processing environment, load compilers, container, and applications.
module purge
module load modtree/gpu
module load ngc
module load applicationname
module list

# Launch GPU code
myexecutablefiles
BioContainers Collection
Link to section 'What is BioContainers?' of 'BioContainers Collection' What is BioContainers?
The BioContainers project came from the idea of using the containers-based technologies such as Docker or rkt for bioinformatics software. Having a common and controllable environment for running software could help to deal with some of the current problems during software development and distribution. BioContainers is a community-driven project that provides the infrastructure and basic guidelines to create, manage and distribute bioinformatics containers with a special focus on omics fields such as proteomics, genomics, transcriptomics, and metabolomics. For more information, please visit BioContainers project.
Link to section ' Getting Started ' of 'BioContainers Collection' Getting Started
Users can download bioinformatic containers from the BioContainers.pro and run them directly using Singularity instructions from the corresponding container’s catalog page.
Detailed Singularity user guide is available at: sylabs.io/guides/3.8/user-guideIn addition, Anvil team provides a subset of pre-downloaded biocontainers wrapped into convenient software modules. These modules wrap underlying complexity and provide the same commands that are expected from non-containerized versions of each application.
On Anvil, type the command below to see the lists of biocontainers we deployed.
$ module purge$ module load modtree/cpu$ module load biocontainers$ module avail
Once module loaded biocontainers, you can run your code as with normal non-containerized applications. This section illustrates how to use SLURM to submit a job with a biocontainers program.
#!/bin/bash
# FILENAME:  myjobsubmissionfile

#SBATCH -A myallocation       # allocation name
#SBATCH --nodes=1             # Total # of nodes
#SBATCH --ntasks-per-node=1   # Number of MPI ranks per node
#SBATCH --time=1:30:00        # Total run time limit (hh:mm:ss)
#SBATCH -J myjobname          # Job name
#SBATCH -o myjob.o%j          # Name of stdout output file
#SBATCH -e myjob.e%j          # Name of stderr error file
#SBATCH -p wholenode          # Queue (partition) name
#SBATCH --mail-user=useremailaddress
#SBATCH --mail-type=all       # Send email to above address at begin and end of job

# Manage processing environment, load compilers, container, and applications.
module purge
module load modtree/cpu
module load biocontainers
module load applicationname
module list

# Launch code
./myexecutablefiles
Monitoring Resources
Knowing the precise resource utilization an application had during a job, such as CPU load or memory, can be incredibly useful. This is especially the case when the application isn't performing as expected.
One approach is to run a program like htop during an interactive job and keep an eye on system resources. You can get precise time-series data from nodes associated with your job using XDmod as well, online. But these methods don't gather telemetry in an automated fashion, nor do they give you control over the resolution or format of the data.
As a matter of course, a robust implementation of some HPC workload would include resource utilization data as a diagnostic tool in the event of some failure.
The monitor utility is a simple command line system resource monitoring tool for gathering such telemetry and is available as a module.
module load monitor
Complete documentation is available online at resource-monitor.readthedocs.io. A full manual page is also available for reference, man monitor.
In the context of a SLURM job you will need to put this monitoring task in the background to allow the rest of your job script to proceed. Be sure to interrupt these tasks at the end of your job.
#!/bin/bash
# FILENAME: monitored_job.sh

module load monitor

# track CPU load
monitor cpu percent >cpu-percent.log &
CPU_PID=$!

# track GPU load if any
monitor gpu percent >gpu-percent.log &
GPU_PID=$!

# your code here

# shut down the resource monitors
kill -s INT $CPU_PID $GPU_PID
A particularly elegant solution would be to include such tools in your prologue script and have the tear down in your epilogue script.
For large distributed jobs spread across multiple nodes, mpiexec can be used to gather telemetry from all nodes in the job. The hostname is included in each line of output so that data can be grouped as such. A concise way of constructing the needed list of hostnames in SLURM is to simply use srun hostname | sort -u.
#!/bin/bash
# FILENAME: monitored_job.sh

module load monitor

# track all CPUs (one monitor per host)
mpiexec -machinefile <(srun hostname | sort -u) \
    monitor cpu percent --all-cores >cpu-percent.log &
CPU_PID=$!

# track all GPUs if any (one monitor per host)
mpiexec -machinefile <(srun hostname | sort -u) \
    monitor gpu percent >gpu-percent.log &
GPU_PID=$!

# your code here

# shut down the resource monitors
kill -s INT $CPU_PID $GPU_PID
To get resource data in a more readily computable format, the monitor program can be told to output in CSV format with the --csv flag.
monitor cpu memory --csv >cpu-memory.csv
Or for GPU
monitor gpu memory --csv >gpu-memory.csv
For a distributed job you will need to suppress the header lines otherwise one will be created by each host.
monitor cpu memory --csv | head -1 >cpu-memory.csv
mpiexec -machinefile <(srun hostname | sort -u) \
    monitor cpu memory --csv --no-header >>cpu-memory.csv
Or for GPU
monitor gpu memory --csv | head -1 >gpu-memory.csv
mpiexec -machinefile <(srun hostname | sort -u) \
    monitor gpu memory --csv --no-header >>gpu-memory.csv
Specific Applications
The following examples demonstrate job submission files for some common real-world applications.
See the Generic SLURM Examples section for more examples on job submissions that can be adapted for use.
Python
Python is a high-level, general-purpose, interpreted, dynamic programming language. We suggest using Anaconda which is a Python distribution made for large-scale data processing, predictive analytics, and scientific computing. For example, to use the default Anaconda distribution:
$ module load anaconda
For a full list of available Anaconda and Python modules enter:
$ module spider anaconda
Example Python Jobs
This section illustrates how to submit a small Python job to a PBS queue.
Link to section 'Example 1: Hello world' of 'Example Python Jobs' Example 1: Hello world
Prepare a Python input file with an appropriate filename, here named myjob.in:
# FILENAME:  hello.py

import string, sys
print "Hello, world!"
Prepare a job submission file with an appropriate filename, here named myjob.sub:
#!/bin/bash
# FILENAME:  myjob.sub

module load anaconda

python hello.py
Basic knowledge about Batch Jobs.
Hello, world!Link to section 'Example 2: Matrix multiply' of 'Example Python Jobs' Example 2: Matrix multiply
Save the following script as matrix.py:
# Matrix multiplication program

x = [[3,1,4],[1,5,9],[2,6,5]]
y = [[3,5,8,9],[7,9,3,2],[3,8,4,6]]

result = [[sum(a*b for a,b in zip(x_row,y_col)) for y_col in zip(*y)] for x_row in x]

for r in result:
        print(r)
Change the last line in the job submission file above to read:
python matrix.pyThe standard output file from this job will result in the following matrix:
[28, 56, 43, 53]
[65, 122, 59, 73]
[63, 104, 54, 60]
Link to section 'Example 3: Sine wave plot using numpy and matplotlib packages' of 'Example Python Jobs' Example 3: Sine wave plot using numpy and matplotlib packages
Save the following script as sine.py:
import numpy as np
import matplotlib
matplotlib.use('Agg')
import matplotlib.pylab as plt

x = np.linspace(-np.pi, np.pi, 201)
plt.plot(x, np.sin(x))
plt.xlabel('Angle [rad]')
plt.ylabel('sin(x)')
plt.axis('tight')
plt.savefig('sine.png')
Change your job submission file to submit this script and the job will output a png file and blank standard output and error files.
For more information about Python:
Installing Packages
We recommend installing Python packages in an Anaconda environment. One key advantage of Anaconda is that it allows users to install unrelated packages in separate self-contained environments. Individual packages can later be reinstalled or updated without impacting others.
To facilitate the process of creating and using Conda environments, we support a script (conda-env-mod) that generates a module file for an environment, as well as an optional Jupyter kernel to use this environment in a Jupyter.
You must load one of the anaconda modules in order to use this script.
$ module load anaconda/2021.05-py38Step-by-step instructions for installing custom Python packages are presented below.
Link to section 'Step 1: Create a conda environment' of 'Installing Packages' Step 1: Create a conda environment
Users can use the conda-env-mod script to create an empty conda environment. This script needs either a name or a path for the desired environment. After the environment is created, it generates a module file for using it in future. Please note that conda-env-mod is different from the official conda-env script and supports a limited set of subcommands. Detailed instructions for using conda-env-mod can be found with the command conda-env-mod --help.
-
Example 1: Create a conda environment named mypackages in user's home directory.
$ conda-env-mod create -n mypackages -yIncluding the -y option lets you skip the prompt to install the package.
-
Example 2: Create a conda environment named mypackages at a custom location.
$ conda-env-mod create -p $PROJECT/apps/mypackages -yPlease follow the on-screen instructions while the environment is being created. After finishing, the script will print the instructions to use this environment.
... ... ...
Preparing transaction: ...working... done
Verifying transaction: ...working... done
Executing transaction: ...working... done
+---------------------------------------------------------------+
| To use this environment, load the following modules:          |
|     module use $HOME/privatemodules                           |
|     module load conda-env/mypackages-py3.8.8                  |
| (then standard 'conda install' / 'pip install' / run scripts) |
+---------------------------------------------------------------+
Your environment "mypackages" was created successfully.
Note down the module names, as you will need to load these modules every time you want to use this environment. You may also want to add the module load lines in your jobscript, if it depends on custom Python packages.
By default, module files are generated in your $HOME/privatemodules directory. The location of module files can be customized by specifying the -m /path/to/modules option.
- Example 3: Create a conda environment named labpackages in your group's $PROJECT folder and place the module file at a shared location for the group to use.
$ conda-env-mod create -p $PROJECT/apps/mypackages -m $PROJECT/etc/modules
... ... ...
Preparing transaction: ...working... done
Verifying transaction: ...working... done
Executing transaction: ...working... done
+----------------------------------------------------------------+
| To use this environment, load the following modules:           |
|     module use /anvil/projects/x-mylab/etc/modules             |
|     module load conda-env/mypackages-py3.8.8                   |
| (then standard 'conda install' / 'pip install' / run scripts)  |
+----------------------------------------------------------------+
Your environment "labpackages" was created successfully.
If you used a custom module file location, you need to run the module use command as printed by the script.
By default, only the environment and a module file are created (no Jupyter kernel). If you plan to use your environment in a Jupyter, you need to append a --jupyter flag to the above commands.
- Example 4: Create a Jupyter-enabled conda environment named labpackages in your group's $PROJECT folder and place the module file at a shared location for the group to use.
$ conda-env-mod create -p $PROJECT/apps/mypackages/labpackages -m $PROJECT/etc/modules --jupyter
... ... ...
Jupyter kernel created: "Python (My labpackages Kernel)"
... ... ...
Your environment "labpackages" was created successfully.
Link to section 'Step 2: Load the conda environment' of 'Installing Packages' Step 2: Load the conda environment
-
The following instructions assume that you have used conda-env-mod to create an environment named mypackages (Examples 1 or 2 above). If you used conda create instead, please use conda activate mypackages.
$ module use $HOME/privatemodules
$ module load conda-env/mypackages-py3.8.8
Note that the conda-env module name includes the Python version that it supports (Python 3.8.8 in this example). This is same as the Python version in the anaconda module.
-
If you used a custom module file location (Example 3 above), please use module use to load the conda-env module.
$ module use /anvil/projects/x-mylab/etc/modules
$ module load conda-env/mypackages-py3.8.8
Link to section 'Step 3: Install packages' of 'Installing Packages' Step 3: Install packages
Now you can install custom packages in the environment using either conda install or pip install.
Link to section 'Installing with conda' of 'Installing Packages' Installing with conda
-
Example 1: Install OpenCV (open-source computer vision library) using conda.
$ conda install opencv -
Example 2: Install a specific version of OpenCV using conda.
$ conda install opencv=3.1.0 -
Example 3: Install OpenCV from a specific anaconda channel.
$ conda install -c anaconda opencv
Link to section 'Installing with pip' of 'Installing Packages' Installing with pip
-
Example 4: Install mpi4py using pip.
$ pip install mpi4py -
Example 5: Install a specific version of mpi4py using pip.
$ pip install mpi4py==3.0.3Follow the on-screen instructions while the packages are being installed. If installation is successful, please proceed to the next section to test the packages.
Note: Do NOT run Pip with the --user argument, as that will install packages in a different location.
Link to section 'Step 4: Test the installed packages' of 'Installing Packages' Step 4: Test the installed packages
To use the installed Python packages, you must load the module for your conda environment. If you have not loaded the conda-env module, please do so following the instructions at the end of Step 1.
$ module use $HOME/privatemodules
$ module load conda-env/mypackages-py3.8.8
- Example 1: Test that OpenCV is available.
$ python -c "import cv2; print(cv2.__version__)" - Example 2: Test that mpi4py is available.
$ python -c "import mpi4py; print(mpi4py.__version__)"
If the commands are finished without errors, then the installed packages can be used in your program.
Link to section 'Additional capabilities of conda-env-mod' of 'Installing Packages' Additional capabilities of conda-env-mod
The conda-env-mod tool is intended to facilitate the creation of a minimal Anaconda environment, matching module file, and optionally a Jupyter kernel. Once created, the environment can then be accessed via familiar module load command, tuned and expanded as necessary. Additionally, the script provides several auxiliary functions to help manage environments, module files, and Jupyter kernels.
General usage for the tool adheres to the following pattern:
$ conda-env-mod help
$ conda-env-mod   [optional arguments]
where required arguments are one of
- -n|--name ENV_NAME (name of the environment)
- -p|--prefix ENV_PATH (location of the environment)
and optional arguments further modify behavior for specific actions (e.g. -m to specify alternative location for generated module file).
Given a required name or prefix for an environment, the conda-env-mod script supports the following subcommands:
- create - to create a new environment, its corresponding module file and optional Jupyter kernel.
- delete - to delete existing environment along with its module file and Jupyter kernel.
- module - to generate just the module file for a given existing environment.
- kernel - to generate just the Jupyter kernel for a given existing environment (note that the environment has to be created with a --jupyter option).
- help - to display script usage help.
Using these subcommands, you can iteratively fine-tune your environments, module files and Jupyter kernels, as well as delete and re-create them with ease. Below we cover several commonly occurring scenarios.
Link to section 'Generating module file for an existing environment' of 'Installing Packages' Generating module file for an existing environment
If you already have an existing configured Anaconda environment and want to generate a module file for it, follow appropriate examples from Step 1 above, but use the module subcommand instead of the create one. E.g.
$ conda-env-mod module -n mypackagesand follow printed instructions on how to load this module. With an optional --jupyter flag, a Jupyter kernel will also be generated.
Note that if you intend to proceed with a Jupyter kernel generation (via the --jupyter flag or a kernel subcommand later), you will have to ensure that your environment has ipython and ipykernel packages installed into it. To avoid this and other related complications, we highly recommend making a fresh environment using a suitable conda-env-mod create .... --jupyter command instead.
Link to section 'Generating Jupyter kernel for an existing environment' of 'Installing Packages' Generating Jupyter kernel for an existing environment
If you already have an existing configured Anaconda environment and want to generate a Jupyter kernel file for it, you can use the kernel subcommand. E.g.
$ conda-env-mod kernel -n mypackagesThis will add a "Python (My mypackages Kernel)" item to the dropdown list of available kernels upon your next time use Jupyter.
Note that generated Jupiter kernels are always personal (i.e. each user has to make their own, even for shared environments). Note also that you (or the creator of the shared environment) will have to ensure that your environment has ipython and ipykernel packages installed into it.
Link to section 'Managing and using shared Python environments' of 'Installing Packages' Managing and using shared Python environments
Here is a suggested workflow for a common group-shared Anaconda environment with Jupyter capabilities:
The PI or lab software manager:
-
Creates the environment and module file (once):
$ module purge $ module load anaconda $ conda-env-mod create -p $PROJECT/apps/labpackages -m $PROJECT/etc/modules --jupyter -
Installs required Python packages into the environment (as many times as needed):
$ module use /anvil/projects/x-mylab/etc/modules
$ module load conda-env/labpackages-py3.8.8
$ conda install  .......                       # all the necessary packages
Lab members:
-
Lab members can start using the environment in their command line scripts or batch jobs simply by loading the corresponding module:
$ module use /anvil/projects/x-mylab/etc/modules $ module load conda-env/labpackages-py3.8.8 $ python my_data_processing_script.py ..... -
To use the environment in Jupyter, each lab member will need to create his/her own Jupyter kernel (once). This is because Jupyter kernels are private to individuals, even for shared environments.
$ module use /anvil/projects/x-mylab/etc/modules
$ module load conda-env/labpackages-py3.8.8
$ conda-env-mod kernel -p $PROJECT/apps/labpackages
A similar process can be devised for instructor-provided or individually-managed class software, etc.
Link to section 'Troubleshooting' of 'Installing Packages' Troubleshooting
- Python packages often fail to install or run due to dependency with other packages. More specifically, if you previously installed packages in your home directory it is safer to clean those installations.
$ mv ~/.local ~/.local.bak $ mv ~/.cache ~/.cache.bak - Unload all the modules.
$ module purge - Clean up PYTHONPATH.
$ unset PYTHONPATH - Next load the modules (e.g. anaconda) that you need.
$ module load anaconda/2021.05-py38 $ module module use $HOME/privatemodules $ module load conda-env/mypackages-py3.8.8 - Now try running your code again.
- Few applications only run on specific versions of Python (e.g. Python 3.6). Please check the documentation of your application if that is the case.
Singularity
Note: Singularity was originally a project out of Lawrence Berkeley National Laboratory. It has now been spun off into a distinct offering under a new corporate entity under the name Sylabs Inc. This guide pertains to the open source community edition, SingularityCE.
Link to section 'What is Singularity?' of 'Singularity' What is Singularity?
Singularity is a powerful tool allowing the portability and reproducibility of operating system and application environments through the use of Linux containers. It gives users complete control over their environment.
Singularity is like Docker but tuned explicitly for HPC clusters. More information is available from the project’s website.
Link to section 'Features' of 'Singularity' Features
- Run the latest applications on an Ubuntu or Centos userland
- Gain access to the latest developer tools
- Launch MPI programs easily
- Much more
Singularity’s user guide is available at: sylabs.io/guides/3.8/user-guide
Link to section 'Example' of 'Singularity' Example
Here is an example of downloading a pre-built Docker container image, converting it into Singularity format and running it on Anvil:
$ singularity pull docker://sylabsio/lolcow:latest
INFO:    Converting OCI blobs to SIF format
INFO:    Starting build...
[....]
INFO:    Creating SIF file...

$ singularity exec lolcow_latest.sif cowsay "Hello, world"
 ______________
< Hello, world >
 --------------
        \   ^__^
         \  (oo)\_______
            (__)\       )\/\
                ||----w |
                ||     ||
Link to section 'Anvil Cluster Specific Notes' of 'Singularity' Anvil Cluster Specific Notes
All service providers will integrate Singularity slightly differently depending on site. The largest customization will be which default files are inserted into your images so that routine services will work.
Services we configure for your images include DNS settings and account information. File systems we overlay into your images are your home directory, scratch, project space, datasets, and application file systems.
Here is a list of paths:
- /etc/resolv.conf
- /etc/hosts
- /home/$USER
- /apps
- /anvil (including /anvil/scratch, /anvil/projects, and /anvil/datasets)
This means that within the container environment these paths will be present and the same as outside the container. The /apps and /anvil directories will need to exist inside your container to work properly.
Link to section 'Creating Singularity Images' of 'Singularity' Creating Singularity Images
Due to how singularity containers work, you must have root privileges to build an image. Once you have a singularity container image built on your own system, you can copy the image file up to the cluster (you do not need root privileges to run the container).
You can find information and documentation for how to install and use singularity on your system:
We have version 3.8.0 on the cluster. You will most likely not be able to run any container built with any singularity past that version. So be sure to follow the installation guide for version 3.8 on your system.
$ singularity --version
singularity version 3.8.0-1.el8
Everything you need on how to build a container is available from their user-guide. Below are merely some quick tips for getting your own containers built for Anvil.
You can use a Container Recipe to both build your container and share its specification with collaborators (for the sake of reproducibility). Here is a simplistic example of such a file:
# FILENAME: Buildfile

Bootstrap: docker
From: ubuntu:18.04

%post
    apt-get update && apt-get upgrade -y
    mkdir /apps /anvil
To build the image itself:
$ sudo singularity build ubuntu-18.04.sif Buildfile
The challenge with this approach however is that it must start from scratch if you decide to change something. In order to create a container image iteratively and interactively, you can use the --sandbox option.
$ sudo singularity build --sandbox ubuntu-18.04 docker://ubuntu:18.04
This will not create a flat image file but a directory tree (i.e., a folder), the contents of which are the container's filesystem. In order to get a shell inside the container that allows you to modify it, user the --writable option.
$ sudo singularity shell --writable ubuntu-18.04
Singularity: Invoking an interactive shell within container...

Singularity ubuntu-18.04.sandbox:~>
You can then proceed to install any libraries, software, etc. within the container. Then to create the final image file, exit the shell and call the build command once more on the sandbox.
$ sudo singularity build ubuntu-18.04.sif ubuntu-18.04
Finally, copy the new image to Anvil and run it.
Distributed Deep Learning with Horovod
Link to section 'What is Horovod?' of 'Distributed Deep Learning with Horovod' What is Horovod?
Horovod is a framework originally developed by Uber for distributed deep learning. While a traditionally laborious process, Horovod makes it easy to scale up training scripts from single GPU to multi-GPU processes with minimal code changes. Horovod enables quick experimentation while also ensuring efficient scaling, making it an attractive choice for multi-GPU work.
Link to section 'Installing Horovod' of 'Distributed Deep Learning with Horovod' Installing Horovod
Before continuing, ensure you have loaded the following modules by running:
ml modtree/gpu
ml learning
Next, load the module for the machine learning framework you are using. Examples for tensorflow and pytorch are below:
ml ml-toolkit-gpu/tensorflow
ml ml-toolkit-gpu/pytorch
Create or activate the environment you want Horovod to be installed in then install the following dependencies:
pip install pyparsing
pip install filelock
Finally, install Horovod. The following command will install Horovod with support for both Tensorflow and Pytorch, but if you do not need both simply remove the HOROVOD_WITH_...=1 part of the command.
HOROVOD_WITH_TENSORFLOW=1 HOROVOD_WITH_TORCH=1 pip install horovod[all-frameworks]Link to section 'Submitting Jobs' of 'Distributed Deep Learning with Horovod' Submitting Jobs
It is highly recommended that you run Horovod within batch jobs instead of interactive jobs. For information about how to format a submission file and submit a batch job, please reference Batch Jobs. Ensure you load the modules listed above as well as your environment in the submission script.
Finally, this line will actually launch your Horovod script inside your job. You will need to limit the number of processes to the number of GPUs you requested.
horovodrun -np {number_of_gpus} python {path/to/training/script.py}An example usage of this is as follows for 4 GPUs and a file called horovod_mnist.py:
horovodrun -np 4 python horovod_mnist.py
Link to section 'Writing Horovod Code' of 'Distributed Deep Learning with Horovod' Writing Horovod Code
It is relatively easy to incorporate Horovod into existing training scripts. The main additional elements you need to incorporate are listed below (syntax for use with pytorch), but much more information, including syntax for other frameworks, can be found on the Horovod website.
#import required horovod framework -- e.g. for pytorch:
import horovod.torch as hvd

# Initialize Horovod
hvd.init()

# Pin to a GPU
if torch.cuda.is_available():
    torch.cuda.set_device(hvd.local_rank())

#Split dataset among workers
train_sampler = torch.utils.data.distributed.DistributedSampler(
    train_dataset, num_replicas=hvd.size(), rank=hvd.rank())

#Build Model

#Wrap optimizer with Horovod DistributedOptimizer
optimizer = hvd.DistributedOptimizer(optimizer, named_parameters=model.named_parameters())

#Broadcast initial variable states from first worker to all others
hvd.broadcast_parameters(model.state_dict(), root_rank=0)

#Train model
Gromacs
This shows an example job submission file for running Gromacs on Anvil. The Gromacs versions can be changed depends on the available modules on Anvil.
#!/bin/bash
# FILENAME:  myjobsubmissionfile

#SBATCH -A myallocation # Allocation name (run 'mybalance' command to find)
#SBATCH -p shared    #Queue (partition) name
#SBATCH --nodes=1 # Total # of nodes
#SBATCH --ntasks=16 # Total # of MPI tasks
#SBATCH --time=96:00:00 # Total run time limit (hh:mm:ss)
#SBATCH --job-name myjob # Job name
#SBATCH -o myjob.o%j    # Name of stdout output file
#SBATCH -e myjob.e%j    # Name of stderr error file

# Manage processing environment, load compilers and applications.
module --force purge
module load gcc/11.2.0
module load openmpi/4.0.6
module load gromacs/2021.2
module list

# Launch md jobs
#energy minimizations
mpirun -np 1 gmx_mpi grompp -f minim.mdp -c myjob.gro -p topol.top -o em.tpr
mpirun gmx_mpi mdrun -v -deffnm em
#nvt run
mpirun -np 1 gmx_mpi grompp -f nvt.mdp -c em.gro -r em.gro -p topol.top -o nvt.tpr
mpirun gmx_mpi mdrun -deffnm nvt
#npt run
mpirun -np 1 gmx_mpi grompp -f npt.mdp -c nvt.gro -r nvt.gro -t nvt.cpt -p topol.top -o npt.tpr
mpirun gmx_mpi mdrun -deffnm npt
#md run
mpirun -np 1 gmx_mpi grompp -f md.mdp -c npt.gro -t npt.cpt -p topol.top -o md.tpr
mpirun gmx_mpi mdrun -deffnm md
The GPU version of Gromacs was available within ngc container on Anvil. Here is an example job script.
#!/bin/bash
# FILENAME:  myjobsubmissionfile

#SBATCH -A myallocation-gpu # Allocation name (run 'mybalance' command to find)
#SBATCH -p gpu   #Queue (partition) name
#SBATCH --nodes=1 # Total # of nodes
#SBATCH --ntasks=16 # Total # of MPI tasks
#SBATCH --gpus-per-node=1 #Total # of GPUs
#SBATCH --time=96:00:00 # Total run time limit (hh:mm:ss)
#SBATCH --job-name myjob # Job name
#SBATCH -o myjob.o%j    # Name of stdout output file
#SBATCH -e myjob.e%j    # Name of stderr error file

# Manage processing environment, load compilers and applications.
module --force purge
module load modtree/gpu
module load ngc
module load gromacs
module list

# Launch md jobs
#energy minimizations
gmx grompp -f minim.mdp -c myjob.gro -p topol.top -o em.tpr
gmx mdrun -v -deffnm em -ntmpi 4 -ntomp 4
#nvt run
gmx grompp -f nvt.mdp -c em.gro -r em.gro -p topol.top -o nvt.tpr
gmx mdrun -deffnm nvt -ntmpi 4 -ntomp 4 -nb gpu -bonded gpu
#npt run
gmx grompp -f npt.mdp -c nvt.gro -r nvt.gro -t nvt.cpt -p topol.top -o npt.tpr
gmx mdrun -deffnm npt -ntmpi 4 -ntomp 4 -nb gpu -bonded gpu
#md run
gmx grompp -f md.mdp -c npt.gro -t npt.cpt -p topol.top -o md.tpr
gmx mdrun -deffnm md -ntmpi 4 -ntomp 4 -nb gpu -bonded gpu
VASP
This shows an example of a job submission file for running Anvil-built VASP with MPI jobs:
#!/bin/bash
# FILENAME:  myjobsubmissionfile

#SBATCH -A myallocation # Allocation name
#SBATCH --nodes=2       # Total # of nodes
#SBATCH --ntasks=256    # Total # of MPI tasks
#SBATCH --time=1:30:00  # Total run time limit (hh:mm:ss)
#SBATCH -J myjobname    # Job name
#SBATCH -o myjob.o%j    # Name of stdout output file
#SBATCH -e myjob.e%j    # Name of stderr error file
#SBATCH -p wholenode    # Queue (partition) name

# Manage processing environment, load compilers and applications.
module purge
module load gcc/11.2.0  openmpi/4.1.6
module load vasp/5.4.4.pl2  # or module load vasp/6.3.0
module list

# Launch MPI code
srun -n $SLURM_NTASKS --kill-on-bad-exit vasp_std # or mpirun -np $SLURM_NTASKS vasp_std
Windows Virtual Machine
Few scientific applications (such as ArcGIS, Tableau Desktop, etc.) can only be run in the Windows operating system. In order to facilitate research that uses these applications, Anvil provides an Open OnDemand application to launch a Windows virtual machine (VM) on Anvil compute nodes. The virtual machine is created using the QEMU/KVM emulator and it currently runs the Windows 11 professional operating system.
Link to section 'Important notes' of 'Windows Virtual Machine' Important notes
- The base Windows VM does not have any pre-installed applications and users must install their desired applications inside the VM.
- If the application requires a license, the researchers must purchase their own license and acquire a copy of the software.
- When you launch the Windows VM, it creates a copy of the VM in your scratch space. Any modifications you make to the VM (e.g. installing additional software) will be saved on your private copy and will persist across jobs.
- All Anvil filesystems (
$HOME,$PROJECT, and$CLUSTER_SCRATCH) are available inside the VM as network drives. You can directly operate on files in your$CLUSTER_SCRATCH.
Link to section 'How to launch Windows VM on Anvil' of 'Windows Virtual Machine' How to launch Windows VM on Anvil
- First login to the Anvil OnDemand portal using your ACCESS credentials.
- From the top menu go to Interactive Applications -> Windows11 Professional.
- In the next page, specify your allocation, queue, walltime, and number of cores. Currently, you must select all 128 cores on a node to run Windows VM. This is to avoid resource conflict among shared jobs.
- Click Launch.
- At this point, Open OnDemand will submit a job to the Anvil scheduler and wait for allocation.
- Once the job starts, you will be presented with a button to connect to the VNC server.
- Click on Launch Windows11 Professional to connect to the VNC display. You may initially see a Linux desktop which will eventually be replaced by the Windows desktop.
- A popup notification will show you the default username and password for the Windows VM. Please note this down. When you login to Windows for the first time, you can change the username and password to your desired username and password.
- Note that it may take upto 5 minutes for the Windows VM to launch properly. This is partly due to the large amount of memory allocated to the VM (216GB). Please wait patiently.
- Once you see the Windows desktop ready, you can proceed with your simulation or workflow.
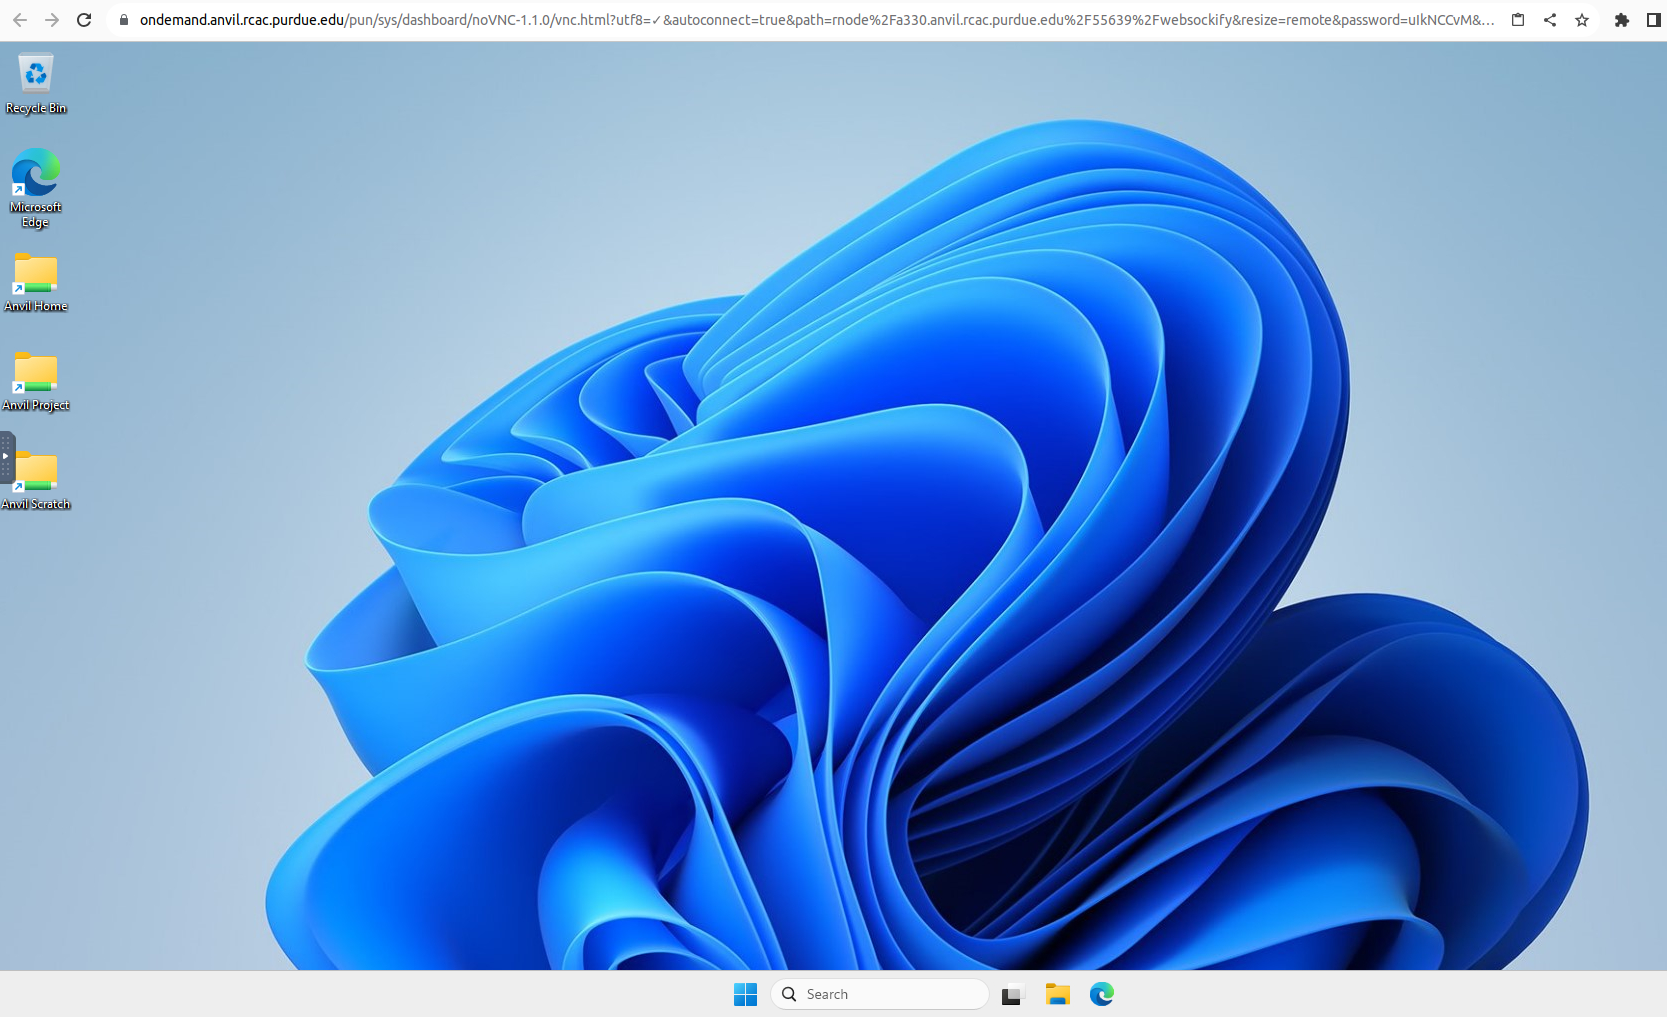
Link to section 'Advanced use-cases' of 'Windows Virtual Machine' Advanced use-cases
If your workfow requires a different version of Windows, or if you need to launch a personal copy of Windows from a non-standard location, please send a support request from the ACCESS Support portal.
Managing and Transferring Files
File Systems
Anvil provides users with separate home, scratch, and project areas for managing files. These will be accessible via the $HOME, $SCRATCH, $PROJECT and $WORK environment variables. Each file system is available from all Anvil nodes but has different purge policies and ideal use cases (see table below). Users in the same allocation will share read and write access to the data in the $PROJECT space. The project space will be created for each allocation. $PROJECT and $WORK variables refer to the same location and can be used interchangeably.
$SCRATCH is a high-performance, internally resilient GPFS parallel file system with 10 PB of usable capacity, configured to deliver up to 150 GB/s bandwidth.
| File System | Mount Point | Quota | Snapshots | Purpose | Purge policy |
|---|---|---|---|---|---|
| Anvil ZFS | /home | 25 GB | Full schedule* | Home directories: area for storing personal software, scripts, compiling, editing, etc. | Not purged |
| Anvil ZFS | /apps | N/A | Weekly* | Applications | |
| Anvil GPFS | /anvil | N/A | No | ||
| Anvil GPFS | /anvil/scratch | 100 TB | No | User scratch: area for job I/O activity, temporary storage | Files older than 30-day (access time) will be purged |
| Anvil GPFS | /anvil/projects | 5 TB | Full schedule* | Per allocation: area for shared data in a project, common datasets and software installation | Not purged while allocation is active. Removed 90 days after allocation expiration |
| Anvil GPFS | /anvil/datasets | N/A | Weekly* | Common data sets (not allocated to users) |
* Full schedule keeps nightly snapshots for 7 days, weekly snapshots for 3 weeks, and monthly snapshots for 2 months.
Link to section 'Useful tool' of 'File Systems' Useful tool
To check the quota of different file systems, type myquota at the command line.
x-anvilusername@login03.anvil:[~] $myquota

Type     Location          Size       Limit      Use     Files    Limit    Use
==============================================================================
home     x-anvilusername   261.5MB    25.0GB     1%       -       -        -
scratch  anvil             6.3GB      100.0TB    0.01%    3k      1,048k   0.36%
projects accountname1      37.2GB     5.0TB      0.73%    403k    1,048k   39%
projects accountname2      135.8GB    5.0TB      3%       20k     1,048k   2%
Transferring Files
Anvil supports several methods for file transfer to and from the system. Users can transfer files between Anvil and Linux-based systems or Mac using either scp or rsync. Windows SSH clients typically include scp-based file transfer capabilities.
SCP
SCP (Secure CoPy) is a simple way of transferring files between two machines that use the SSH protocol. SCP is available as a protocol choice in some graphical file transfer programs and also as a command line program on most Linux, Unix, and Mac OS X systems. SCP can copy single files, but will also recursively copy directory contents if given a directory name. SSH Keys is required for SCP. Following is an example of transferring test.txt file from Anvil home directory to your local machine, make sure to use your anvil username x-anvilusername:
localhost> scp x-anvilusername@anvil.rcac.purdue.edu:/home/x-anvilusername/test.txt .
Warning: Permanently added the xxxxxxx host key for IP address 'xxx.xxx.xxx.xxx' to the list of known hosts.
test.txt                                                                    100%    0     0.0KB/s   00:00
Rsync
Rsync, or Remote Sync, is a free and efficient command-line tool that lets you transfer files and directories to local and remote destinations. It allows to copy only the changes from the source and offers customization, use for mirroring, performing backups, or migrating data between different filesystems. SSH Keys is required for Rsync. Similar to the above SCP example, make sure to use your anvil username x-anvilusername here.
SFTP
SFTP (Secure File Transfer Protocol) is a reliable way of transferring files between two machines. SFTP is available as a protocol choice in some graphical file transfer programs and also as a command-line program on most Linux, Unix, and Mac OS X systems. SFTP has more features than SCP and allows for other operations on remote files, remote directory listing, and resuming interrupted transfers. Command-line SFTP cannot recursively copy directory contents; to do so, try using SCP or graphical SFTP client.
Command-line usage:
$ sftp -B buffersize x-anvilusername@anvil.rcac.purdue.edu

      (to a remote system from local)
sftp> put sourcefile somedir/destinationfile
sftp> put -P sourcefile somedir/

      (from a remote system to local)
sftp> get sourcefile somedir/destinationfile
sftp> get -P sourcefile somedir/

sftp> exit
- -B: optional, specify buffer size for transfer; larger may increase speed, but costs memory
- -P: optional, preserve file attributes and permissions
Linux / Solaris / AIX / HP-UX / Unix:
- The "sftp" command-line program should already be installed.
Microsoft Windows:
- MobaXterm
Free, full-featured, graphical Windows SSH, SCP, and SFTP client.
Mac OS X:
- The "sftp" command-line program should already be installed. You may start a local terminal window from "Applications->Utilities".
- Cyberduck is a full-featured and free graphical SFTP and SCP client.
Globus
Globus is a powerful and easy to use file transfer and sharing service for transferring files virtually anywhere. It works between any ACCESS and non-ACCESS sites running Globus, and it connects any of these research systems to personal systems. You may use Globus to connect to your home, scratch, and project storage directories on Anvil. Since Globus is web-based, it works on any operating system that is connected to the internet. The Globus Personal client is available on Windows, Linux, and Mac OS X. It is primarily used as a graphical means of transfer but it can also be used over the command line. More details can be found at ACCESS Using Globus.
Lost File Recovery
Your HOME and PROJECTS directories on Anvil are protected against accidental file deletion through a series of snapshots taken every night just after midnight. Each snapshot provides the state of your files at the time the snapshot was taken. It does so by storing only the files which have changed between snapshots. A file that has not changed between snapshots is only stored once but will appear in every snapshot. This is an efficient method of providing snapshots because the snapshot system does not have to store multiple copies of every file.
These snapshots are kept for a limited time at various intervals. Please refer to Anvil File Systems to see the frequency of generating snapshots on different mount points. Anvil keeps nightly snapshots for 7 days, weekly snapshots for 3 weeks, and monthly snapshots for 2 months. This means you will find snapshots from the last 7 nights, the last 3 Sundays, and the last 2 first of the months. Files are available going back between two and three months, depending on how long ago the last first of the month was. Snapshots beyond this are not kept.
Only files which have been saved during an overnight snapshot are recoverable. If you lose a file the same day you created it, the file is not recoverable because the snapshot system has not had a chance to save the file.
Snapshots are not a substitute for regular backups. It is the responsibility of the researchers to back up any important data to long-term storage space. Anvil does protect against hardware failures or physical disasters through other means however these other means are also not substitutes for backups.
Anvil offers several ways for researchers to access snapshots of their files.
flost
If you know when you lost the file, the easiest way is to use the flost command.
To run the tool you will need to specify the location where the lost file was with the -w argument:
$ flost -w /home

This script will help you try to recover lost home or group directory contents.
NB: Scratch directories are not backed up and cannot be recovered.

Currently anchoring the search under:  /home
If your lost files were on a different filesystem, exit now with Ctrl-C and
rerun flost with a suitable '-w WHERE' argument (or see 'flost -h' for help).

Please enter the date that you lost your files:  MM/DD/YYYY

The closest recovery snapshot to your date of loss currently available is from
MM/DD/YYYY 12:00am.  First, you will need to SSH to a dedicated
service host zfs.anvil.rcac.purdue.edu, then change your directory
to the snapshot location:
    $ ssh zfs.anvil.rcac.purdue.edu
    $ cd /home/.zfs/snapshot/zfs-auto-snap_daily-YYYY-MM-DD-0000
    $ ls

Then copy files or directories from there back to where they belong:
    $ cp mylostfile /home
    $ cp -r mylostdirectory /home
Here is an example of /home directory. If you know more specifically where the lost file was you may provide the full path to that directory.
This tool will prompt you for the date on which you lost the file or would like to recover the file from. If the tool finds an appropriate snapshot it will provide instructions on how to search for and recover the file.
If you are not sure what date you lost the file you may try entering different dates into the flost to try to find the file or you may also manually browse the snapshots in /home/.zfs/snapshot folder for Home directory and /anvil/projects/.snapshots folder for Projects directory.
Software
Anvil provides a number of software packages to users of the system via the module command. To check the list of applications installed as modules on Anvil and their user guides, please go to the Scientific Applications on ACCESS Anvil page. For some common applications such as Python, Singularity, Horovod and R, we also provide detailed instructions and examples on the Specific Applications page.
Module System
The Anvil cluster uses Lmod to manage the user environment, so users have access to the necessary software packages and versions to conduct their research activities. The associated module command can be used to load applications and compilers, making the corresponding libraries and environment variables automatically available in the user environment.
Lmod is a hierarchical module system, meaning a module can only be loaded after loading the necessary compilers and MPI libraries that it depends on. This helps avoid conflicting libraries and dependencies being loaded at the same time. A list of all available modules on the system can be found with the module spider command:
$ module spider # list all modules, even those not available due to incompatible with currently loaded modules

-----------------------------------------------------------------------------------
The following is a list of the modules and extensions currently available:
-----------------------------------------------------------------------------------
  amdblis: amdblis/3.0
  amdfftw: amdfftw/3.0
  amdlibflame: amdlibflame/3.0
  amdlibm: amdlibm/3.0
  amdscalapack: amdscalapack/3.0
  anaconda: anaconda/2021.05-py38
  aocc: aocc/3.0

Lines 1-45
The module spider command can also be used to search for specific module names.
$ module spider intel # all modules with names containing 'intel'
-----------------------------------------------------------------------------------
  intel:
-----------------------------------------------------------------------------------
     Versions:
        intel/19.0.5.281
        intel/19.1.3.304
     Other possible modules matches:
        intel-mkl
-----------------------------------------------------------------------------------
$ module spider intel/19.1.3.304 # additional details on a specific module
-----------------------------------------------------------------------------------
  intel: intel/19.1.3.304
-----------------------------------------------------------------------------------

    This module can be loaded directly: module load intel/19.1.3.304

    Help:
      Intel Parallel Studio.
When users log into Anvil, a default compiler (GCC), MPI libraries (OpenMPI), and runtime environments (e.g., Cuda on GPU-nodes) are automatically loaded into the user environment. It is recommended that users explicitly specify which modules and which versions are needed to run their codes in their job scripts via the module load command. Users are advised not to insert module load commands in their bash profiles, as this can cause issues during initialization of certain software (e.g. Thinlinc).
When users load a module, the module system will automatically replace or deactivate modules to ensure the packages you have loaded are compatible with each other. Following example shows that the module system automatically unload the default Intel compiler version to a user-specified version:
$ module load intel # load default version of Intel compiler
$ module list # see currently loaded modules

Currently Loaded Modules:
  1) intel/19.0.5.281

$ module load intel/19.1.3.304 # load a specific version of Intel compiler
$ module list # see currently loaded modules

The following have been reloaded with a version change:
  1) intel/19.0.5.281 => intel/19.1.3.304
Most modules on Anvil include extensive help messages, so users can take advantage of the module help APPNAME command to find information about a particular application or module. Every module also contains two environment variables named $RCAC_APPNAME_ROOT and $RCAC_APPNAME_VERSION identifying its installation prefix and its version. This information can be found by module show APPNAME. Users are encouraged to use generic environment variables such as CC, CXX, FC, MPICC, MPICXX etc. available through the compiler and MPI modules while compiling their code.
Link to section 'Some other common module commands:' of 'Module System' Some other common module commands:
To unload a module
$ module unload mymodulenameTo unload all loaded modules and reset everything to original state.
$ module purgeTo see all available modules that are compatible with current loaded modules
$ module availTo display information about a specified module, including environment changes, dependencies, software version and path.
$ module show mymodulenameCompiling, performance, and optimization on Anvil
Anvil CPU nodes have GNU, Intel, and AOCC (AMD) compilers available along with multiple MPI implementations (OpenMPI, Intel MPI (IMPI) and MVAPICH2). Anvil GPU nodes also provide the PGI compiler. Users may want to note the following AMD Milan specific optimization options that can help improve the performance of your code on Anvil:
- The majority of the applications on Anvil are built using GCC 11.2.0 which features an AMD Milan specific optimization flag (
-march=znver3). - AMD Milan CPUs support the Advanced Vector Extensions 2 (AVX2) vector instructions set. GNU, Intel, and AOCC compilers all have flags to support AVX2. Using AVX2, up to eight floating point operations can be executed per cycle per core, potentially doubling the performance relative to non-AVX2 processors running at the same clock speed.
- In order to enable AVX2 support, when compiling your code, use the
-march=znver3flag (for GCC 11.2 and newer, Clang and AOCC compilers),-march=znver2flag (for GCC 10.2), or-march=core-avx2(for Intel compilers and GCC prior to 9.3).
Other Software Usage Notes:
- Use the same environment that you compile the code to run your executables. When switching between compilers for different applications, make sure that you load the appropriate modules before running your executables.
- Explicitly set the optimization level in your makefiles or compilation scripts. Most well written codes can safely use the highest optimization level (
-O3), but many compilers set lower default levels (e.g. GNU compilers use the default-O0, which turns off all optimizations). - Turn off debugging, profiling, and bounds checking when building executables intended for production runs as these can seriously impact performance. These options are all disabled by default. The flag used for bounds checking is compiler dependent, but the debugging (
-g) and profiling (-pg) flags tend to be the same for all major compilers. - Some compiler options are the same for all available compilers on Anvil (e.g.
-o), while others are different. Many options are available in one compiler suite but not the other. For example, Intel, PGI, and GNU compilers use the-qopenmp,-mp, and-fopenmpflags, respectively, for building OpenMP applications. - MPI compiler wrappers (e.g. mpicc, mpif90) all call the appropriate compilers and load the correct MPI libraries depending on the loaded modules. While the same names may be used for different compilers, keep in mind that these are completely independent scripts.
For Python users, Anvil provides two Python distributions: 1) a natively compiled Python module with a small subset of essential numerical libraries which are optimized for the AMD Milan architecture and 2) binaries distributed through Anaconda. Users are recommended to use virtual environments for installing and using additional Python packages.
A broad range of application modules from various science and engineering domains are installed on Anvil, including mathematics and statistical modeling tools, visualization software, computational fluid dynamics codes, molecular modeling packages, and debugging tools.
In addition, Singularity is supported on Anvil and Nvidia GPU Cloud containers are available on Anvil GPU nodes.
Compiling Source code
This section provides some examples of compiling source code on Anvil.
Compiling Serial Programs
A serial program is a single process which executes as a sequential stream of instructions on one processor core. Compilers capable of serial programming are available for C, C++, and versions of Fortran.
Here are a few sample serial programs:
To load a compiler, enter one of the following:
$ module load intel
$ module load gcc
$ module load aocc| Language | Intel Compiler | GNU Compiler | AOCC Compiler | |
|---|---|---|---|---|
| Fortran 77 | |
|
|
|
| Fortran 90 | |
|
|
|
| Fortran 95 | |
|
|
|
| C | |
|
|
|
| C++ | |
|
|
The Intel, GNU and AOCC compilers will not output anything for a successful compilation. Also, the Intel compiler does not recognize the suffix ".f95". You may use ".f90" to stand for any Fortran code regardless of version as it is a free-formatted form.
Compiling MPI Programs
OpenMPI, Intel MPI (IMPI) and MVAPICH2 are implementations of the Message-Passing Interface (MPI) standard. Libraries for these MPI implementations and compilers for C, C++, and Fortran are available on Anvil.
| Language | Header Files |
|---|---|
| Fortran 77 | |
| Fortran 90 | |
| Fortran 95 | |
| C | |
| C++ | |
Here are a few sample programs using MPI:
To see the available MPI libraries:
$ module avail openmpi
$ module avail impi
$ module avail mvapich2
| Language | Intel Compiler with Intel MPI (IMPI) | Intel/GNU/AOCC Compiler with OpenMPI/MVAPICH2 |
|---|---|---|
| Fortran 77 | |
|
| Fortran 90 | |
|
| Fortran 95 | |
|
| C | |
|
| C++ | |
|
The Intel, GNU and AOCC compilers will not output anything for a successful compilation. Also, the Intel compiler does not recognize the suffix ".f95". You may use ".f90" to stand for any Fortran code regardless of version as it is a free-formatted form.
Here is some more documentation from other sources on the MPI libraries:
Compiling OpenMP Programs
All compilers installed on Anvil include OpenMP functionality for C, C++, and Fortran. An OpenMP program is a single process that takes advantage of a multi-core processor and its shared memory to achieve a form of parallel computing called multithreading. It distributes the work of a process over processor cores in a single compute node without the need for MPI communications.
| Language | Header Files |
|---|---|
| Fortran 77 | |
| Fortran 90 | |
| Fortran 95 | |
| C | |
| C++ | |
Sample programs illustrate task parallelism of OpenMP:
A sample program illustrates loop-level (data) parallelism of OpenMP:
To load a compiler, enter one of the following:
$ module load intel
$ module load gcc
$ module load aocc| Language | Intel Compiler | GNU Compiler | AOCC Compiler |
|---|---|---|---|
| Fortran 77 | |
|
|
| Fortran 90 | |
|
|
| Fortran 95 | |
|
|
| C | |
|
|
| C++ | |
|
|
The Intel, GNU and AOCC compilers will not output anything for a successful compilation. Also, the Intel compiler does not recognize the suffix ".f95". You may use ".f90" to stand for any Fortran code regardless of version as it is a free-formatted form.
Here is some more documentation from other sources on OpenMP:
Compiling Hybrid Programs
A hybrid program combines both MPI and shared-memory to take advantage of compute clusters with multi-core compute nodes. Libraries for OpenMPI, Intel MPI (IMPI) and MVAPICH2 and compilers which include OpenMP for C, C++, and Fortran are available.
| Language | Header Files |
|---|---|
| Fortran 77 | |
| Fortran 90 | |
| Fortran 95 | |
| C | |
| C++ | |
A few examples illustrate hybrid programs with task parallelism of OpenMP:
This example illustrates a hybrid program with loop-level (data) parallelism of OpenMP:
To see the available MPI libraries:
$ module avail impi
$ module avail openmpi
$ module avail mvapich2| Language | Intel Compiler with Intel MPI (IMPI) | Intel/GNU/AOCC Compiler with OpenMPI/MVAPICH2 |
|---|---|---|
| Fortran 77 | |
|
| Fortran 90 | |
|
| Fortran 95 | |
|
| C | |
|
| C++ | |
|
The Intel, GNU and AOCC compilers will not output anything for a successful compilation. Also, the Intel compiler does not recognize the suffix ".f95". You may use ".f90" to stand for any Fortran code regardless of version as it is a free-formatted form.
Compiling NVIDIA GPU Programs
The Anvil cluster contains GPU nodes that support CUDA and OpenCL. See the detailed hardware overview for the specifics on the GPUs in Anvil. This section focuses on using CUDA.
A simple CUDA program has a basic workflow:
- Initialize an array on the host (CPU).
- Copy array from host memory to GPU memory.
- Apply an operation to array on GPU.
- Copy array from GPU memory to host memory.
Here is a sample CUDA program:
Link to section '"modtree/gpu" Recommended Environment' of 'Compiling NVIDIA GPU Programs' "modtree/gpu" Recommended Environment
ModuleTree or modtree helps users to navigate between CPU stack and GPU stack and sets up a default compiler and MPI environment. For Anvil cluster, our team makes a recommendation regarding the cuda version, compiler, and MPI library. This is a proven stable cuda, compiler, and MPI library combination that is recommended if you have no specific requirements. By load the recommended set:
$ module load modtree/gpu
$ module list
# you will have all following modules
Currently Loaded Modules:
  1) gcc/8.4.1   2) numactl/2.0.14   3) zlib/1.2.11   4) openmpi/4.0.6   5) cuda/11.2.2   6) modtree/gpu
Both login and GPU-enabled compute nodes have the CUDA tools and libraries available to compile CUDA programs. For complex compilations, submit an interactive job to get to the GPU-enabled compute nodes. The gpu-debug queue is ideal for this case. To compile a CUDA program, load modtree/gpu, and use nvcc to compile the program:
$ module load modtree/gpu
$ nvcc gpu_hello.cu -o gpu_hello
./gpu_hello
No GPU specified, using first GPUhello, world
The example illustrates only how to copy an array between a CPU and its GPU but does not perform a serious computation.
The following program times three square matrix multiplications on a CPU and on the global and shared memory of a GPU:
$ module load modtree/gpu
$ nvcc mm.cu -o mm
$ ./mm 0
                                                            speedup
                                                            -------
Elapsed time in CPU:                    7810.1 milliseconds
Elapsed time in GPU (global memory):      19.8 milliseconds  393.9
Elapsed time in GPU (shared memory):       9.2 milliseconds  846.8
For best performance, the input array or matrix must be sufficiently large to overcome the overhead in copying the input and output data to and from the GPU.
For more information about NVIDIA, CUDA, and GPUs:
Provided Software
The Anvil team provides a suite of broadly useful software for users of research computing resources. This suite of software includes compilers, debuggers, visualization libraries, development environments, and other commonly used software libraries. Additionally, some widely-used application software is provided.
Link to section '"modtree/cpu" or "modtree/gpu" Recommended Environment' of 'Provided Software' "modtree/cpu" or "modtree/gpu" Recommended Environment
ModuleTree or modtree helps users to navigate between CPU stack and GPU stack and sets up a default compiler and MPI environment. For Anvil cluster, our team makes recommendations for both CPU and GPU stack regarding the CUDA version, compiler, math library, and MPI library. This is a proven stable CUDA version, compiler, math, and MPI library combinations that are recommended if you have no specific requirements. To load the recommended set:
$ module load modtree/cpu # for CPU
$ module load modtree/gpu # for GPU
Link to section 'GCC Compiler' of 'Provided Software' GCC Compiler
The GNU Compiler (GCC) is provided via the module command on Anvil clusters and will be maintained at a common version compatible across all clusters. Third-party software built with GCC will use this GCC version, rather than the GCC provided by the operating system vendor. To see available GCC compiler versions available from the module command:
$ module avail gccLink to section 'Toolchain' of 'Provided Software' Toolchain
The Anvil team will build and maintain an integrated, tested, and supported toolchain of compilers, MPI libraries, data format libraries, and other common libraries. This toolchain will consist of:
- Compiler suite (C, C++, Fortran) (Intel, GCC and AOCC)
- BLAS and LAPACK
- MPI libraries (OpenMPI, MVAPICH, Intel MPI)
- FFTW
- HDF5
- NetCDF
Each of these software packages will be combined with the stable "modtree/cpu" compiler, the latest available Intel compiler, and the common GCC compiler. The goal of these toolchains is to provide a range of compatible compiler and library suites that can be selected to build a wide variety of applications. At the same time, the number of compiler and library combinations is limited to keep the selection easy to navigate and understand. Generally, the toolchain built with the latest Intel compiler will be updated at major releases of the compiler.
Link to section 'Commonly Used Applications' of 'Provided Software' Commonly Used Applications
The Anvil team will go to every effort to provide a broadly useful set of popular software packages for research cluster users. Software packages such as Matlab, Python (Anaconda), NAMD, GROMACS, R, VASP, LAMMPS, and others that are useful to a wide range of cluster users are provided via the module command.
Link to section 'Changes to Provided Software' of 'Provided Software' Changes to Provided Software
Changes to available software, such as the introduction of new compilers and libraries or the retirement of older toolchains, will be scheduled in advance and coordinated with system maintenances. This is done to minimize impact and provide a predictable time for changes. Advance notice of changes will be given with regular maintenance announcements and through notices printed through “module load”s. Be sure to check maintenance announcements and job output for any upcoming changes.
Link to section 'Long Term Support' of 'Provided Software' Long Term Support
The Anvil team understands the need for a stable and unchanging suite of compilers and libraries. Research projects are often tied to specific compiler versions throughout their lifetime. The Anvil team will go to every effort to provide the "modtree/cpu" or "modtree/gpu" environment and the common GCC compiler as a long-term supported environment. These suites will stay unchanged for longer periods than the toolchain built with the latest available Intel compiler.
Installing applications
This section provides some instructions for installing and compiling some common applications on Anvil.VASP
The Vienna Ab initio Simulation Package (VASP) is a computer program for atomic scale materials modelling, e.g. electronic structure calculations and quantum-mechanical molecular dynamics, from first principles.
Link to section 'VASP License' of 'VASP' VASP License
The VASP team allows only registered users who have purchased their own license to use the software and access is only given to the VASP release which is covered by the license of the respective research group. For those who are interested to use VASP on Anvil, please send a ticket to ACCESS Help Desk to request access and provide your license for our verification. Once confirmed, the approved users will be given access to the vasp5 or vasp6 unix groups.
Prospective users can use the command below to check their unix groups on the system.
$ id $USER
If you are interested to purchase and get a VASP license, please visit VASP website for more information.
Link to section 'VASP 5 and VASP 6 Installations' of 'VASP' VASP 5 and VASP 6 Installations
The Anvil team provides VASP 5.4.4 and VASP 6.3.0 installations and modulefiles with our default environment compiler gcc/11.2.0 and mpi library openmpi/4.1.6. Note that only license-approved users can load the VASP modulefile as below.
You can use the VASP 5.4.4 module by:
$ module load gcc/11.2.0  openmpi/4.1.6
$ module load vasp/5.4.4.pl2
You can use the VASP 6.3.0 module by:
$ module load gcc/11.2.0  openmpi/4.1.6
$ module load vasp/6.3.0
Once a VASP module is loaded, you can choose one of the VASP executables to run your code: vasp_std, vasp_gam, and vasp_ncl.
The VASP pseudopotential files are not provided on Anvil, you may need to bring your own POTCAR files.
Link to section 'Build your own VASP 5 and VASP 6' of 'VASP' Build your own VASP 5 and VASP 6
If you would like to use your own VASP on Anvil, please follow the instructions for Installing VASP.6.X.X and Installing VASP.5.X.X.
In the following sections, we provide some instructions about how to install VASP 5 and VASP 6 on Anvil and also the installation scripts:
Build your own VASP 5
For VASP 5.X.X version, VASP provide several templates of makefile.include in the /arch folder, which contain information such as precompiler options, compiler options, and how to link libraries. You can pick up one based on your system and preferred features . Here we provide some examples about how to install the vasp.5.4.4.pl2.tgz version on Anvil with different module environments. We also prepared two versions of VASP5 installation scripts at the end of this page.
Link to section 'Step 1: Download' of 'Build your own VASP 5' Step 1: Download
As a license holder, you can download the source code of VASP from the VASP Portal, we will not check your license in this case.
Copy the VASP resource file vasp.5.4.4.pl2.tgz to the desired location, and unzip the file tar zxvf vasp.5.4.4.pl2.tgz to obtain the folder /path/to/vasp-build-folder/vasp.5.4.4.pl2and reveal its content.
Link to section 'Step 2: Prepare makefile.include' of 'Build your own VASP 5' Step 2: Prepare makefile.include
-
For GNU compilers parallelized using OpenMPI, combined with MKL
We modified the
makefile.include.linux_gnufile to adapt the Anvil system. Download it to your VASP build folder/path/to/vasp-build-folder/vasp.5.4.4.pl2:$ cd /path/to/vasp-build-folder/vasp.5.4.4.pl2 $ wget https://www.rcac.purdue.edu/files/knowledge/compile/src/makefile.include.linux_gnu $ cp makefile.include.linux_gnu makefile.includeIf you would like to include the Wannier90 interface, you may also need to include the following lines to the end of your
makefile.includefile:# For the interface to Wannier90 (optional) LLIBS += $(WANNIER90_HOME)/libwannier.aLoad the required modules:
$ module purge $ module load gcc/11.2.0 openmpi/4.1.6 $ module load intel-mkl # If you would like to include the Wannier90 interface, also load the following module: # $ module load wannier90/3.1.0 -
For Intel compilers parallelized using IMPI, combined with MKL
Copy the
makefile.include.linux_inteltemplet from the/archfolder to your VASP build folder/path/to/vasp-build-folder/vasp.5.4.4.pl2:$ cd /path/to/vasp-build-folder/vasp.5.4.4.pl2 $ cp arch/makefile.include.linux_intel makefile.includeFor better performance, you may add the following line to the end of your
makefile.includefile (above the GPU section):FFLAGS += -march=core-avx2If you would like to include the Wannier90 interface, you may also need to include the following lines to the end of your
makefile.includefile (above the GPU section):# For the interface to Wannier90 (optional) LLIBS += $(WANNIER90_HOME)/libwannier.aLoad the required modules:
$ module purge
$ module load intel/19.0.5.281  impi/2019.5.281
$ module load intel-mkl
# If you would like to include the Wannier90 interface, also load this module:
# $ module load wannier90/3.1.0
Link to section 'Step 3: Make' of 'Build your own VASP 5' Step 3: Make
Build VASP with command make all to install all three executables vasp_std, vasp_gam, and vasp_ncl or use make std to install only the vasp_std executable. Use make veryclean to remove the build folder if you would like to start over the installation process.
Link to section 'Step 4: Test' of 'Build your own VASP 5' Step 4: Test
You can open an Interactive session to test the installed VASP, you may bring your own VASP test files:
$ cd /path/to/vasp-test-folder/
$ module purge
$ module load gcc/11.2.0 openmpi/4.1.6 intel-mkl
# If you included the Wannier90 interface, also load this module:
# $ module load wannier90/3.1.0
$ mpirun /path/to/vasp-build-folder/vasp.5.4.4.pl2/bin/vasp_std
Link to section ' ' of 'Build your own VASP 5'
Build your own VASP 6
For VASP 6.X.X version, VASP provide several templates of makefile.include, which contain information such as precompiler options, compiler options, and how to link libraries. You can pick up one based on your system and preferred features . Here we provide some examples about how to install vasp 6.3.0 on Anvil with different module environments. We also prepared two versions of VASP6 installation scripts at the end of this page.
Link to section 'Step 1: Download' of 'Build your own VASP 6' Step 1: Download
As a license holder, you can download the source code of VASP from the VASP Portal, we will not check your license in this case.
Copy the VASP resource file vasp.6.3.0.tgz to the desired location, and unzip the file tar zxvf vasp.6.3.0.tgz to obtain the folder /path/to/vasp-build-folder/vasp.6.3.0 and reveal its content.
Link to section 'Step 2: Prepare makefile.include' of 'Build your own VASP 6' Step 2: Prepare makefile.include
-
For GNU compilers parallelized using OpenMPI + OpenMP, combined with MKL
We modified the
makefile.include.gnu_ompi_mkl_ompfile to adapt the Anvil system. Download it to your VASP build folder/path/to/vasp-build-folder/vasp.6.3.0:$ cd /path/to/vasp-build-folder/vasp.6.3.0 $ wget https://www.rcac.purdue.edu/files/knowledge/compile/src/makefile.include.gnu_ompi_mkl_omp $ cp makefile.include.gnu_ompi_mkl_omp makefile.includeIf you would like to include the Wannier90 interface, you may also need to include the following lines to the end of your
makefile.includefile:# For the VASP-2-Wannier90 interface (optional) CPP_OPTIONS += -DVASP2WANNIER90 WANNIER90_ROOT ?=$(WANNIER90_HOME) LLIBS += -L$(WANNIER90_ROOT) -lwannierThen, load the required modules:
$ module purge $ module load gcc/11.2.0 openmpi/4.1.6 $ module load intel-mkl hdf5 # If you would like to include the Wannier90 interface, also load the following module: # $ module load wannier90/3.1.0 -
For Intel compilers parallelized using IMPI + OpenMP, combined with MKL
We modified the
makefile.include.intel_ompfile to adapt the Anvil system. Download it to your VASP build folder/path/to/vasp-build-folder/vasp.6.3.0:$ cd /path/to/vasp-build-folder/vasp.6.3.0 $ wget https://www.rcac.purdue.edu/files/knowledge/compile/src/makefile.include.intel_omp $ cp makefile.include.intel_omp makefile.includeIf you would like to include the Wannier90 interface, you may also need to include the following lines to the end of your
makefile.includefile:# For the VASP-2-Wannier90 interface (optional) CPP_OPTIONS += -DVASP2WANNIER90 WANNIER90_ROOT ?=$(WANNIER90_HOME) LLIBS += -L$(WANNIER90_ROOT) -lwannierThen, load the required modules:
$ module purge
$ module load intel/19.0.5.281  impi/2019.5.281
$ module load intel-mkl hdf5
# If you would like to include the Wannier90 interface, also load the following module:
# $ module load wannier90/3.1.0
Link to section 'Step 3: Make' of 'Build your own VASP 6' Step 3: Make
Open makefile, make sure the first line is VERSIONS = std gam ncl.
Build VASP with command make all to install all three executables vasp_std, vasp_gam, and vasp_ncl or use make std to install only the vasp_std executable. Use make veryclean to remove the build folder if you would like to start over the installation process.
Link to section 'Step 4: Test' of 'Build your own VASP 6' Step 4: Test
You can open an Interactive session to test the installed VASP 6. Here is an example of testing above installed VASP 6.3.0 with GNU compilers and OpenMPI:
$ cd /path/to/vasp-build-folder/vasp.6.3.0/testsuite
$ module purge
$ module load gcc/11.2.0 openmpi/4.1.6 intel-mkl hdf5
# If you included the Wannier90 interface, also load the following module:
# $ module load wannier90/3.1.0
$ ./runtest
Link to section ' ' of 'Build your own VASP 6'
LAMMPS
Large-scale Atomic/Molecular Massively Parallel Simulator (LAMMPS) is a molecular dynamics program from Sandia National Laboratories. LAMMPS makes use of Message Passing Interface for parallel communication and is a free and open-source software, distributed under the terms of the GNU General Public License.
Provided LAMMPS module
Link to section 'LAMMPS modules' of 'Provided LAMMPS module' LAMMPS modules
The Anvil team provides LAMMPS module with our default module environment gcc/11.2.0 and openmpi/4.0.6 to all users. It can be accessed by:
$ module load gcc/11.2.0 openmpi/4.0.6
$ module load lammps/20210310
The LAMMPS executable is lmp and the LAMMPS potential files are installed at $LAMMPS_HOME/share/lammps/potentials, where the value of $LAMMPS_HOMEis the path to LAMMPS build folder. Use this variable in any scripts. Your actual LAMMPS folder path may change without warning, but this variable will remain current. The current path is:
$ echo $LAMMPS_HOME
$ /apps/spack/anvil/apps/lammps/20210310-gcc-11.2.0-jzfe7x3
LAMMPS Job Submit Script
This is an example of a job submission file for running parallel LAMMPS jobs using the LAMMPS module installed on Anvil.
#!/bin/bash
# FILENAME:  myjobsubmissionfile

#SBATCH -A myallocation # Allocation name
#SBATCH --nodes=2       # Total # of nodes
#SBATCH --ntasks=256    # Total # of MPI tasks
#SBATCH --time=1:30:00  # Total run time limit (hh:mm:ss)
#SBATCH -J myjobname    # Job name
#SBATCH -o myjob.o%j    # Name of stdout output file
#SBATCH -e myjob.e%j    # Name of stderr error file
#SBATCH -p wholenode    # Queue (partition) name

# Manage processing environment, load compilers and applications.
module purge
module load gcc/11.2.0 openmpi/4.0.6
module load lammps/20210310
module list

# Launch MPI code
srun -n $SLURM_NTASKS lmp
Build your own LAMMPS
Link to section 'Build your own LAMMPS' of 'Build your own LAMMPS' Build your own LAMMPS
LAMMPS provides a very detailed instruction of Build LAMMPS with a lot of customization options. In the following sections, we provide basic installation instructions of how to install LAMMPS on Anvil, as well as a LAMMPS Installation Script for users who would like to build their own LAMMPS on Anvil:
Link to section 'Step 1: Download' of 'Build your own LAMMPS' Step 1: Download
LAMMPS is an open-source code, you can download LAMMPS as a tarball from LAMMPS download page. There are several versions available on the LAMMPS webpage, we strongly recommend downloading the latest released stable version and unzip and untar it. It will create a LAMMPS directory:
$ wget https://download.lammps.org/tars/lammps-stable.tar.gz
$ tar -xzvf lammps-stable.tar.gz
$ ls
lammps-23Jun2022 lammps-stable.tar.gz
Link to section 'Step 2: Build source code' of 'Build your own LAMMPS' Step 2: Build source code
LAMMPS provides two ways to build the source code: traditional configure && make method and the cmake method. These are two independent approaches and users should not mix them together. You can choose the one you are more familiar with.
Build LAMMPS with Make
Traditional make method requires a Makefile file appropriate for your system in either the src/MAKE, src/MAKE/MACHINES, src/MAKE/OPTIONS, or src/MAKE/MINE directory. It provides various options to customize your LAMMPS. If you would like to build your own LAMMPS on Anvil with make, please follow the instructions for Build LAMMPS with make. In the following sections, we will provide some instructions on how to install LAMMPS on Anvil with make.
Link to section 'Include LAMMPS Packages' of 'Build LAMMPS with Make' Include LAMMPS Packages
In LAMMPS, a package is a group of files that enable a specific set of features. For example, force fields for molecular systems or rigid-body constraints are in packages. Usually, you can include only the packages you plan to use, but it doesn't hurt to run LAMMPS with additional packages.
To use make command to see the make options and package status, you need to first jump to src subdirectory. Here we will continue use lammps-23Jun2022 as an example:
$ cd lammps-23Jun2022/src     # change to main LAMMPS source folder
$ make                        # see a variety of make options
$ make ps                     # check which packages are currently installed
For most LAMMPS packages, you can include them by:
$ make yes-PGK_NAME      # install a package with its name, default value is "no", which means exclude the package
# For example:
$ make yes-MOLECULE
A few packages require additional steps to include libraries or set variables, as explained on Packages with extra build options. If a package requires external libraries, you must configure and build those libraries before building LAMMPS and especially before enabling such a package.
If you have issues with installing external libraries, please contact us at Help Desk.
Instead of specifying all the package options via the command line, LAMMPS provides some Make shortcuts for installing many packages, such as make yes-most, which will install most LAMMPS packages w/o libs. You can pick up one of the shortcuts based on your needs.
Link to section 'Compilation' of 'Build LAMMPS with Make' Compilation
Once the desired packages are included, you can compile lammps with our default environment: compiler gcc/11.2.0 and MPI library openmpi/4.0.6 , you can load them all at once by module load modtree/cpu. Then corresponding make option will be make g++_openmpi for OpenMPI with compiler set to GNU g++.
Then the LAMMPS executable lmp_g++_openmpi will be generated in the build folder.
LAMMPS support parallel compiling, so you may submit an Interactive job to do parallel compiling.
If you get some error messages and would like to start over the installation process, you can delete compiled objects, libraries and executables with make clean-all.
Link to section 'Examples' of 'Build LAMMPS with Make' Examples
Here is an example of how to install the lammps-23Jun2022 version on Anvil with most packages enabled:
# Setup module environments $ module purge $ module load modtree/cpu$ module load hdf5 fftw gsl netlib-lapack$ module list $ cd lammps-23Jun2022/src # change to main LAMMPS source folder $ make yes-most # install most LAMMPS packages w/o libs $ make ps # check which packages are currently installed # compilation $ make g++_openmpi # or "make -j 12 g++_openmpi" to do parallel compiling if you open an interactive session with 12 cores.
Link to section 'Tips' of 'Build LAMMPS with Make' Tips
When you run LAMMPS and get an error like "command or style is unknown", it is likely due to the fact you did not include the required packages for that command or style. If the command or style is available in a package included in the LAMMPS distribution, the error message will indicate which package would be needed.
For more information about LAMMPS build options, please refer to these sections of LAMMPS documentation:
Build LAMMPS with Cmake
CMake is an alternative to compiling LAMMPS in addition to the traditional Make method. CMake has several advantages, and might be helpful for people with limited experience in compiling software or for those who want to modify or extend LAMMPS. If you prefer using cmake, please follow the instructions for Build LAMMPS with CMake. In the following sections, we will provide some instructions on how to install LAMMPS on Anvil with cmake and the LAMMPS Installation Script:
Link to section 'Use CMake to generate a build environment' of 'Build LAMMPS with Cmake' Use CMake to generate a build environment
-
First go to your LAMMPS directory and generate a new folder
buildfor build environment. Here we will continue uselammps-23Jun2022as an example:$ cd lammps-23Jun2022 $ mkdir build; cd build # create and change to a build directory -
To use
cmakefeatures, you need tomodule load cmakefirst. -
For basic LAMMPS installation with no add-on packages enabled and no customization, you can generate a build environment by:
$ cmake ../cmake # configuration reading CMake scripts from ../cmake -
You can also choose to include or exclude packages to or from build.
In LAMMPS, a package is a group of files that enable a specific set of features. For example, force fields for molecular systems or rigid-body constraints are in packages. Usually, you can include only the packages you plan to use, but it doesn't hurt to run LAMMPS with additional packages.
For most LAMMPS packages, you can include it by adding the following flag to
cmakecommand:-D PKG_NAME=yes # degualt value is "no", which means exclude the packageFor example:
$ cmake -D PKG_MOLECULE=yes -D PKG_RIGID=yes -D PKG_MISC=yes ../cmakeA few packages require additional steps to include libraries or set variables, as explained on Packages with extra build options. If you have issue with installing external libraries, please contact us at Help Desk.
-
Instead of specifying all the package options via the command line, LAMMPS provides some CMake setting scripts in
/cmake/presetsfolder. You can pick up one of them or customize it based on your needs. -
If you get some error messages after the
cmake ../cmakestep and would like to start over, you can delete the wholebuildfolder and create new one:$ cd lammps-23Jun2022 $ rm -rf build $ mkdir build && cd build
Link to section 'Compilation' of 'Build LAMMPS with Cmake' Compilation
-
Once the build files are generated by
cmakecommand, you can compile lammps with our default environments: compilergcc/11.2.0and MPI libraryopenmpi/4.0.6, you can load them all at once bymodule load modtree/cpu. -
Then, the next step is to compile LAMMPS with
makeorcmake --build, upon completion, the LAMMPS executablelmpwill be generated in thebuildfolder. -
LAMMPS supports parallel compiling, so you may submit an Interactive job to do parallel compilation.
-
If you get some error with compiling, you can delete compiled objects, libraries and executables with
make cleanorcmake --build . --target clean.
Link to section 'Examples' of 'Build LAMMPS with Cmake' Examples
Here is an example of how to install the lammps-23Jun2022 version on Anvil with most packages enabled:
# Setup module environments
$ module purge
$ module load modtree/cpu
$ module load hdf5 fftw gsl netlib-lapack
$ module load cmake anaconda
$ module list

$ cd lammps-23Jun2022      # change to the LAMMPS distribution directory
$ mkdir build; cd build;   # create and change to a build directory

# enable most packages and setup Python package library path
$ cmake -C ../cmake/presets/most.cmake -D PYTHON_EXECUTABLE=$CONDA_PYTHON_EXE ../cmake
# If everything works well, you will see
# -- Build files have been written to: /path-to-lammps/lammps-23Jun2022/build

# compilation
$ make      # or "make -j 12" to do parallel compiling if you open an interactive session with 12 cores.
# If everything works well, you will see
# [100%] Built target lmp
The CMake setting script /cmake/presets/most.cmake we used in the example here will includes 57 most common packages:
$ ASPHERE BOCS BODY BROWNIAN CG-DNA CG-SDK CLASS2 COLLOID COLVARS COMPRESS CORESHELL DIELECTRIC DIFFRACTION DIPOLE DPD-BASIC DPD-MESO DPD-REACT DPD-SMOOTH DRUDE EFF EXTRA-COMPUTE EXTRA-DUMP EXTRA-FIX EXTRA-MOLECULE EXTRA-PAIR FEP GRANULAR INTERLAYER KSPACE MACHDYN MANYBODY MC MEAM MISC ML-IAP ML-SNAP MOFFF MOLECULE OPENMP OPT ORIENT PERI PLUGIN POEMS QEQ REACTION REAXFF REPLICA RIGID SHOCK SPH SPIN SRD TALLY UEF VORONOI YAFF
Link to section 'Tips' of 'Build LAMMPS with Cmake' Tips
When you run LAMMPS and get an error like "command or style is unknown", it is likely due to you did not include the required packages for that command or style. If the command or style is available in a package included in the LAMMPS distribution, the error message will indicate which package would be needed.
After the initial build, whenever you edit LAMMPS source files, enable or disable packages, change compiler flags or build options, you must recompile LAMMPS with make.
For more information about LAMMPS build options, please following these links from LAMMPS website:
LAMMPS Installation Script
Here we provide a lammps-23Jun2022 installation script with cmake. It contains the procedures from downloading the source code to what we mentioned in Build LAMMPS with Cmake Example section. You will start with making an empty folder. Then, download the installation scriptinstall-lammps.sh to this folder. Since parallel compiling with 12 cores is used in the script, you may submit an Interactive job to ask for 12 cores:
$ mkdir lammps; cd lammps;   # create and change to a lammps directory
$ wget https://www.rcac.purdue.edu/files/knowledge/compile/src/install-lammps.sh
$ ls
install-lammps.sh
$ sinteractive -N 1 -n 12 -A oneofyourallocations -p shared -t 1:00:00
$ bash install-lammps.sh
Policies, Helpful Tips and FAQs
Here are details on some policies for research users and systems.
Software Installation Request Policy
The Anvil team will go to every reasonable effort to provide a broadly useful set of popular software packages for research cluster users. However, many domain-specific packages that may only be of use to single users or small groups of users are beyond the capacity of staff to fully maintain and support. Please consider the following if you require software that is not available via the module command:
- If your lab is the only user of a software package, Anvil staff may recommend that you install your software privately, either in your home directory or in your allocation project space. If you need help installing software, the Anvil support team may be able to provide limited help.
- As more users request a particular piece of software, Anvil may decide to provide the software centrally. Matlab, Python (Anaconda), NAMD, GROMACS, and R are all examples of frequently requested and used centrally-installed software.
- Python modules that are available through the Anaconda distribution will be installed through it. Anvil staff may recommend you install other Python modules privately.
If you're not sure how your software request should be handled or need help installing software please contact us at Help Desk.
Helpful Tips
We will strive to ensure that Anvil serves as a valuable resource to the national research community. We hope that you the user will assist us by making note of the following:
- You share Anvil with thousands of other users, and what you do on the system affects others. Exercise good citizenship to ensure that your activity does not adversely impact the system and the research community with whom you share it. For instance: do not run jobs on the login nodes and do not stress the filesystem.
- Help us serve you better by filing informative help desk tickets. Before submitting a help desk ticket do check what the user guide and other documentation say. Search the internet for key phrases in your error logs; that's probably what the consultants answering your ticket are going to do. What have you changed since the last time your job succeeded?
- Describe your issue as precisely and completely as you can: what you did, what happened, verbatim error messages, other meaningful output. When appropriate, include the information a consultant would need to find your artifacts and understand your workflow: e.g. the directory containing your build and/or job script; the modules you were using; relevant job numbers; and recent changes in your workflow that could affect or explain the behavior you're observing.
- Have realistic expectations. Consultants can address system issues and answer questions about Anvil. But they can't teach parallel programming in a ticket and may know nothing about the package you downloaded. They may offer general advice that will help you build, debug, optimize, or modify your code, but you shouldn't expect them to do these things for you.
- Be patient. It may take a business day for a consultant to get back to you, especially if your issue is complex. It might take an exchange or two before you and the consultant are on the same page. If the admins disable your account, it's not punitive. When the file system is in danger of crashing, or a login node hangs, they don't have time to notify you before taking action.
For GPU jobs, make sure to use --gpus-per-node command, otherwise, your job may not run properly.
Link to section ' Helpful Tools' of 'Helpful Tips' Helpful Tools
The Anvil cluster provides a list of useful auxiliary tools:
| Tool | Use | |
|---|---|---|
myquota |
Check the quota of different file systems. | |
flost |
A utility to recover files from snapshots. | |
showpartitions |
Display all Slurm partitions and their current usage. | |
myscratch |
Show the path to your scratch directory. | |
jobinfo |
Collates job information from the sstat, sacctand squeue SLURM commands to give a uniform interface for both current and historical jobs. |
|
sfeatures |
Show the list of available constraint feature names for different node types. | |
myproject |
Print the location of my project directory. | |
mybalance |
Check the allocation usage of your project team. |
Frequently Asked Questions
Some common questions, errors, and problems are categorized below. Click the Expand Topics link in the upper right to see all entries at once. You can also use the search box above to search the user guide for any issues you are seeing.
About Anvil
Frequently asked questions about Anvil.
Can you remove me from the Anvil mailing list?
Your subscription in the Anvil mailing list is tied to your account on Anvil which was granted to you through an ACCESS allocation. If you are no longer using your account on Anvil, you can contact your PI or allocation manager to remove you from their Anvil allocation.
How is Anvil different than Purdue Community Clusters?
Anvil is part of the national Advanced Cyberinfrastructure Coordination Ecosystem: Services & Support (ACCESS) ecosystem and is not part of Purdue Community Clusters program. There are a lot of similarities between the systems, yet there are also a few differences in hardware, software and overall governance. For Purdue users accustomed to the way Purdue supercomputing clusters operate, the following summarizes key differences between RCAC clusters and Anvil.
Link to section 'Support' of 'How is Anvil different than Purdue Community Clusters?' Support
-
While Anvil is operated by Purdue RCAC, it is an ACCESS resource, and all support requests have to go through ACCESS channels rather than RCAC ones. Please direct your Anvil questions to the ACCESS Help Desk (https://support.access-ci.org/open-a-ticket) and they will be dispatched to us.
Link to section 'Resource Allocations' of 'How is Anvil different than Purdue Community Clusters?' Resource Allocations
Two key things to remember on Anvil and other ACCESS resources:
- In contrast with Community Clusters, you do not buy nodes on Anvil. To access Anvil, PIs must request an allocation through ACCESS.
- Users don't get access to a dedicated “owner” queue with X-number of cores. Instead, they get an allocation for Y-number of core-hours. Jobs can be submitted to any of the predefined partitions.
More details on these differences are presented below.
-
Access to Anvil is free (no need to purchase nodes), and is governed by ACCESS allocation policies. All allocation requests must be submitted via ACCESS Resource Allocation System. These allocations other than the Maximize ACCESS Request can be requested at any time.
Explore ACCESS allocations are intended for purposes that require small resource amounts. Researchers can try out resources or run benchmarks, instructors can provide access for small-scale classroom activities, research software engineers can develop or port codes, and so on. Graduate students can conduct thesis or dissertation work.
Discover ACCESS allocations are intended to fill the needs of many small-scale research activities or other resource needs. The goal of this opportunity is to allow many researchers, Campus Champions, and Gateways to request allocations with a minimum amount of effort so they can complete their work.
Accelerate ACCESS allocations support activities that require more substantial, mid-scale resource amounts to pursue their research objectives. These include activities such as consolidating multi-grant programs, collaborative projects, preparing for Maximize ACCESS requests, and supporting gateways with growing communities.
Maximize ACCESS allocations are for projects with resource needs beyond those provided by an Accelerate ACCESS project, a Maximize ACCESS request is required. ACCESS does not place an upper limit on the size of allocations that can be requested or awarded at this level, but resource providers may have limits on allocation amounts for specific resources.
-
Unlike the Community Clusters model (where you “own” a certain amount of nodes and can run on them for the lifetime of the cluster), under ACCESS model, you apply for resource allocations on one or more ACCESS systems, and your project is granted certain amounts of Service Units (SUs) on each system. Different ACCESS centers compute SUs differently, but in general SUs are always some measure of CPU-hours or similar resource usage by your jobs. Anvil job accounting page provides more details on how we compute SU consumption on Anvil. Once granted, you can use your allocation’s SUs until they are consumed or expired, after which the allocation must be renewed via established ACCESS process (note: no automatic refills, but there are options to extend the time to use up your SUs and request additional SUs as supplements). You can check your allocation balances on ACCESS website, or use a local
mybalancecommand in Anvil terminal window.
Link to section 'Accounts and Passwords' of 'How is Anvil different than Purdue Community Clusters?' Accounts and Passwords
-
Your Anvil account is not the same as your Purdue Career Account. Following ACCESS procedures, you will need to create an ACCESS account (it is these ACCESS user names that your PI or project manager adds to their allocation to grant you access to Anvil). Your Anvil user name will be automatically derived from ACCESS account name, and it will look something similar to
x-ACCESSname, starting with anx-. -
Anvil does not support password authentication, and there is no “Anvil password”. The recommended authentication method for SSH is public key-based authentication (“SSH keys”). Please see the user guide for detailed descriptions and steps to configure and use your SSH keys.
Link to section 'Storage and Filesystems' of 'How is Anvil different than Purdue Community Clusters?' Storage and Filesystems
-
Anvil scratch purging policies (see the filesystems section) are significantly more stringent than on Purdue RCAC systems. Files not accessed for 30 days are deleted instantly and automatically (on the filesystem's internal policy engine level). Note: there are no warning emails!
-
Purdue Data Depot is not available on Anvil, but every allocation receives a dedicated project space (
$PROJECT) shared among allocation members in a way very similar to Data Depot. See the filesystems section in the user guide for more details. You can transfer files between Anvil and Data Depot or Purdue clusters using any of the mutually supported methods (e.g. SCP, SFTP, rsync, Globus). -
Purdue Fortress is available on Anvil, but direct HSI and HTAR are currently not supported. You can transfer files between Anvil and Fortress using any of the mutually supported methods (e.g. SFTP, Globus).
-
Anvil features Globus Connect Server v5 which enables direct HTTPS access to data on Anvil Globus collections right from your browser (both uploads and downloads).
Link to section 'Partitions and Node Types' of 'How is Anvil different than Purdue Community Clusters?' Partitions and Node Types
-
Anvil consists of several types of compute nodes (regular, large memory, GPU-equipped, etc), arranged into multiple partitions according to various hardware properties and scheduling policies. You are free to direct your jobs and use your SUs in any partition that suits your jobs’ specific computational needs and matches your allocation type (CPU vs. GPU). Note that different partitions may “burn” your SUs at a different rate - see Anvil job accounting page for detailed description.
Corollary: On Anvil, you need to specify both allocation account and partition for your jobs (
-A allocationand-p partitionoptions), otherwise your job will end up in the defaultsharedpartition, which may or may not be optimal. See partitions page for details. -
There are no
standby,partnerorowner-type queues on Anvil. All jobs in all partitions are prioritized equally.
Link to section 'Software Stack' of 'How is Anvil different than Purdue Community Clusters?' Software Stack
-
Two completely separate software stacks and corresponding Lmod module files are provided for CPU- and GPU-based applications. Use
module load modtree/cpuandmodule load modtree/gputo switch between them. The CPU stack is loaded by default when you login to the system. See example jobs section for specific instructions and submission scripts templates.
Link to section 'Composable Subsystem' of 'How is Anvil different than Purdue Community Clusters?' Composable Subsystem
-
A composable subsystem alongside of the main HPC cluster is a uniquely empowering feature of Anvil. Composable subsystem is a Kubernetes-based private cloud that enables researchers to define and stand up custom services, such as notebooks, databases, elastic software stacks, and science gateways.
Link to section 'Everything Else' of 'How is Anvil different than Purdue Community Clusters?' Everything Else
-
The above list provides highlights of major differences an RCAC user would find on Anvil, but it is by no means exhaustive. Please refer to Anvil user guide for detailed descriptions, or reach out to us through ACCESS Help Desk (https://support.access-ci.org/open-a-ticket)
Logging In & Accounts
Frequently asked questions related to Logging In & Accounts.
Questions
Common login-related questions.
Can I use browser-based Thinlinc to access Anvil?
Link to section 'Problem' of 'Can I use browser-based Thinlinc to access Anvil?' Problem
You would like to use browser-based Thinlinc to access Anvil, but do not know what username and password to use.
Link to section 'Solution' of 'Can I use browser-based Thinlinc to access Anvil?' Solution
Password based access is not supported at this moment. Please use Thinlinc Client instead.
For your first time login to Anvil, you will have to login to Open OnDemand with your ACCESS username and password to start an anvil terminal and then set up SSH keys. Then you are able to use your native Thinlic client to access Anvil with SSH keys.
What is my username and password to access Anvil?
Link to section 'Problem' of 'What is my username and password to access Anvil?' Problem
You would like to login to Anvil, but do not know what username and password to use.
Link to section 'Solution' of 'What is my username and password to access Anvil?' Solution
Currently, you can access Anvil through:
-
SSH client:
You can login with standard SSH connections with SSH keys-based authentication to
anvil.rcac.purdue.eduusing your Anvil username. -
Native Thinlinc Client:
You can access native Thinlic client with SSH keys.
-
Open OnDemand:
You can access Open OnDemand with your ACCESS username and password.
What if my ThinLinc screen is locked?
Link to section 'Problem' of 'What if my ThinLinc screen is locked?' Problem
Your ThinLinc desktop is locked after being idle for a while, and it asks for a password to refresh it, but you do not know the password.

Link to section 'Solution' of 'What if my ThinLinc screen is locked?' Solution
If your screen is locked, close the ThinLinc client, reopen the client login popup, and select End existing session.
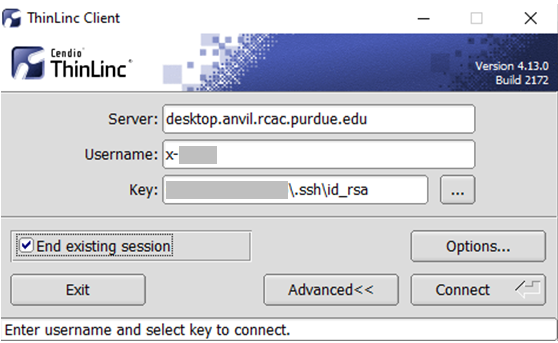
To permanently avoid screen lock issue, right click desktop and select Applications, then settings, and select Screensaver.
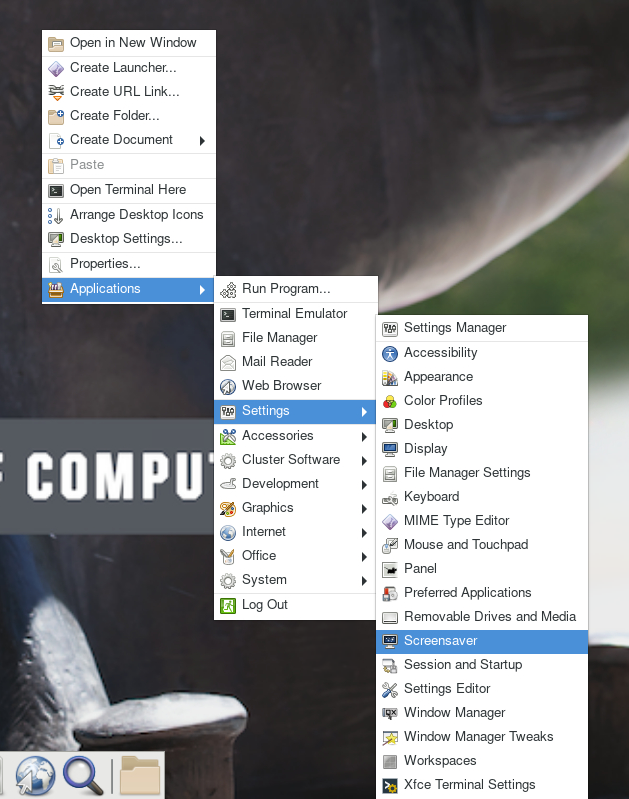
Under Screensaver, turn off the Enable Screensaver, then under Lock Screen, turn off the Enable Lock Screen, and close the window.
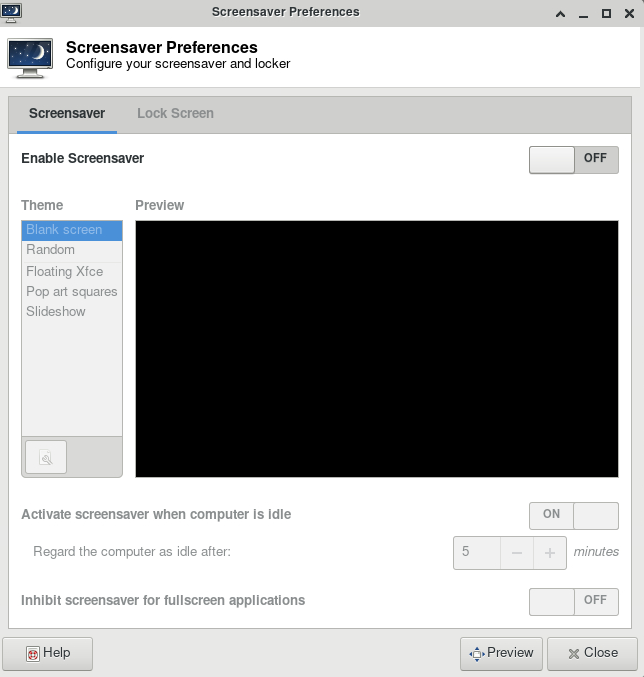
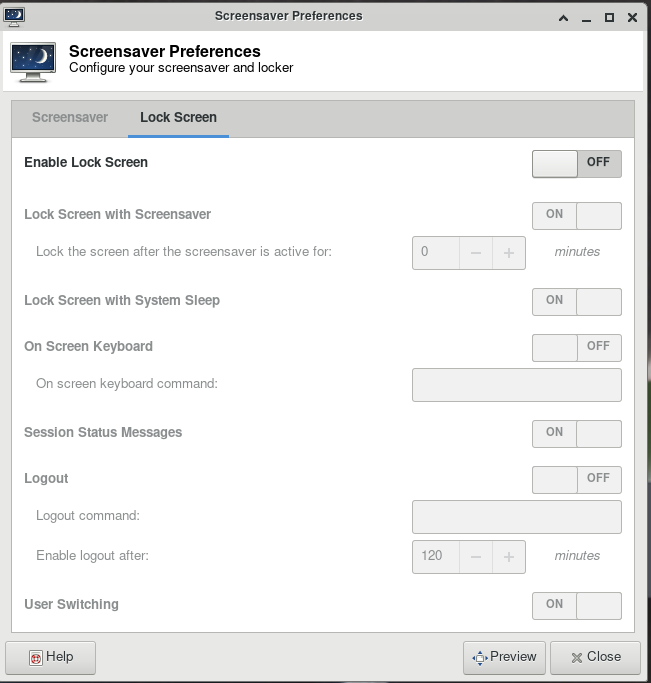
Jobs
Frequently asked questions related to running jobs.
Errors
Common errors and potential solutions/workarounds for them.
Close Firefox / Firefox is already running but not responding
Link to section 'Problem' of 'Close Firefox / Firefox is already running but not responding' Problem
You receive the following message after trying to launch Firefox browser inside your graphics desktop:
Close Firefox

Firefox is already running, but not responding.  To open a new window,
you  must first close the existing Firefox process, or restart your system.
Link to section 'Solution' of 'Close Firefox / Firefox is already running but not responding' Solution
When Firefox runs, it creates several lock files in the Firefox profile directory (inside ~/.mozilla/firefox/ folder in your home directory). If a newly-started Firefox instance detects the presence of these lock files, it complains.
This error can happen due to multiple reasons:
- Reason: You had a single Firefox process running, but it terminated abruptly without a chance to clean its lock files (e.g. the job got terminated, session ended, node crashed or rebooted, etc).
- Solution: If you are certain you do not have any other Firefox processes running elsewhere, please use the following command in a terminal window to detect and remove the lock files:
$ unlock-firefox
- Solution: If you are certain you do not have any other Firefox processes running elsewhere, please use the following command in a terminal window to detect and remove the lock files:
- Reason: You may indeed have another Firefox process (in another Thinlinc or Gateway session on this or other cluster, another front-end or compute node). With many clusters sharing common home directory, a running Firefox instance on one can affect another.
- Solution: Try finding and closing running Firefox process(es) on other nodes and clusters.
- Solution: If you must have multiple Firefoxes running simultaneously, you may be able to create separate Firefox profiles and select which one to use for each instance.
Jupyter: database is locked / can not load notebook format
Link to section 'Problem' of 'Jupyter: database is locked / can not load notebook format' Problem
You receive the following message after trying to load existing Jupyter notebooks inside your JupyterHub session:
Error loading notebook

An unknown error occurred while loading this notebook.  This version can load notebook formats or earlier. See the server log for details.
Alternatively, the notebook may open but present an error when creating or saving a notebook:
Autosave Failed!

Unexpected error while saving file:  MyNotebookName.ipynb database is locked
Link to section 'Solution' of 'Jupyter: database is locked / can not load notebook format' Solution
When Jupyter notebooks are opened, the server keeps track of their state in an internal database (located inside ~/.local/share/jupyter/ folder in your home directory). If a Jupyter process gets terminated abruptly (e.g. due to an out-of-memory error or a host reboot), the database lock is not cleared properly, and future instances of Jupyter detect the lock and complain.
Please follow these steps to resolve:
- Fully exit from your existing Jupyter session (close all notebooks, terminate Jupyter, log out from JupyterHub or JupyterLab, terminate OnDemand gateway's Jupyter app, etc).
- In a terminal window (SSH, Thinlinc or OnDemand gateway's terminal app) use the following command to clean up stale database locks:
$ unlock-jupyter - Start a new Jupyter session as usual.
Anvil Composable Subsystem
New usage patterns have emerged in research computing that depend on the availability of custom services such as notebooks, databases, elastic software stacks, and science gateways alongside traditional batch HPC. The Anvil Composable Subsystem is a Kubernetes based private cloud managed with Rancher that provides a platform for creating composable infrastructure on demand. This cloud-style flexibility provides researchers the ability to self-deploy and manage persistent services to complement HPC workflows and run container-based data analysis tools and applications.
Concepts
Link to section 'Containers & Images' of 'Concepts' Containers & Images
Image - An image is a simple text file that defines the source code of an application you want to run as well as the libraries, dependencies, and tools required for the successful execution of the application. Images are immutable meaning they do not hold state or application data. Images represent a software environment at a specific point of time and provide an easy way to share applications across various environments. Images can be built from scratch or downloaded from various repositories on the internet, additionally many software vendors are now providing containers alongside traditional installation packages like Windows .exe and Linux rpm/deb.
Container - A container is the run-time environment constructed from an image when it is executed or run in a container runtime. Containers allow the user to attach various resources such as network and volumes in order to move and store data. Containers are similar to virtual machines in that they can be attached to when a process is running and have arbitrary commands executed that affect the running instance. However, unlike virtual machines, containers are more lightweight and portable allowing for easy sharing and collaboration as they run identically in all environments.
Tags - Tags are a way of organizing similar image files together for ease of use. You might see several versions of an image represented using various tags. For example, we might be building a new container to serve web pages using our favorite web server: nginx. If we search for the nginx container on Docker Hub image repository we see many options or tags are available for the official nginx container.
The most common you will see are typically :latest and :number where
number refers to the most recent few versions of the software releases. In
this example we can see several tags refer to the same image:
1.21.1, mainline, 1, 1.21, and latest all reference the same image while the
1.20.1, stable, 1.20 tags all reference a common but different image.
In this case we likely want the nginx image with either the latest or 1.21.1
tag represented as nginx:latest and nginx:1.21.1 respectively.
Container Security - Containers enable fast developer velocity and ease compatibility through great portability, but the speed and ease of use come at some costs. In particular it is important that folks utilizing container driver development practices have a well established plan on how to approach container and environment security. Best Practices
Container Registries - Container registries act as large repositories of images, containers, tools and surrounding software to enable easy use of pre-made containers software bundles. Container registries can be public or private and several can be used together for projects. Docker Hub is one of the largest public repositories available, and you will find many official software images present on it. You need a user account to avoid being rate limited by Docker Hub. A private container registry based on Harbor that is available to use. TODO: link to harbor instructions
Docker Hub - Docker Hub is one of the largest container image registries that exists and is well known and widely used in the container community, it serves as an official location of many popular software container images. Container image repositories serve as a way to facilitate sharing of pre-made container images that are “ready for use.” Be careful to always pay attention to who is publishing particular images and verify that you are utilizing containers built only from reliable sources.
Harbor - Harbor is an open source registry for Kubernetes artifacts, it provides private image storage and enforces container security by vulnerability scanning as well as providing RBAC or role based access control to assist with user permissions. Harbor is a registry similar to Docker Hub, however it gives users the ability to create private repositories. You can use this to store your private images as well as keeping copies of common resources like base OS images from Docker Hub and ensure your containers are reasonably secure from common known vulnerabilities.
Link to section 'Container Runtime Concepts' of 'Concepts' Container Runtime Concepts
Docker Desktop - Docker Desktop is an application for your Mac / Windows machine that will allow you to build and run containers on your local computer. Docker desktop serves as a container environment and enables much of the functionality of containers on whatever machine you are currently using. This allows for great flexibility, you can develop and test containers directly on your laptop and deploy them directly with little to no modifications.
Volumes - Volumes provide us with a method to create persistent data that is generated and consumed by one or more containers. For docker this might be a folder on your laptop while on a large Kubernetes cluster this might be many SSD drives and spinning disk trays. Any data that is collected and manipulated by a container that we want to keep between container restarts needs to be written to a volume in order to remain around and be available for later use.
Link to section 'Container Orchestration Concepts' of 'Concepts' Container Orchestration Concepts
Container Orchestration - Container orchestration broadly means the automation of much of the lifecycle management procedures surrounding the usage of containers. Specifically it refers to the software being used to manage those procedures. As containers have seen mass adoption and development in the last decade, they are now being used to power massive environments and several options have emerged to manage the lifecycle of containers. One of the industry leading options is Kubernetes, a software project that has descended from a container orchestrator at Google that was open sourced in 2015.
Kubernetes (K8s) - Kubernetes (often abbreviated as "K8s") is a platform providing container orchestration functionality. It was open sourced by Google around a decade ago and has seen widespread adoption and development in the ensuing years. K8s is the software that provides the core functionality of the Anvil Composable Subsystem by managing the complete lifecycle of containers. Additionally it provides the following functions: service discovery and load balancing, storage orchestration, secret and configuration management. The Kubernetes cluster can be accessed via the Rancher UI or the kubectl command line tool.
Rancher - Rancher is a “is a complete software stack for teams adopting containers.” as described by its website. It can be thought of as a wrapper around Kubernetes, providing an additional set of tools to help operate the K8 cluster efficiently and additional functionality that does not exist in Kubernetes itself. Two examples of the added functionality is the Rancher UI that provides an easy to use GUI interface in a browser and Rancher projects, a concept that allows for multi-tenancy within the cluster. Users can interact directly with Rancher using either the Rancher UI or Rancher CLI to deploy and manage workloads on the Anvil Composable Subsystem.
Rancher UI - The Rancher UI is a web based graphical interface to use the Anvil Composable Subsystem from anywhere.
Rancher CLI - The Rancher CLI provides a convenient text based toolkit to interact with the cluster. The binary can be downloaded from the link on the right hand side of the footer in the Rancher UI. After you download the Rancher CLI, you need to make a few configurations Rancher CLI requires:
-
Your Rancher Server URL, which is used to connect to Rancher Server.
-
An API Bearer Token, which is used to authenticate with Rancher. see Creating an API Key.
After setting up the Rancher CLI you can issue rancher --help to view the full
range of options available.
Kubectl - Kubectl is a text based tool for working with the underlying Anvil Kubernetes cluster. In order to take advantage of kubectl you will either need to set up a Kubeconfig File or use the built in kubectl shell in the Rancher UI. You can learn more about kubectl and how to download the kubectl file here.
Storage - Storage is utilized to provide persistent data storage between container deployments. The Ceph filesystem provides access to Block, Object and shared file systems. File storage provides an interface to access data in a file and folder hierarchy similar to NTFS or NFS. Block storage is a flexible type of storage that allows for snapshotting and is good for database workloads and generic container storage. Object storage is also provided by Ceph, this features a REST based bucket file system providing S3 and Swift compatibility.
Access
How to Access the Anvil Composable Subsystem via the Rancher UI, the command line (kubectl) and the Anvil Harbor registry.
Rancher
Logging in to Rancher
The Anvil Composable Subsystem Rancher interface can be accessed via a web browser at https://composable.anvil.rcac.purdue.edu. Log in by choosing "log in with shibboleth" and using your ACCESS credentials at the ACCESS login screen.
kubectl
Link to section 'Configuring local kubectl access with Kubeconfig file' of 'kubectl' Configuring local kubectl access with Kubeconfig file
kubectl can be installed and run on your local machine to perform various actions against the Kubernetes cluster using the API server.
These tools authenticate to Kubernetes using information stored in a kubeconfig file.
To authenticate to the Anvil cluster you can download a kubeconfig file that is generated by Rancher as well as the kubectl tool binary.
-
From anywhere in the rancher UI navigate to the cluster dashboard by hovering over the box to the right of the cattle and selecting anvil under the "Clusters" banner.
-
Click on kubeconfig file at the top right
-
Click copy to clipboard
-
Create a hidden folder called .kube in your home directory
-
Copy the contents of your kubeconfig file from step 2 to a file called config in the newly create .kube directory
-
-
You can now issue commands using kubectl against the Anvil Rancher cluster
-
to look at the current config settings we just set use
kubectl config view -
now let’s list the available resource types present in the API with
kubectl api-resources
-
To see more options of kubectl review the cheatsheet found on Kubernetes' kubectl cheatsheet.
Link to section 'Accessing kubectl in the rancher web UI' of 'kubectl' Accessing kubectl in the rancher web UI
You can launch a kubectl command window from within the Rancher UI by selecting the Launch kubectl button to the left of the Kubeconfig File button. This will deploy a container in the cluster with kubectl installed and give you an interactive window to use the command from.
Harbor
Link to section 'Logging into the Anvil Registry UI with ACCESS credentials' of 'Harbor' Logging into the Anvil Registry UI with ACCESS credentials
Harbor is configured to use ACCESS as an OpenID Connect (OIDC) authentication provider. This allows you to login using your ACCESS credentials.
To login to the harbor registry using your ACCESS credentials:
Navigate to https://registry.anvil.rcac.purdue.edu in your favorite web browser.
-
Click the Login via OIDC Provider button.
-
This redirects you to the ACCESS account for authentication.
-
-
If this is the first time that you are logging in to Harbor with OIDC, specify a user name for Harbor to associate with your OIDC username.
-
This is the user name by which you are identified in Harbor, which is used when adding you to projects, assigning roles, and so on. If the username is already taken, you are prompted to choose another one.
-
-
After the OIDC provider has authenticated you, you are redirected back to the Anvil Harbor Registry.
Workloads
Link to section 'Deploy a Workload' of 'Workloads' Deploy a Workload
- Using the top right dropdown select the Project or Namespace you wish to deploy to.
- Using the far left menu navigate to Workload
- Click Create at the top right
- Select the appropriate Deployment Type for your use case
- Select Namespace if not already done from step 1
- Set a unique Name for your deployment, i.e. “myapp"
- Set Container Image. Ensure you're using the Anvil registry for personal images or the Anvil registry docker-hub cache when pulling public docker-hub specific images. e.g:
registry.anvil.rcac.purdue.edu/my-registry/myimage:tagorregistry.anvil.rcac.purdue.edu/docker-hub-cache/library/image:tag - Click Create
Wait a couple minutes while your application is deployed. The “does not have minimum availability” message is expected. But, waiting more than 5 minutes for your workload to deploy typically indicates a problem. You can check for errors by clicking your workload name (i.e. "myapp"), then the lower button on the right side of your deployed pod and selecting View Logs
If all goes well, you will see an Active status for your deployment
You can then interact with your deployed container on the command line by clicking the button with three dots on the right side of the screen and choosing "Execute Shell"
Services
Link to section 'Service' of 'Services' Service
A Service is an abstract way to expose an application running on Pods as a network service. This allows the networking and application to be logically decoupled so state changes in either the application itself or the network connecting application components do not need to be tracked individually by all portions of an application.
Link to section 'Service resources' of 'Services' Service resources
In Kubernetes, a Service is an abstraction which defines a logical set of Pods and a policy by which to access them (sometimes this pattern is called a micro-service). The set of Pods targeted by a Service is usually determined by a Pod selector, but can also be defined other ways.
Link to section 'Publishing Services (ServiceTypes)' of 'Services' Publishing Services (ServiceTypes)
For some parts of your application you may want to expose a Service onto an external IP address, that’s outside of your cluster.
Kubernetes ServiceTypes allow you to specify what kind of Service you want. The default is ClusterIP.
-
ClusterIP: Exposes the Service on a cluster-internal IP. Choosing this value makes the Service only reachable from within the cluster. This is the default ServiceType.
-
NodePort: Exposes the Service on each Node’s IP at a static port (the NodePort). A ClusterIP Service, to which the NodePort Service routes, is automatically created. You’ll be able to contact the NodePort Service, from outside the cluster, by requesting
<NodeIP>:<NodePort>. -
LoadBalancer: Exposes the Service externally using a cloud provider’s load balancer. NodePort and ClusterIP Services, to which the external load balancer routes, are automatically created.
You can see an example of exposing a workload using the LoadBalancer type on Anvil in the examples section.
-
ExternalName: Maps the Service to the contents of the externalName field (e.g. foo.bar.example.com), by returning a CNAME record with its value. No proxying of any kind is set up.
Link to section 'Ingress' of 'Services' Ingress
An Ingress is an API object that manages external access to the services in a cluster, typically HTTP/HTTPS. An Ingress is not a ServiceType, but rather brings external traffic into the cluster and then passes it to an Ingress Controller to be routed to the correct location. Ingress may provide load balancing, SSL termination and name-based virtual hosting. Traffic routing is controlled by rules defined on the Ingress resource.
You can see an example of a service being exposed with an Ingress on Anvil in the examples section.
Link to section 'Ingress Controller' of 'Services' Ingress Controller
In order for the Ingress resource to work, the cluster must have an ingress controller running to handle Ingress traffic.
Anvil provides the nginx ingress controller configured to facilitate SSL termination and automatic DNS name generation under the anvilcloud.rcac.purdue.edu subdomain.
Kubernetes provides additional information about Ingress Controllers in the official documentation.
Registry
Link to section 'Accessing the Anvil Composable Registry' of 'Registry' Accessing the Anvil Composable Registry
The Anvil registry uses Harbor, an open source registry to manage containers and artifacts, it can be accessed at the following URL: https://registry.anvil.rcac.purdue.edu
Link to section 'Using the Anvil Registry Docker Hub Cache' of 'Registry' Using the Anvil Registry Docker Hub Cache
It’s advised that you use the Docker Hub cache within Anvil to pull images for deployments. There’s a limit to how many images Docker hub will allow to be pulled in a 24 hour period which Anvil reaches depending on user activity. This means if you’re trying to deploy a workload, or have a currently deployed workload that needs migrated, restarted, or upgraded, there’s a chance it will fail.
To bypass this, use the Anvil cache url registry.anvil.rcac.purdue.edu/docker-hub-cache/ in your image names
For example if you’re wanting to pull a notebook from jupyterhub’s Docker Hub repo e.g jupyter/tensorflow-notebook:latest Pulling it from the Anvil cache would look like this registry.anvil.rcac.purdue.edu/docker-hub-cache/jupyter/tensorflow-notebook:latest
Link to section 'Using OIDC from the Docker or Helm CLI' of 'Registry' Using OIDC from the Docker or Helm CLI
After you have authenticated via OIDC and logged into the Harbor interface for the first time, you can use the Docker or Helm CLI to access Harbor.
The Docker and Helm CLIs cannot handle redirection for OIDC, so Harbor provides a CLI secret for use when logging in from Docker or Helm.
-
Log in to Harbor with an OIDC user account.
-
Click your username at the top of the screen and select User Profile.
-
Click the clipboard icon to copy the CLI secret associated with your account.
-
Optionally click the … icon in your user profile to display buttons for automatically generating or manually creating a new CLI secret.
-
A user can only have one CLI secret, so when a new secret is generated or create, the old one becomes invalid.
-
-
If you generated a new CLI secret, click the clipboard icon to copy it.
You can now use your CLI secret as the password when logging in to Harbor from the Docker or Helm CLI.
docker login -u <username> -p <cli secret> registry.anvil.rcac.purdue.edu
Link to section 'Creating a harbor Registry' of 'Registry' Creating a harbor Registry
-
Using a browser login to https://registry.anvil.rcac.purdue.edu with your ACCESS account username and password
-
From the main page click create project, this will act as your registry
-
Fill in a name and select whether you want the project to be public or private
-
Click ok to create and finalize
Link to section 'Tagging and Pushing Images to Your Harbor Registry' of 'Registry' Tagging and Pushing Images to Your Harbor Registry
-
Tag your image
$ docker tag my-image:tag registry.anvil.rcac.purdue.edu/project-registry/my-image:tag -
login to the Anvil registry via command line
$ docker login registry.anvil.rcac.purdue.edu -
Push your image to your project registry
$ docker push registry.anvil.rcac.purdue.edu/project-registry/my-image:tag
Link to section 'Creating a Robot Account for a Private Registry' of 'Registry' Creating a Robot Account for a Private Registry
A robot account and token can be used to authenticate to your registry in place of having to supply or store your private credentials on multi-tenant cloud environments like Rancher/Anvil.
-
Navigate to your project after logging into https://registry.anvil.rcac.purdue.edu
-
Navigate to the Robot Accounts tab and click New Robot Account
-
Fill out the form
-
Name your robot account
-
Select account expiration if any, select never to make permanent
-
Customize what permissions you wish the account to have
-
Click Add
-
-
Copy your information
-
Your robot’s account name will be something longer than what you specified, since this is a multi-tenant registry, harbor does this to avoid unrelated project owners creating a similarly named robot account
-
Export your token as JSON or copy it to a clipboard
-
Link to section 'Adding Your Private Registry to Rancher' of 'Registry' Adding Your Private Registry to Rancher
-
From your project navigate to
Resources > secrets -
Navigate to the Registry Credentials tab and click Add Registry
-
Fill out the form
-
Give a name to the Registry secret (this is an arbitrary name)
-
Select whether or not the registry will be available to all or a single namespace
-
Select address as “custom” and provide “registry.anvil.rcac.purdue.edu”
-
Enter your robot account’s long name eg.
robot$my-registry+robotas the Username -
Enter your robot account’s token as the password
-
Click Save
-
Link to section 'External Harbor Documentation' of 'Registry' External Harbor Documentation
-
You can learn more about the Harbor project on the official website: https://goharbor.io/
Storage
Storage is utilized to provide persistent data storage between container deployments and comes in a few options on Anvil.
The Ceph software is used to provide block, filesystem and object storage on the Anvil composable cluster. File storage provides an interface to access data in a file and folder hierarchy similar to NTFS or NFS. Block storage is a flexible type of storage that allows for snapshotting and is good for database workloads and generic container storage. Object storage is ideal for large unstructured data and features a REST based API providing an S3 compatible endpoint that can be utilized by the preexisting ecosystem of S3 client tools.
Link to section 'Provisioning Block and Filesystem Storage for use in deployments' of 'Storage' Provisioning Block and Filesystem Storage for use in deployments
Block and Filesystem storage can both be provisioned in a similar way.
-
While deploying a Workload, select the Volumes drop down and click Add Volume…
-
Select “Add a new persistent volume (claim)”
-
Set a unique volume name, i.e. “<username>-volume”
-
Select a Storage Class. The default storage class is Ceph for this Kubernetes cluster
-
Request an amount of storage in Gigabytes
-
Click Define
-
Provide a Mount Point for the persistent volume: i.e /data
Link to section 'Accessing object storage externally from local machine using Cyberduck' of 'Storage' Accessing object storage externally from local machine using Cyberduck
Cyberduck is a free server and cloud storage browser that can be used to access the public S3 endpoint provided by Anvil.
-
Launch Cyberduck
-
Click + Open Connection at the top of the UI.
-
Select S3 from the dropdown menu
-
Fill in Server, Access Key ID and Secret Access Key fields
-
Click Connect
-
You can now right click to bring up a menu of actions that can be performed against the storage endpoint
Further information about using Cyberduck can be found on the Cyberduck documentation site.
Examples
Examples of deploying a database with persistent storage and making it available on the network and deploying a webserver using a self-assigned URL.
Database
Link to section 'Deploy a postgis Database' of 'Database' Deploy a postgis Database
- Select your Project from the top right dropdown
- Using the far left menu, select Workload
- Click Create at the top right
- Select the appropriate Deployment Type for your use case, here we will select and use Deployment
- Fill out the form
- Select Namespace
- Give arbitrary Name
- Set Container Image to the postgis Docker image:
registry.anvil.rcac.purdue.edu/docker-hub-cache/postgis/postgis:latest - Set the postgres user password
- Select the Add Variable button under the Environment Variables section
- Fill in the fields Variable Name and Value so that we have a variable
POSTGRES_PASSWORD = <some password>
- Create a persistent volume for your database
- Select the Storage tab from within the current form on the left hand side
- Select Add Volume and choose Create Persistent Volume Claim
- Give arbitrary Name
- Select Single-Node Read/Write
- Select appropriate Storage Class from the dropdown and give Capacity in GiB e.g 5
- Provide the default postgres data directory as a Mount Point for the persistent volume
/var/lib/postgresql/data - Set Sub Path to
data
- Set resource CPU limitations
- Select Resources tab on the left within the current form
- Under the CPU Reservation box fill in
2000This ensures that Kubernetes will only schedule your workload to nodes that have that resource amount available, guaranteeing your application has 2CPU cores to utilize - Under the CPU Limit box also will in 2000 This ensures that your workload cannot exceed or utilize more than 2CPU cores. This helps resource quota management on the project level.
- Setup Pod Label
- Select Labels & Annotations on the left side of the current form
- Select Add Label under the Pod Labels section
- Give arbitrary unique key and value you can remember later when creating Services and other resources e.g Key:
my-dbValue:postgis
- Select Create to launch the postgis database
Wait a couple minutes while your persistent volume is created and the postgis container is deployed. The “does not have minimum availability” message is expected. But, waiting more than 5 minutes for your workload to deploy typically indicates a problem. You can check for errors by clicking your workload name (i.e. "mydb"), then the lower button on the right side of your deployed pod and selecting View Logs If all goes well, you will see an Active status for your deployment
Link to section 'Expose the Database to external clients' of 'Database' Expose the Database to external clients
Use a LoadBalancer service to automatically assign an IP address on a private Purdue network and open the postgres port (5432). A DNS name will automatically be configured for your service as <servicename>.<namespace>.anvilcloud.rcac.purdue.edu.
- Using the far left menu and navigate to Service Discovery > Services
- Select Create at the top right
- Select Load Balancer
- Fill out the form
- Ensure to select the namespace where you deployed the postgis database
- Give a Name to your Service. Remember that your final DNS name when the service creates will be in the format of
<servicename>.<namespace>.anvilcloud.rcac.purdue.edu - Fill in Listening Port and Target Port with the postgis default port 5432
- Select the Selectors tab within the current form
- Fill in Key and Value with the label values you created during the Setup Pod Label step from earlier e.g Key:
my-dbValue:postgis - IMPORTANT: The yellow bar will turn green if your key-value pair matches the pod label you set during the "Setup Pod Label" deployment step above. If you don't see a green bar with a matching Pod, your LoadBalancer will not work.
- Fill in Key and Value with the label values you created during the Setup Pod Label step from earlier e.g Key:
- Select the Labels & Annotations tab within the current form
- Select Add Annotation
- To deploy to a Purdue Private Address Range fill in Key:
metallb.universe.tf/address-poolValue:anvil-private-pool - To deploy to a Public Address Range fill in Key:
metallb.universe.tf/address-poolValue:anvil-public-pool
Kubernetes will now automatically assign you an IP address from the Anvil Cloud private IP pool. You can check the IP address by hovering over the “5432/tcp” link on the Service Discovery page or by viewing your service via kubectl on a terminal.
$ kubectl -n <namespace> get services
Verify your DNS record was created:
$ host <servicename>.<namespace>.anvilcloud.rcac.purdue.edu
Web Server
Link to section 'Nginx Deployment' of 'Web Server' Nginx Deployment
- Select your Project from the top right dropdown
- Using the far left menu so select Workload
- Click Create at the top right
- Select the appropriate Deployment Type for your use case, here we will select and use Deployment
- Fill out the form
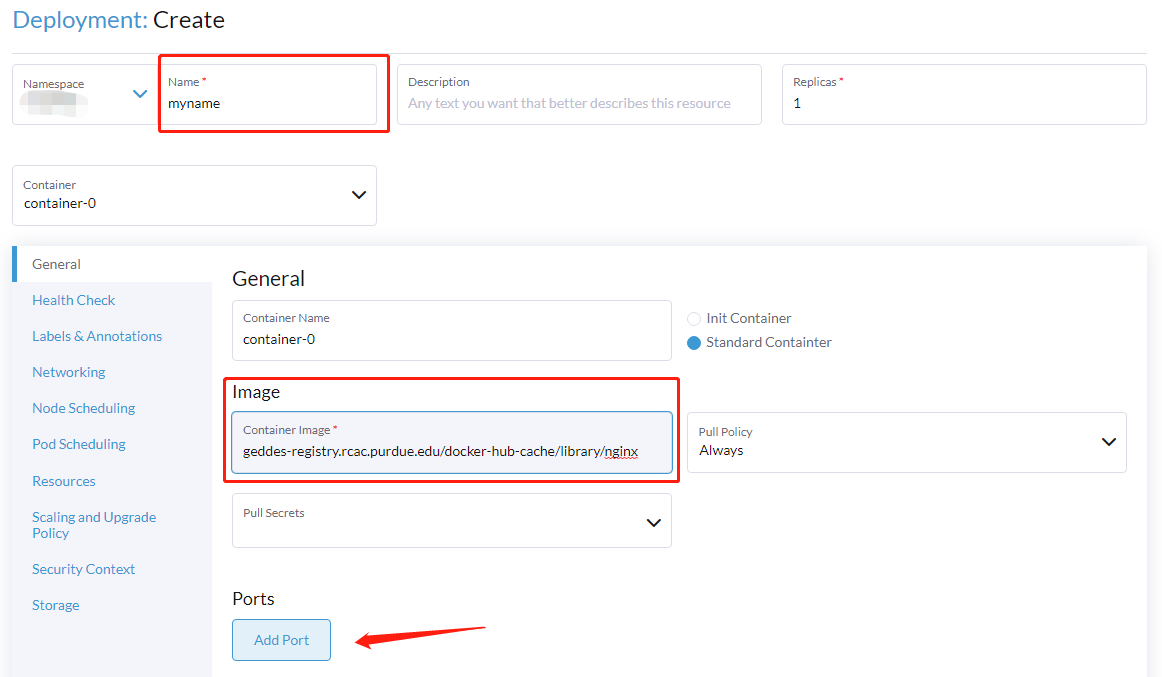
- Select Namespace
- Give arbitrary Name
- Set Container Image to the postgis Docker image:
registry.anvil.rcac.purdue.edu/docker-hub-cache/library/nginx - Create a Cluster IP service to point our external accessible ingress to later

- Click Add Port
- Click Service Type and with the drop select Cluster IP
- In the Private Container Port box type 80
- Setup Pod Label
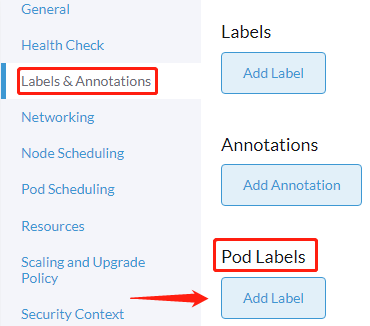

- Select Labels & Annotations on the left side of the current form
- Select Add Label under the Pod Labels section
- Give arbitrary unique key and value you can remember later when creating Services and other resources e.g Key:
my-webValue:nginx
- Click Create
Wait a couple minutes while your application is deployed. The “does not have minimum availability” message is expected. But, waiting more than 5 minutes for your workload to deploy typically indicates a problem. You can check for errors by clicking your workload name (i.e. "mywebserver"), then using the vertical ellipsis on the right hand side of your deployed pod and selecting View Logs
If all goes well, you will see an Active status for your deployment.
Link to section 'Expose the web server to external clients via an Ingress' of 'Web Server' Expose the web server to external clients via an Ingress
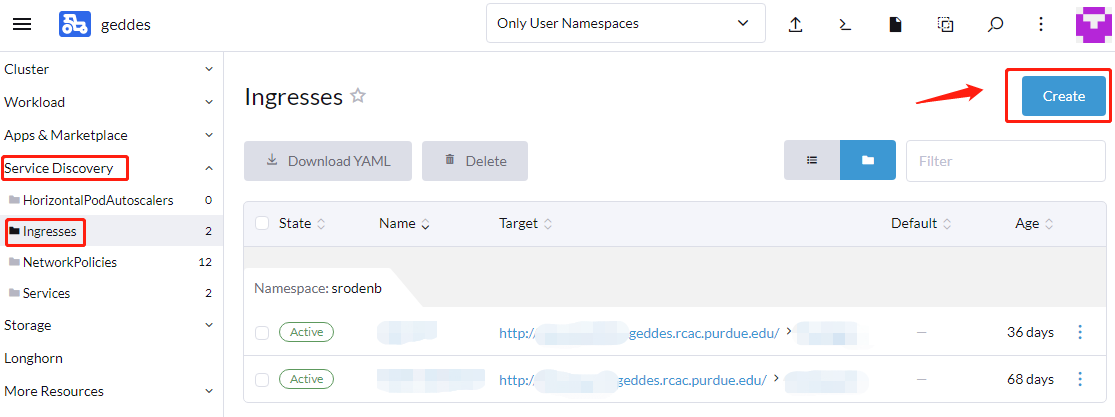
- Using the far left menu and navigate to Service Discovery > Ingresses and select Create at the top right
- Fill out the form

- Ensure to select the namespace where you deployed the nginx
- Give an arbitrary Name
- Under Request Host give the url you want for your web application e.g
my-nginx.anvilcloud.rcac.purdue.edu - Fill in the value Path > Prefix as
/ - Use the Target Service and ;Port dropdowns to select the service you created during the Nginx Deployment section
- Click Create
Help
Link to section 'Looking for help?' of 'Help' Looking for help?
You can find varieties of help topics from the new ACCESS Support Portal, including helpful user guides, communities to connect with other researchers, submit a ticket for expert help, and longer-term MATCH Research Support, etc.
Link to section 'Send a ticket to Anvil support team' of 'Help' Send a ticket to Anvil support team
Specifically, if you would like to ask questions to our Anvil support team, you can send a ticket to ACCESS Help Desk:
-
Login to submit a ticket:
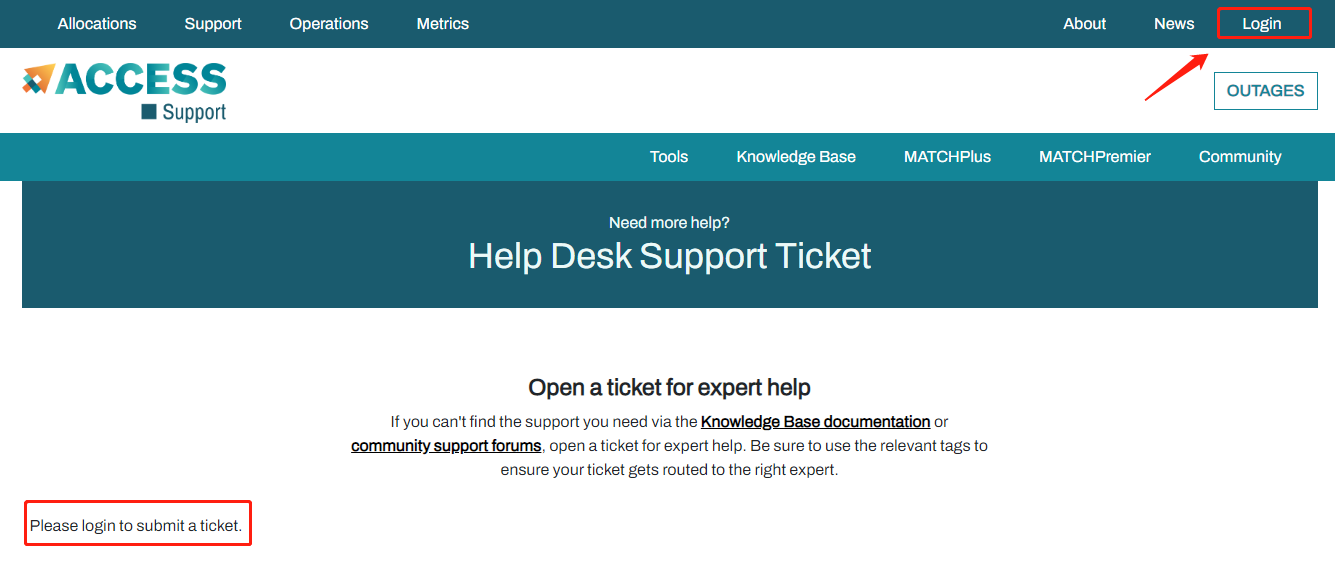
You should find the "login" button in the top right of the page. -
If you already have an XSEDE account, use your XSEDE portal username and password to login to ACCESS site. Make sure to choose
ACCESS-CIas your identity provider:
Follow "Log on with CILogon". 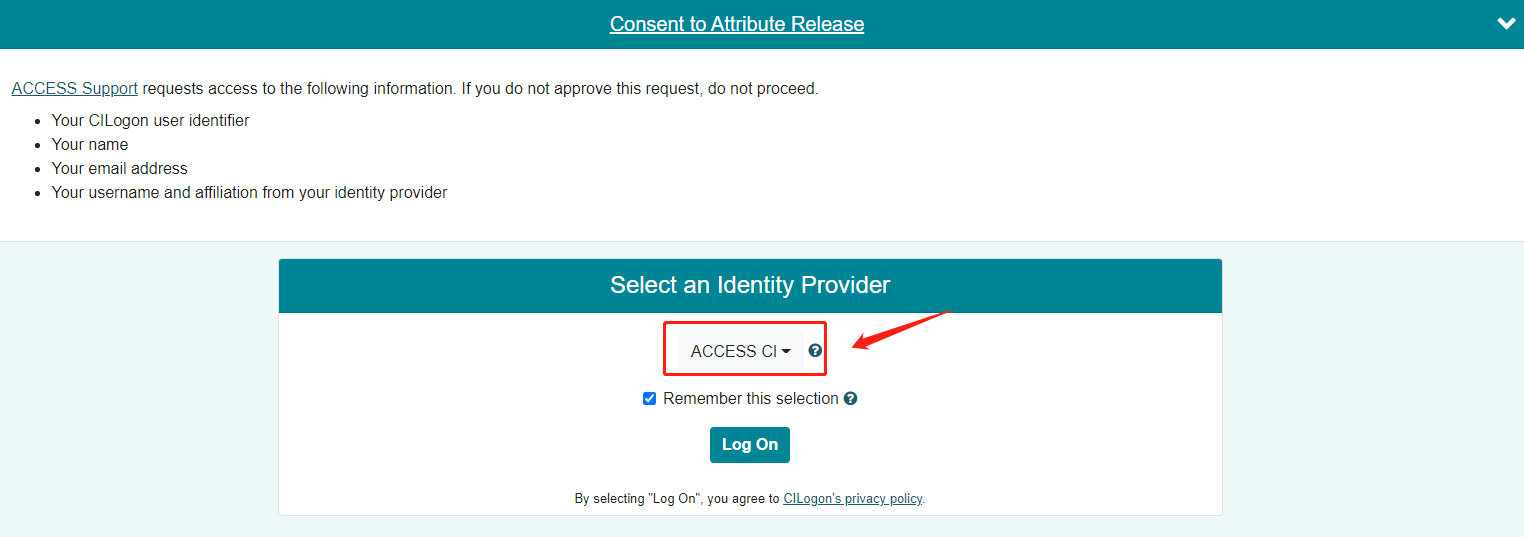
Make sure to choose ACCESS-CIas your identity provider.
If you already have an XSEDE account, use your XSEDE portal username and password. -
ACCESS login requires Duo service for additional authentication. If you already set up XSEDE Duo service, you will continue to receive Duo pushes from ACCESS. If you have not set up Duo service, please refer to the Manage Multi-Factor Authentication page for account setup instructions.
-
Then, select
Anvilfrom the resource list to send ticket to Anvil support team:Please follow the template in
Problem descriptionsection when submitting a ticket to Anvil support: