
Menu Launcher
Windows VMs can be easily launched through the login/thinlinc">Thinlinc remote desktop environment.
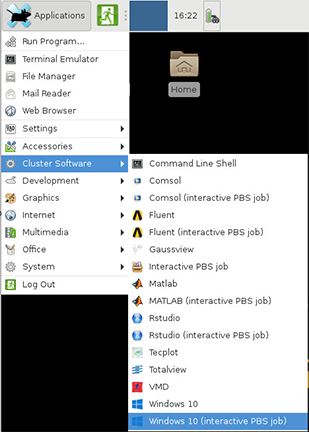
- Log in via login/thinlinc">Thinlinc.
- Click on Applications menu in the upper left corner.
- Look under the Cluster Software menu.
- The "Windows 10" launcher will launch a VM directly on the front-end.
- Follow the dialogs to set up your VM.
The dialog menus will walk you through setting up and loading your VM.
- You can choose to create a new image or load a saved image.
- New VMs should be saved on Scratch or Research Data Depot as they are too large for Home Directories.
- If you are using scratch, remember that scratch spaces are temporary, and be sure to safely back up your disk image somewhere permanent, such as Research Data Depot or Fortress.
You will also be prompted to select a storage space to mount on your image (Home, Scratch, or Data Depot). You can only choose one to be mounted. It will appear on a shortcut on the desktop once the VM loads.
Link to section 'Notes' of 'Menu Launcher' Notes
Using the menu launcher will launch automatically select reasonable CPU and memory values. If you wish to choose other options or work Windows VMs into scripted workflows see the section on using the command line.