
Windows
Windows virtual machines (VMs) are supported as batch jobs on HPC systems. This section illustrates how to submit a job and run a Windows instance in order to run Windows applications on the high-performance computing systems.
The following images are pre-configured and made available by staff:
- Windows 2016 Server Basic (minimal software pre-loaded)
- Windows 2016 Server GIS (GIS Software Stack pre-loaded)
The Windows VMs can be launched in two fashions:
- Menu Launcher - Point and click to start
- Command Line - Advanced and customized usage
Click each of the above links for detailed instructions on using them.
Link to section 'Software Provided in Pre-configured Virtual Machines' of 'Windows' Software Provided in Pre-configured Virtual Machines
The Windows 2016 Base server image available on Hammer has the following software packages preloaded:
- Anaconda Python 2 and Python 3
- JMP 13
- Matlab R2017b
- Microsoft Office 2016
- Notepad++
- NVivo 12
- Rstudio
- Stata SE 15
- VLC Media Player
Command line
If you wish to work with Windows VMs on the command line or work into scripted workflows you can interact directly with the Windows system:
Copy a Windows 2016 Server VM image to your storage. Scratch or Research Data Depot are good locations to save a VM image. If you are using scratch, remember that scratch spaces are temporary, and be sure to safely back up your disk image somewhere permanent, such as Research Data Depot or Fortress. To copy a basic image:
$ cp /apps/external/apps/windows/images/latest.qcow2 $RCAC_SCRATCH/windows.qcow2
To copy a GIS image:
$ cp /depot/itap/windows/gis/2k16.qcow2 $RCAC_SCRATCH/windows.qcow2
To launch a virtual machine in a batch job, use the "windows" script, specifying the path to your Windows virtual machine image. With no other command-line arguments, the windows script will autodetect a number cores and memory for the Windows VM. A Windows network connection will be made to your home directory. To launch:
$ windows -i $RCAC_SCRATCH/windows.qcow2
Link to section 'Command line options:' of 'Command line' Command line options:
-i <path to qcow image file> (For example, $RCAC_SCRATCH/windows-2k16.qcow2)
-m <RAM>G (For example, 32G)
-c <cores> (For example, 20)
-s <smbpath> (UNIX Path to map as a drive, for example, $RCAC_SCRATCH)
-b  (If present, launches VM in background. Use VNC to connect to Windows.)
To launch a virtual machine with 32GB of RAM, 20 cores, and a network mapping to your home directory:
$ windows -i /path/to/image.qcow2 -m 32G -c 20 -s $HOME
To launch a virtual machine with 16GB of RAM, 10 cores, and a network mapping to your Data Depot space:
$ windows -i /path/to/image.qcow2 -m 16G -c 10 -s /depot/mylab
The Windows 2016 server desktop will open, and automatically log in as an administrator, so that you can install any software into the Windows virtual machine that your research requires. Changes to the image will be stored in the file specified with the -i option.
Menu Launcher
Windows VMs can be easily launched through the login/thinlinc">Thinlinc remote desktop environment.
- Log in via login/thinlinc">Thinlinc.
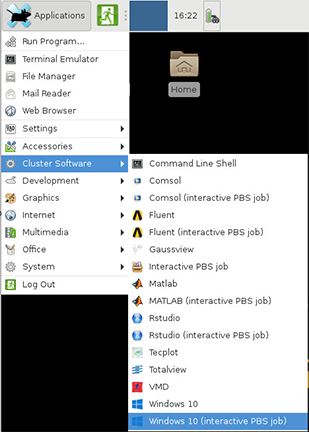
- Click on Applications menu in the upper left corner.
- Look under the Cluster Software menu.
- The "Windows 10" launcher will launch a VM directly on the front-end.
- Follow the dialogs to set up your VM.
The dialog menus will walk you through setting up and loading your VM.
- You can choose to create a new image or load a saved image.
- New VMs should be saved on Scratch or Research Data Depot as they are too large for Home Directories.
- If you are using scratch, remember that scratch spaces are temporary, and be sure to safely back up your disk image somewhere permanent, such as Research Data Depot or Fortress.
You will also be prompted to select a storage space to mount on your image (Home, Scratch, or Data Depot). You can only choose one to be mounted. It will appear on a shortcut on the desktop once the VM loads.
Link to section 'Notes' of 'Menu Launcher' Notes
Using the menu launcher will launch automatically select reasonable CPU and memory values. If you wish to choose other options or work Windows VMs into scripted workflows see the section on using the command line.