
Geddes User Guide
New usage patterns have emerged in research computing that depend on the availability of custom services such as notebooks, databases, elastic software stacks, and science gateways alongside traditional batch HPC. The Geddes Composable Platform is a Kubernetes based private cloud managed with Rancher that provides a platform for creating composable infrastructure on demand. This cloud-style flexibility provides researchers the ability to self-deploy and manage persistent services to complement HPC workflows and run container-based data analysis tools and applications. Funded by the National Science Foundation under grant OAC-2018926, Geddes consists of Dell compute nodes with two 64-core AMD Epyc 'Rome' processors (128 cores per node).
Link to section 'Overview of Geddes' of 'Overview of Geddes' Overview of Geddes
Geddes is a Community Composable Platform optimized for composable, cloud-like workflows that are complementary to the batch applications run on Community Clusters. Funded by the National Science Foundation under grant OAC-2018926, Geddes consists of Dell Compute nodes with two 64-core AMD Epyc 'Rome' processors (128 cores per node).
To purchase access to Geddes today, go to the Cluster Access Purchase page. Please subscribe to our Community Cluster Program Mailing List to stay informed on the latest purchasing developments or contact us if you have any questions.
Link to section 'Geddes Namesake' of 'Overview of Geddes' Geddes Namesake
Geddes is named in honor of Lanelle Geddes, Professor of Nursing. More information about her life and impact on Purdue is available in a Biography of Geddes.
Link to section 'Geddes Specifications' of 'Overview of Geddes' Geddes Specifications
All Geddes compute nodes have 128 processor cores and 100 Gbps Infiniband interconnects.
| Worker Type | Number of Nodes | Processors per Node | Cores per Node | Storage per Node | Memory per Node | |
|---|---|---|---|---|---|---|
| A | 8 | Two AMD Epyc CPUs @ 2.0GHz | 128 | 24 TB SATA SSD | 1 TB | |
| B | 16 | Two AMD Epyc CPUs @ 2.0GHz | 128 | 24 TB SATA SSD | 512 GB |
| Number of Nodes | Processors per Node | Cores per Node | GPUs per Node | Storage per Node | Memory per Node | |
|---|---|---|---|---|---|---|
| 4 | Two AMD Epyc CPUs @ 2.0GHz | 128 | 2 Nvidia A100 | 24 TB SATA SSD | 512 GB |
| Number of Nodes | Processors per Node | Cores per Node | Storage per Node | Memory per Node | |
|---|---|---|---|---|---|
| 8 | Two Intel Xeon Gold 6126 | 24 | 24 TB NVMe | 192 GB |
Geddes nodes run Rocky 8 and use Rancher and Kubernetes as the resource manager for resource and workload orchestration.
Biography of Lanelle Geddes

LaNelle E. (Nerger) Geddes was born on September 15, 1935 in Houston, Texas to Carl O. and Evelyn Nerger. She received a B.S. in Nursing from the University of Houston in 1957, and earned a PhD in Biophysics there in 1970. After receiving her PhD, Geddes taught at the Texas Women's University and in the Department of Physiology at Baylor College of Medicine in Houston.
Geddes joined the faculty at Purdue in 1975 where her husband, Leslie A. Geddes, was the head of the Department of Biomedical Engineering. Lanelle started in the School of Nursing as the Assistant Head of the Department. In 1980, she was promoted to the Head of the Department and served as Head until 1991. While at Purdue, Geddes challenged traditional perceptions of nurses as merely doctors' assistants who were wrongly believed to have no expertise or skill for diagnosis and treatment. In addition, Geddes was also instrumental in instituting a four-year nursing baccalaureate program and starting the Freshman Scholars, a program that provided scholarships to outstanding incoming freshman.
Geddes' research was focused on cardiovascular physiology. Her teaching emphasized the impact of human pathophysiologic alterations and their influence on nursing and medical care. Her inclusion of pathophysiology encouraged her students to make better clinical judgments and to be stronger patient advocates. From 1996-2003, Geddes also taught pathophysiology to IU School of Medicine students at Purdue University. Geddes retired as a professor emeritus in 2003.
Geddes' research and teaching had far-reaching impacts, and she received many awards over the course of her career. She was an AMOCO Foundation (Murphy) Award winner, a fellow of the University Teaching Academy, and a Helen B Schleman Gold Medallion Awardee. She also received the Lafayette YWCA Salute to Women Award and the Westminster Village Lifetime Service Award for her work within the community. Geddes passed away on January 25, 2016.
Link to section 'Citations' of 'Biography of Lanelle Geddes' Citations
Archives and Special Collections. (2021, May 19). Geddes, Lanelle E., September 15, 1935 - January 25, 2016. Purdue University. Retrieved from: https://archives.lib.purdue.edu/agents/people/802
https://earchives.lib.purdue.edu/digital/collection/oralhist/id/31
Concepts
Link to section 'Containers & Images' of 'Concepts' Containers & Images
Image - An image is a simple text file that defines the source code of an application you want to run as well as the libraries, dependencies, and tools required for the successful execution of the application. Images are immutable meaning they do not hold state or application data. Images represent a software environment at a specific point of time and provide an easy way to share applications across various environments. Images can be built from scratch or downloaded from various repositories on the internet, additionally many software vendors are now providing containers alongside traditional installation packages like Windows .exe and Linux rpm/deb.
Container - A container is the run-time environment constructed from an image when it is executed or run in a container runtime. Containers allow the user to attach various resources such as network and volumes in order to move and store data. Containers are similar to virtual machines in that they can be attached to when a process is running and have arbitrary commands executed that affect the running instance. However, unlike virtual machines, containers are more lightweight and portable allowing for easy sharing and collaboration as they run identically in all environments.
Tags - Tags are a way of organizing similar image files together for ease of use. You might see several versions of an image represented using various tags. For example, we might be building a new container to serve web pages using our favorite web server: nginx. If we search for the nginx container on Docker Hub image repository we see many options or tags are available for the official nginx container.
The most common you will see are typically :latest and :number where
number refers to the most recent few versions of the software releases. In
this example we can see several tags refer to the same image:
1.21.1, mainline, 1, 1.21, and latest all reference the same image while the
1.20.1, stable, 1.20 tags all reference a common but different image.
In this case we likely want the nginx image with either the latest or 1.21.1
tag represented as nginx:latest and nginx:1.21.1 respectively.
Container Security - Containers enable fast developer velocity and ease compatibility through great portability, but the speed and ease of use come at some costs. In particular it is important that folks utilizing container driver development practices have a well established plan on how to approach container and environment security. Best Practices
Container Registries - Container registries act as large repositories of images, containers, tools and surrounding software to enable easy use of pre-made containers software bundles. Container registries can be public or private and several can be used together for projects. Docker Hub is one of the largest public repositories available, and you will find many official software images present on it. You need a user account to avoid being rate limited by Docker Hub. A private container registry based on Harbor that is available to use. TODO: link to harbor instructions
Docker Hub - Docker Hub is one of the largest container image registries that exists and is well known and widely used in the container community, it serves as an official location of many popular software container images. Container image repositories serve as a way to facilitate sharing of pre-made container images that are “ready for use.” Be careful to always pay attention to who is publishing particular images and verify that you are utilizing containers built only from reliable sources.
Harbor - Harbor is an open source registry for Kubernetes artifacts, it provides private image storage and enforces container security by vulnerability scanning as well as providing RBAC or role based access control to assist with user permissions. Harbor is a registry similar to Docker Hub, however it gives users the ability to create private repositories. You can use this to store your private images as well as keeping copies of common resources like base OS images from Docker Hub and ensure your containers are reasonably secure from common known vulnerabilities.
Link to section 'Container Runtime Concepts' of 'Concepts' Container Runtime Concepts
Docker Desktop - Docker Desktop is an application for your Mac / Windows machine that will allow you to build and run containers on your local computer. Docker desktop serves as a container environment and enables much of the functionality of containers on whatever machine you are currently using. This allows for great flexibility, you can develop and test containers directly on your laptop and deploy them directly with little to no modifications.
Volumes - Volumes provide us with a method to create persistent data that is generated and consumed by one or more containers. For docker this might be a folder on your laptop while on a large Kubernetes cluster this might be many SSD drives and spinning disk trays. Any data that is collected and manipulated by a container that we want to keep between container restarts needs to be written to a volume in order to remain around and be available for later use.
Link to section 'Container Orchestration Concepts' of 'Concepts' Container Orchestration Concepts
Container Orchestration - Container orchestration broadly means the automation of much of the lifecycle management procedures surrounding the usage of containers. Specifically it refers to the software being used to manage those procedures. As containers have seen mass adoption and development in the last decade, they are now being used to power massive environments and several options have emerged to manage the lifecycle of containers. One of the industry leading options is Kubernetes, a software project that has descended from a container orchestrator at Google that was open sourced in 2015.
Kubernetes (K8s) - Kubernetes (often abbreviated as "K8s") is a platform providing container orchestration functionality. It was open sourced by Google around a decade ago and has seen widespread adoption and development in the ensuing years. K8s is the software that provides the core functionality of the Anvil Composable Subsystem by managing the complete lifecycle of containers. Additionally it provides the following functions: service discovery and load balancing, storage orchestration, secret and configuration management. The Kubernetes cluster can be accessed via the Rancher UI or the kubectl command line tool.
Rancher - Rancher is a “is a complete software stack for teams adopting containers.” as described by its website. It can be thought of as a wrapper around Kubernetes, providing an additional set of tools to help operate the K8 cluster efficiently and additional functionality that does not exist in Kubernetes itself. Two examples of the added functionality is the Rancher UI that provides an easy to use GUI interface in a browser and Rancher projects, a concept that allows for multi-tenancy within the cluster. Users can interact directly with Rancher using either the Rancher UI or Rancher CLI to deploy and manage workloads on the Anvil Composable Subsystem.
Rancher UI - The Rancher UI is a web based graphical interface to use the Anvil Composable Subsystem from anywhere.
Rancher CLI - The Rancher CLI provides a convenient text based toolkit to interact with the cluster. The binary can be downloaded from the link on the right hand side of the footer in the Rancher UI. After you download the Rancher CLI, you need to make a few configurations Rancher CLI requires:
-
Your Rancher Server URL, which is used to connect to Rancher Server.
-
An API Bearer Token, which is used to authenticate with Rancher. see Creating an API Key.
After setting up the Rancher CLI you can issue rancher --help to view the full
range of options available.
Kubectl - Kubectl is a text based tool for working with the underlying Anvil Kubernetes cluster. In order to take advantage of kubectl you will either need to set up a Kubeconfig File or use the built in kubectl shell in the Rancher UI. You can learn more about kubectl and how to download the kubectl file here.
Storage - Storage is utilized to provide persistent data storage between container deployments. The Ceph filesystem provides access to Block, Object and shared file systems. File storage provides an interface to access data in a file and folder hierarchy similar to NTFS or NFS. Block storage is a flexible type of storage that allows for snapshotting and is good for database workloads and generic container storage. Object storage is also provided by Ceph, this features a REST based bucket file system providing S3 and Swift compatibility.
Access
Access to the Geddes Composable Platform is handled via the RCAC web portal. When access is purchased, a Rancher project with your research group's name will be created and managers will be able to click to give users access, similar to how access is managed for community clusters. Links to access Geddes via the Rancher UI and the command line (kubectl) are below.
Rancher
Link to section 'Logging in to Rancher' of 'Rancher' Logging in to Rancher
To access the Geddes user interface, you must be on a Purdue campus network or connected through VPN.
Once connected to a Purdue network, the Geddes Rancher interface can be accessed via a web browser at https://geddes.rcac.purdue.edu. Log in by choosing "log in with shibboleth" and using Purdue Login at the login screen.
Kubectl
Link to section 'Configuring local kubectl access with Kubeconfig file' of 'Kubectl' Configuring local kubectl access with Kubeconfig file
kubectl can be installed and ran on your local machine to perform various actions against the Kubernetes cluster using the API server.
These tools authenticate to Kubernetes using information stored in a kubeconfig file.
To begin accessing Geddes via Kubectl you must first gather your rancher generated Kubeconfig file and set up your local .kube directory
- From anywhere in the Rancher UI navigate to the top right and click on either Download KubeConfig or Copy KubeConfig to Clipboard
- Create a directory in your home directory (
$HOME) called.kube - Change into the newly created directory and copy the file or contents of KubeConfig from earlier into a file called config
- Create a directory in your home directory (
- Test connections to the Geddes cluster
- To look at the current config settings we just set use
$ kubectl config view - Now let’s list the available resource types present in the API with
$ kubectl api-resources
- To look at the current config settings we just set use
To see more options of kubectl, review the Kubernetes' kubectl cheatsheet.
Link to section 'Accessing kubectl in the rancher web UI' of 'Kubectl' Accessing kubectl in the rancher web UI
You can launch a kubectl command window from within the Rancher UI by selecting
the Kubectl Shell button at the top right or using the hotkey (CTL + `).
This will deploy a container in the cluster with kubectl installed and give you
an interactive window to use the command from.
Registry
Link to section 'Accessing the Geddes Harbor Registry' of 'Registry' Accessing the Geddes Harbor Registry
The Geddes Harbor registry is only accessible via campus networks and the Purdue VPN. Use a web browser navigate to geddes-registry.rcac.purdue.edu and log in with your Purdue career account username and password. (Do not add ",push" to your password nor use the Purdue Duo client.)
Link to section 'Using the Geddes Registry Docker Hub Cache' of 'Registry' Using the Geddes Registry Docker Hub Cache
It's advised that you use the Docker Hub cache within Geddes to pull images for your deployments. There's a limit to how many images Docker hub will allow to be pulled within a 24 hour period which Geddes does reach depending on user activity. This means if you're trying to deploy a workload without the cache, or have a currently deployed workload that needs migrated, restarted, or upgraded without the cache, there's a chance it will fail.
To bypass this, use the geddes cache url geddes-registry.rcac.purdue.edu/docker-hub-cache/in your image names.
For example if you're wanting to pull a notebook from jupyterhub's Docker Hub repo e.g jupyter/tensorflow-notebook:latest Pulling it from the Geddes cache would look like this geddes-registry.rcac.purdue.edu/docker-hub-cache/jupyter/tensorflow-notebook:latest.
If the image you are using is an "Official" docker image (like httpd or mongo) the URL will use the "library" in the path instead of the Docker repository name: geddes-registry.rcac.purdue.edu/docker-hub-cache/library/mongo:latest.
Link to section 'Creating a registry' of 'Registry' Creating a registry
- Using a browser login to geddes-registry.rcac.purdue.edu with your Purdue account username and password
- From the main page click create project, this will act as your registry
- Fill in a name and select whether you want the project to be public or private
- Click ok to create and finalize
Link to section 'Tagging and Pushing Images to Your Harbor Registry' of 'Registry' Tagging and Pushing Images to Your Harbor Registry
- Tag your image
$ docker tag my-image:tag geddes-registry.rcac.purdue.edu/project-registry/my-image:tag - login to the Geddes registry via command line
$ docker login geddes-registry.rcac.purdue.edu - Push your image to your project registry
$ docker push geddes-registry.rcac.purdue.edu/project-registry/my-image:tag
Link to section 'Creating a Robot Account for a Private Registry' of 'Registry' Creating a Robot Account for a Private Registry
A robot account and token can be used to authenticate to your registry in place of having to supply or store your private credentials on multi-tenant cloud environments like rancher/Geddes.
- Navigate to your project by logging into geddes-registry.rcac.purdue.edu
- Navigate to the Robot Accounts tab and click New Robot Account
- Fill out the form
- Name your robot account
- Select account expiration if any, select never to make permanent
- Customize what permissions you wish the account to have
- Click Add
- Copy your information
- Your robot’s account name will be something longer than what you specified, since this is a multi-tenant registry, harbor does this to avoid unrelated project owners creating a similarly named robot account
- Export your token as JSON or copy it to a clipboard
NOTE: Harbor does not store account tokens, once you exit this page your token will be unrecoverable
Link to section 'Adding Your Private Registry to Rancher' of 'Registry' Adding Your Private Registry to Rancher
- Select your Project from the top right dropdown
- Using the far left dropdown menu navigate to Storage > Secrets
- Click Create
- Click Registry
- Fill out the form
- Select namespace that will have access to the registry
- Give a name to the Registry secret (this is an arbitrary name)
- Under the Data tab ensure custom is selected
- Enter "geddes-registry.rcac.purdue.edu" under Registry Domain Name
- Enter your robot account's long name eg. robot$my-registry+robot as the Username
- Enter your robot account's token as the password
- Click Create
Link to section 'External Harbor Documentation' of 'Registry' External Harbor Documentation
Workloads
Link to section 'Deploy a Workload' of 'Workloads' Deploy a Workload
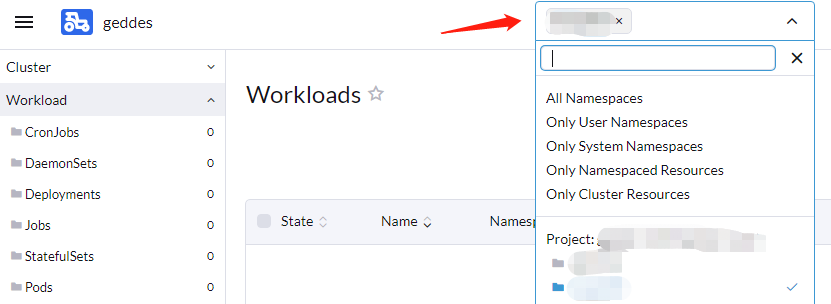
- Using the top right dropdown select the Project or Namespace you wish to deploy to.
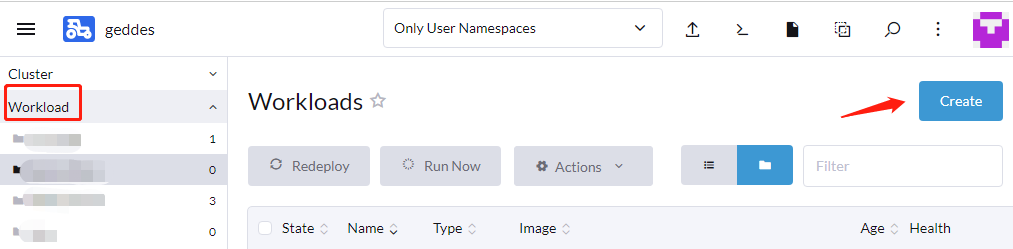
- Using the far left menu navigate to Workload
- Click Create at the top right
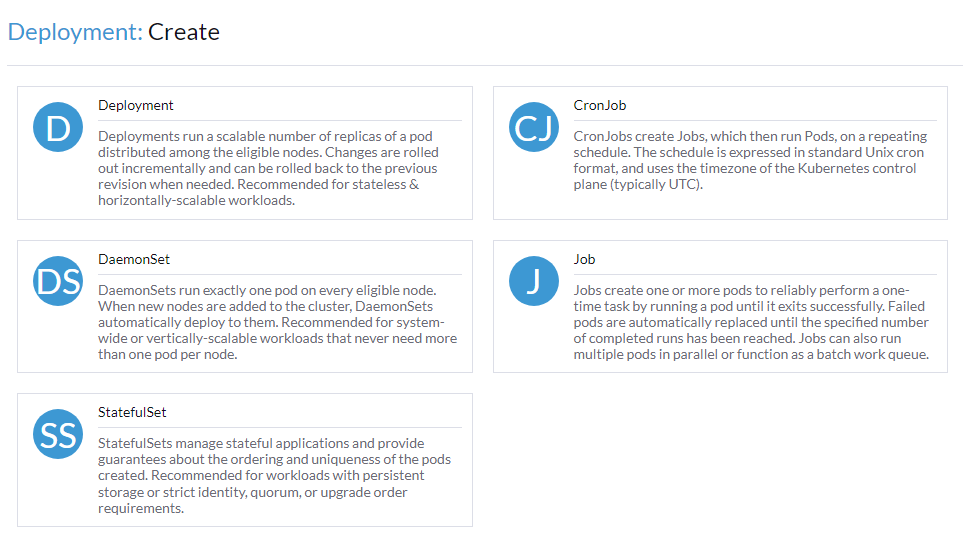
- Select the appropriate Deployment Type for your use case
- Select Namespace if not already done from step 1
- Set a unique Name for your deployment, i.e. “myapp"
- Set Container Image. Ensure you're using the Geddes registry for personal images or the Geddes registry docker-hub cache when
pulling public docker-hub specific images. e.g:
geddes-registry.rcac.purdue.edu/my-registry/myimage:tagorgeddes- registry.rcac.purdue.edu/docker-hub-cache/library/image:tag - Click Create
Services
A Service is an abstract way to expose an application running on Pods as a network service. This allows the networking and application to be logically decoupled so state changes in either the application itself or the network connecting application components do not need to be tracked individually by all portions of an application.
Link to section 'Service resources' of 'Services' Service resources
In Kubernetes, a Service is an abstraction which defines a logical set of Pods and a policy by which to access them (sometimes this pattern is called a micro-service). The set of Pods targeted by a Service is usually determined by a Pod selector, but can also be defined other ways.
Link to section 'Publishing Services (ServiceTypes)' of 'Services' Publishing Services (ServiceTypes)
For some parts of your deployment you may need to expose an application externally from the cluster using Services
Kubernetes ServiceTypes allow you to specify what kind of Service you want. The default is ClusterIP.
-
ClusterIP: Exposes the Service on a cluster-internal IP. Choosing this value makes the Service only reachable from within the cluster. This is the default ServiceType.
-
NodePort: Exposes the Service on each Node’s IP at a static port (the NodePort). A ClusterIP Service, to which the NodePort Service routes, is automatically created. You’ll be able to contact the NodePort Service, from outside the cluster, by requesting
<NodeIP>:<NodePort>. -
LoadBalancer: Exposes the Service externally using a cloud provider’s load balancer. NodePort and ClusterIP Services, to which the external load balancer routes, are automatically created.
You can see an example of exposing a workload using the LoadBalancer type in the examples section.
Link to section 'Ingress' of 'Services' Ingress
An Ingress is an API object that manages external access to the services in a cluster, typically HTTP/HTTPS. An Ingress is not a ServiceType, but rather brings external traffic into the cluster and then passes it to an Ingress Controller to be routed to the correct location. Ingress may provide load balancing, SSL termination and name-based virtual hosting. Traffic routing is controlled by rules defined on the Ingress resource.
Link to section 'Ingress Controller' of 'Services' Ingress Controller
Geddes provides the nginx ingress controller configured to facilitate SSL termination and automatic DNS name generation under the geddes.rcac.purdue.edu subdomain.
In the Examples section, there are detailed instructions about how to expose a service with an Ingress. Here are the outline of major steps:
- Create a new Deployment under Workload
- Set Container Image to the Docker image you want to use
- Create a Cluster IP service to point our external accessible ingress for later
- Setup Pod Label
- Create a new Ingress page
- Give the URL you would like to use for your web application under Request Host
- Put the Cluster IP you created in Step 1 to Target Service and Port
- The default Ingress is private, which is only accessible within Purdue network. To make a public one, add an Annotation:
kubernetes.io/ingress.class: "public"
Kubernetes provides additional information about Ingress Controllers in the official documentation.
Storage
Geddes has a software defined storage system that provides user-provisioned persistent data storage for container deployments.
Ceph is used to provide block, filesystem and object storage on the Geddes Composable Platform. File storage provides an interface to access data in a file and folder hierarchy similar to Data Depot. Block storage is a flexible type of storage that is good for database workloads and generic container storage. Object storage is ideal for large unstructured data and features a REST based API providing an S3 compatible endpoint that can be utilized by the preexisting ecosystem of S3 client tools.
Link to section 'Storage Classes' of 'Storage' Storage Classes
Geddes provides four different storage classes based on access characteristics and performance needs a workload. Performance classes should be used for workloads with high I/O requirements (databases, AI/ML).
geddes-standard-singlenode- Block storage based on SSDs that can be accessed by a single node (Single-Node Read/Write).geddes-standard-multinode- File storage based on SSDs that can be accessed by multiple nodes (Many-Node Read/Write or Many-Node Read-Only)geddes-performance-singlenode- Block storage based on NVMe drives that can be accessed by a single node (Single-Node Read/Write).geddes-performance-multinode- File storage based on NVMe drives that can be accessed by multiple nodes (Many-Node Read/Write or Many-Node Read-Only)
Link to section 'Block and Filesystem Storage Provisioning in Deployments' of 'Storage' Block and Filesystem Storage Provisioning in Deployments
Block and Filesystem storage can both be provisioned in a similar way.
-
While deploying a Workload, click the Storage tab and click Add Volume…
-
Select “Create Persistent Volume Claim”
-
Set a unique Persistent Volume Claim Name, i.e. “<username>-volume”
-
Select a Storage Class. The default storage class is "geddes-standard-singlenode".
-
Select an Access Mode. The "geddes-standard-singlenode" class only supports Single-Node Read/Write.
-
Request an amount of storage in Gigabytes
-
Provide a Mount Point for the persistent volume: i.e /data
Link to section 'Backup Strategies' of 'Storage' Backup Strategies
Developers using the Geddes platform should have a backup strategy in place to ensure that your data is safe and can be recovered in case of a disaster. Below is a list of methods that can be used to backup data on Persistent Volume Claims.
Link to section 'Copying Files to and from a Container' of 'Storage' Copying Files to and from a Container
The kubectl cp command can be used to copy files into or out of a running container.
# get pod id you want to copy to/form
kubectl -n <namespace> get pods

# copy a file from local filesystem to remote pod
kubectl cp /tmp/myfile <namespace>/<pod>:/tmp/myfile

# copy a file from remote pod to local filesystem
kubectl cp <namespace>/<pod>:/tmp/myfile /tmp/myfile
This method requires the tar executable to be present in your container, which is usually the case with Linux image. More info can be found in the kubectl docs.
Link to section 'Copying Directories from a Container' of 'Storage' Copying Directories from a Container
The kubectl cp command can also be used to recusively copy entire directories to local storage or places like Data Depot.
# get pod id you want to copy to/form
kubectl -n <namespace> get pods

# copy a directory from remote pod to local filesystem
kubectl cp <namespace>/<pod>:/pvcdirectory /localstorage
Link to section 'Backing up a Database from a Container' of 'Storage' Backing up a Database from a Container
The kubectl exec command can be used to create a backup or dump of a database and save it to a local directory. For instance, to backup a MySQL database with kubectl, run the following commands from a local workstation or cluster frontend.
# get pod id of your database pod
kubectl -n <namespace> get pods

# run mysqldump in the remote pod and redirect the output to local storage
kubectl -n <namespace> exec <pod> -- mysqldump --user=<username> --password=<password> my_database > my_database_dump.sql
Link to section 'Backups using common Linux tools' of 'Storage' Backups using common Linux tools
If your container has the OpenSSH client or rsync packages installed, one can use the kubectl exec command to copy or synchonize another storage location.
# get pod id of your pod
kubectl -n <namespace> get pods

# run scp to transfer data from the pod to a remote storage location
kubectl -n <namespace> <pod> exec -- scp -r /data username@negishi.rcac.purdue.edu:~/backup
Link to section 'Automating Backups' of 'Storage' Automating Backups
Kubernetes CronJob resources can be used with the commands above to create an automated backup solution. For more information, refer to the Kubernetes documentation.
Link to section 'Object Storage' of 'Storage' Object Storage
Geddes provides S3 compatible object storage from the endpoint https://s3-prod.geddes.rcac.purdue.edu.
S3 access can be requested by contacting support. Access keys will be provided via Filelocker.
Link to section 'Accessing Object Storage' of 'Storage' Accessing Object Storage
The S3 endpoint provided by Geddes can be accessed in multiple ways. Two popular options for interacting with S3 storage via the command line and GUI are listed below.
S3cmd is a free command line tool for managing data in S3 compatible storage resources that works on Linux and Mac.
- Download: https://s3tools.org/download
- How-To Documentation: https://s3tools.org/s3cmd-howto
Cyberduck is a free server and cloud storage browser that can be used on Windows and Mac.
-
Launch Cyberduck
-
Click + Open Connection at the top of the UI.
-
Select S3 from the dropdown menu
-
Fill in Server, Access Key ID and Secret Access Key fields
-
Click Connect
-
You can now right click to bring up a menu of actions that can be performed against the storage endpoint
Further information about using Cyberduck can be found on the Cyberduck documentation site.
Link to section 'Accessing and Mounting Depot' of 'Storage' Accessing and Mounting Depot
Contact support to request access. Make sure to provide the Geddes namespace that will be accessing depot and the $PATH to your user/lab depot space. Once Access has been approved and an admin has created the needed Persistent Volumes for depot you can move on to the steps below.
The overall process is:
-
Submit request.
- An admin will create the needed Persistent Volume needed to access your depot space and will provide you with the name pv-depot-<your-pv-name>
-
Create Kubernetes secrets for Depot username/password authentication.
-
Create a Persistent Volume Claim via Rancher UI or Kubectl .
-
Use that claim for your workloads/pods to mount depot.
-
From the rancher UI, use the left navigation bar to select Storage > Secrets
-
Click Create at the top right
-
Select Oqaque and fill out the form.
-
Make sure select the namespace that will be accessing depot
-
Name should be depot-credentials-<myusername>
-
Under the data tab click add to create a second secret key field
-
Provide key/values
-
Key: username value: <yourUsername>
-
Key: password value: <yourPassword>
-
-
Click Create at the bottom right
-
-
From the Rancher UI, use the left navigation bar to select Storage > PersistentVolumeCLaims
-
Click Create at the top right and fill out the form
-
Make sure select the namespace that will be accessing depot
-
Name should be pvc-depot-<yourUsername>
-
Select Use an existing Persistent Volume
-
Use the dropdown to the immediate right to select pv-depot-<your pv name>
-
Click Customize in the form tab on the left
-
Select Many Nodes Read-Write
-
Click Create at the bottom right.
-
-
Create a yaml file i.e depot-pvc.yaml with the code below
apiVersion: v1 kind: PersistentVolumeClaim metadata: name: pvc-depot-<yourUsername> namespace: <namespace> spec: accessModes: - ReadWriteMany resources: requests: storage: 1Mi volumeName: pv-depot-<your pv name> storageClassName: "" -
Replace all the <yourUsername>
and <namespace> with the appropriate values. -
Do not include the example angle brackets < > in your code
-
-
Apply the yaml with the command $ kubectl apply -f depot-pvc.yaml
Examples
Examples of deploying a database with persistent storage and making it available on the network and deploying a webserver using a self-assigned URL.
Database
Link to section 'Deploy a postgis Database' of 'Database' Deploy a postgis Database
- Select your Project from the top right dropdown
- Using the far left menu, select Workload
- Click Create at the top right
- Select the appropriate Deployment Type for your use case, here we will select and use Deployment
- Fill out the form
- Select Namespace
- Give arbitrary Name
- Set Container Image to the postgis Docker image:
geddes-registry.rcac.purdue.edu/docker-hub-cache/postgis/postgis:latest - Set the postgres user password
- Select the Add Variable button under the Environment Variables section
- Fill in the fields Variable Name and Value so that we have a variable
POSTGRES_PASSWORD = <some password>
- Create a persistent volume for your database
- Select the Storage tab from within the current form on the left hand side
- Select Add Volume and choose Create Persistent Volume Claim
- Give arbitrary Name
- Select Single-Node Read/Write
- Select appropriate Storage Class from the dropdown and give Capacity in GiB e.g 5
- Provide the default postgres data directory as a Mount Point for the persistent volume
/var/lib/postgresql/data - Set Sub Path to
data
- Set resource CPU limitations
- Select Resources tab on the left within the current form
- Under the CPU Reservation box fill in
2000This ensures that Kubernetes will only schedule your workload to nodes that have that resource amount available, guaranteeing your application has 2CPU cores to utilize - Under the CPU Limit box also will in 2000 This ensures that your workload cannot exceed or utilize more than 2CPU cores. This helps resource quota management on the project level.
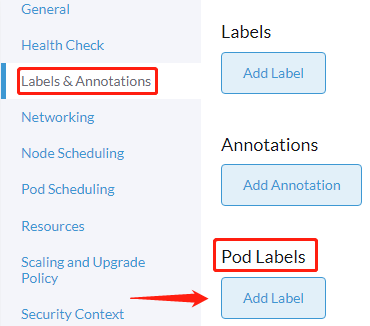
- Setup Pod Label
- Select Labels & Annotations on the left side of the current form
- Select Add Label under the Pod Labels section
- Give arbitrary unique key and value you can remember later when creating Services and other resources e.g Key:
my-dbValue:postgis
- Select Create to launch the postgis database
Wait a couple minutes while your persistent volume is created and the postgis container is deployed. The “does not have minimum availability” message is expected. But, waiting more than 5 minutes for your workload to deploy typically indicates a problem. You can check for errors by clicking your workload name (i.e. "mydb"), then the lower button on the right side of your deployed pod and selecting View Logs If all goes well, you will see an Active status for your deployment
Link to section 'Expose the Database to external clients' of 'Database' Expose the Database to external clients
Use a LoadBalancer service to automatically assign an IP address on a private Purdue network and open the postgres port (5432). A DNS name will automatically be configured for your service as <servicename>.<namespace>.geddes.rcac.purdue.edu.
- Using the far left menu and navigate to Service Discovery > Services
- Select Create at the top right
- Select Load Balancer
- Fill out the form
- Ensure to select the namespace where you deployed the postgis database
- Give a Name to your Service. Remember that your final DNS name when the service creates will be in the format of
<servicename>.<namespace>.geddes.rcac.purdue.edu - Fill in Listening Port and Target Port with the postgis default port 5432
- Select the Selectors tab within the current form
- Fill in Key and Value with the label values you created during the Setup Pod Label step from earlier e.g Key:
my-dbValue:postgis - IMPORTANT: The yellow bar will turn green if your key-value pair matches the pod label you set during the "Setup Pod Label" deployment step above. If you don't see a green bar with a matching Pod, your LoadBalancer will not work.
- Fill in Key and Value with the label values you created during the Setup Pod Label step from earlier e.g Key:
- Select the Labels & Annotations tab within the current form
- Select Add Annotation
- To deploy to a Purdue Private Address Range fill in Key:
metallb.universe.tf/address-poolValue:geddes-private-pool - To deploy to a Public Address Range fill in Key:
metallb.universe.tf/address-poolValue:geddes-public-pool
Kubernetes will now automatically assign you an IP address from the Geddes private IP pool. You can check the IP address by hovering over the “5432/tcp” link on the Service Discovery page or by viewing your service via kubectl on a terminal.
$ kubectl -n <namespace> get services
Verify your DNS record was created:
$ host <servicename>.<namespace>.geddes.rcac.purdue.edu
Web Server
Link to section 'Nginx Deployment' of 'Web Server' Nginx Deployment
- Select your Project from the top right dropdown
- Using the far left menu so select Workload
- Click Create at the top right
- Select the appropriate Deployment Type for your use case, here we will select and use Deployment
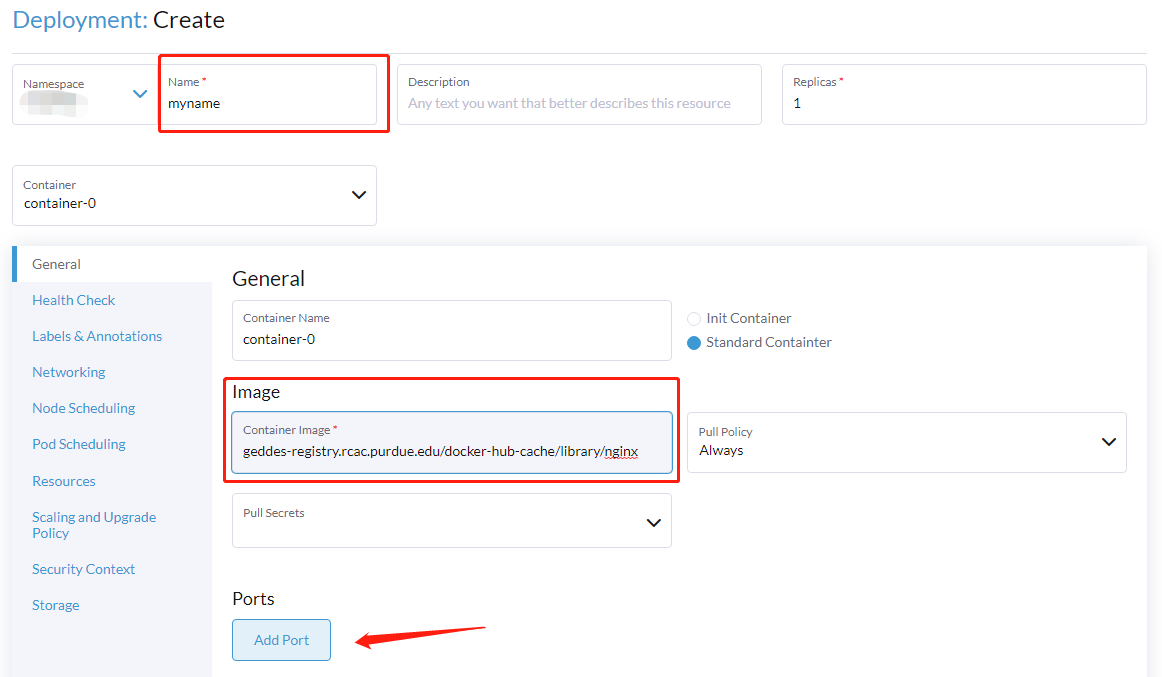
- Fill out the form
- Select Namespace
- Give arbitrary Name
- Set Container Image to the nginx Docker image:
geddes-registry.rcac.purdue.edu/docker-hub-cache/library/nginx - Create a Cluster IP service to point our external accessible ingress to later
- Click Add Port
- Click Service Type and with the drop select Cluster IP
- In the Private Container Port box type 80

- Setup Pod Label
- Select Labels & Annotations on the left side of the current form
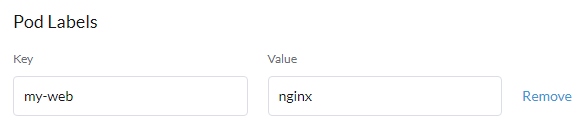
- Select Add Label under the Pod Labels section
- Give arbitrary unique key and value you can remember later when creating Services and other resources e.g Key:
my-webValue:nginx
- Click Create
Wait a couple minutes while your application is deployed. The “does not have minimum availability” message is expected. But, waiting more than 5 minutes for your workload to deploy typically indicates a problem. You can check for errors by clicking your workload name (i.e. "mywebserver"), then using the vertical ellipsis on the right hand side of your deployed pod and selecting View Logs
If all goes well, you will see an Active status for your deployment.
Link to section 'Expose the web server to external clients via an Ingress' of 'Web Server' Expose the web server to external clients via an Ingress
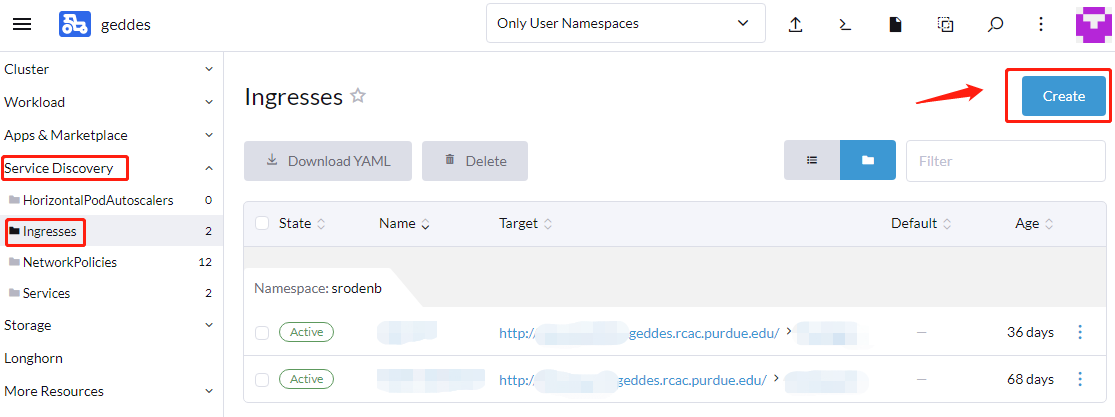
- Using the far left menu and navigate to Service Discovery > Ingresses and select Create at the top right
- Fill out the form
- Ensure to select the namespace where you deployed the nginx
- Give an arbitrary Name
- Under Request Host give the url you want for your web application e.g
my-nginx.geddes.rcac.purdue.edu - Fill in the value Path > Prefix as
/ - Use the Target Service and ;Port dropdowns to select the service you created during the Nginx Deployment section
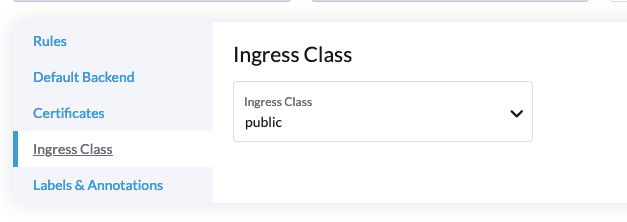
- The default Ingress is private, which is only accessible within Purdue network. To make a public one, change the Ingress Class to
public:

R Shiny
This guide provides instructions on how to build a Docker image for an R Shiny application, push it to the Geddes Registry and deploy it on Geddes.
Link to section 'Create an RShiny Docker Image' of 'R Shiny' Create an RShiny Docker Image
Create a local Dockerfile by saving the following Dockerfile to your computer and editing the contents for your R Shiny App.
FROM rocker/shiny

# install R package dependencies
RUN apt-get update && apt-get install -y \
    libssl-dev \
    git \
    ## clean up
    && apt-get clean \
    && rm -rf /var/lib/apt/lists/ \
    && rm -rf /tmp/downloaded_packages/ /tmp/*.rds

## Install any R packages you need
RUN install2.r --error \
        <package 1> \
        <package 2> \
        <package 3> \
    ## clean up
    && rm -rf /tmp/downloaded_packages/ /tmp/*.rds

## copy shiny app to shiny server location
COPY ./<app directory> /srv/shiny-server/
Link to section 'Docker Build and Testing Process' of 'R Shiny' Docker Build and Testing Process
Build the Docker image locally based on the Dockerfile above. The Dockerfile must be in your current working directory. This command tags the image with the name "myshinyapp" and version 1.0.
docker build -t myshinyapp:1.0 .Test your application locally. This command will run your container locally and expose the R Shiny port (3838) so it can be accessed via http://localhost:3838 in your web browser.
On Linux or Mac: docker run --network=host myshinyapp:1.1
On Windows: docker run -p 3838:3838 myshinyapp:1.1
Iterate on code changes locally until you want to deploy on Geddes.
Link to section 'Tag and Upload to the Geddes Registry' of 'R Shiny' Tag and Upload to the Geddes Registry
Tag the image for upload to the Geddes Registry
docker tag myshiny:1.0 geddes-registry.rcac.purdue.edu/<repo>/myshinyapp:1.0Push the image to the Geddes Registry. Run the login command using your Purdue career account username and password if you currently are not authenticated to the registry.
docker login geddes-registry.rcac.purdue.edudocker push geddes-registry.rcac.purdue.edu/<repo>/myshinyapp:1.0Link to section 'Deploy the Application on Geddes' of 'R Shiny' Deploy the Application on Geddes
To deploy the application, one can follow the instructions for deploying a web server and replace the image name with the Geddes registry image tag from above: geddes-registry.rcac.purdue.edu/<repo>/myshinyapp:1.0
Troubleshooting
Link to section 'Useful Links' of 'Troubleshooting' Useful Links
There are many valuable Kubernetes troubleshooting guides readily accessible on the Internet. Instead of duplicating them here, we provide links to external documentation that has been useful for users of the Geddes platform.
- Debugging Pods
- Debugging Services
- Pod Failures
- Get a Shell on a Running Container
- Though the Geddes UI, the equivalent method by clicking the vertical elipse and selecting "Execute Shell".
Link to section 'Create a Pod for Debugging' of 'Troubleshooting' Create a Pod for Debugging
Many times, users want to start a simple persistent Pod from a container image like Alpine or Ubuntu to do troubleshooting. The following YAML will deploy an Alpine Linux pod in a namespace that sleeps for 24 hours.
apiVersion: v1
kind: Pod
metadata:
  name: debug
  namespace: <namespace>
  labels:
    app: debug
spec:
  containers:
  - image: geddes-registry.rcac.purdue.edu/docker-hub-cache/library/alpine
    command:
      - "sleep"
      - "86400"
    name: debug
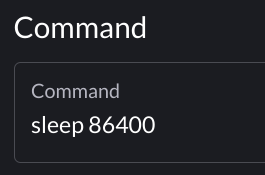
One can also launch a persistent Pod by specifying the sleep command via the Geddes UI.
Link to section 'Permission Denied on PVC for non-root User' of 'Troubleshooting' Permission Denied on PVC for non-root User
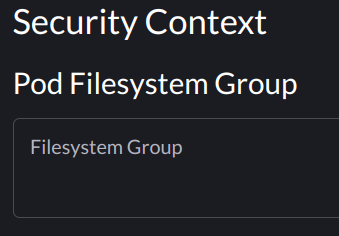
If your container or process runs as a non-root user and you see a "Permission denied" error, you may need to set the fsGroup SecurityContext on your Pod so permissions are configured correctly on the PVC. This can be done in the Pod's spec.
securityContext:
  fsGroup: <gid>
Where gid is the group id your container is running as, or the group id of the process that is trying to write to the PVC.
This setting can also be applied under the Pod menu when deploying a workfload via the Geddes UI.
Link to section 'Pull Rate Limit Error' of 'Troubleshooting' Pull Rate Limit Error
Symptom:
ImagePullBackoff Error with message Failed to pull image "<image>:<tag>
Solution:
Use the Geddes Registry Docker Hub Cache to pull your image from Docker Hub.
Link to section 'Ingress 413 Content Too Large Errors' of 'Troubleshooting' Ingress 413 Content Too Large Errors
By default, the Ingress controller on Geddes can handle requests up to 1 MB in size. If you need to send requests larger than 1 MB you can increase the size with the following Ingress annotation. Using "0" will allow unlimited size.
metadata:
  annotations:
    nginx.ingress.kubernetes.io/proxy-body-size: "0"