
SSH Keys
Link to section 'General overview' of 'SSH Keys' General overview
To connect to Anvil using SSH keys, you must follow three high-level steps:
- Generate a key pair consisting of a private and a public key on your local machine.
- Copy the public key to the cluster and append it to
$HOME/.ssh/authorized_keysfile in your account. - Test if you can ssh from your local computer to the cluster directly.
Detailed steps for different operating systems and specific SSH client software are given below.
Link to section 'Mac and Linux:' of 'SSH Keys' Mac and Linux:
-
Run
ssh-keygenin a terminal on your local machine.localhost >$ ssh-keygen Generating public/private rsa key pair. Enter file in which to save the key (localhost/.ssh/id_rsa):You may supply a filename and a passphrase for protecting your private key, but it is not mandatory. To accept the default settings, press Enter without specifying a filename.
Note: If you do not protect your private key with a passphrase, anyone with access to your computer could SSH to your account on Anvil.Created directory 'localhost/.ssh'. Enter passphrase (empty for no passphrase): Enter same passphrase again: Your identification has been saved in localhost/.ssh/id_rsa. Your public key has been saved in localhost/.ssh/id_rsa.pub. The key fingerprint is: ... The key's randomart image is: ...By default, the key files will be stored in
~/.ssh/id_rsaand~/.ssh/id_rsa.pubon your local machine. -
Go to the
~/.sshfolder in your local machine andcatthe key information in theid_rsa.pub file.localhost/.ssh>$ cat id_rsa.pub ssh-rsa XXXXXXXXXXXXXXXXXXXXXXXXXXXXXXXXXXXXXXXXXXXXXXXXXXXXXXXXXXXXXXXXXXXXXXXXXXXXXXXXXXXXXXXXXXXXXXXXXXXXXXXXXXXXXXXX XXXXXXXXXXXXXXXXXXXXXXXXXXXXXXXXXXXXXXXXXXXXXXXXXXXXXXXXXXXXXXXXXXXXXX= localhost-username@localhost -
For your first time login to Anvil, please log in to Open OnDemand ondemand.anvil.rcac.purdue.edu using your ACCESS username and password.
-
Once logged on to OnDemand, go to the
Clusterson the top toolbar. ClickAnvil Shell Accessand you will be able to see the terminal.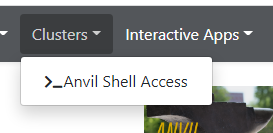
============================================================================= == Welcome to the Anvil Cluster == …… ============================================================================= ** DID YOU KNOW? ** …… ***************************************************************************** x-anvilusername@login04.anvil:[~] $ pwd /home/x-anvilusername -
Under the home directory on Anvil, make a
.sshdirectory usingmkdir -p ~/.sshif it does not exist.
Create a file~/.ssh/authorized_keyson the Anvil cluster and copy the contents of the public keyid_rsa.pubin your local machine into~/.ssh/authorized_keys.x-anvilusername@login04.anvil:[~] $ pwd /home/x-anvilusername x-anvilusername@login04.anvil:[~] $ cd ~/.ssh x-anvilusername@login04.anvil:[.ssh] $ vi authorized_keys # copy-paste the contents of the public key id_rsa.pub in your local machine (as shown in step 2) to authorized_keys here and save the change of authorized_keys file. Then it is all set! # -
Test the new key by SSH-ing to the server. The login should now complete without asking for a password.
localhost>$ ssh x-anvilusername@anvil.rcac.purdue.edu ============================================================================= == Welcome to the Anvil Cluster == ... ============================================================================= x-anvilusername@login06.anvil:[~] $ -
If the private key has a non-default name or location, you need to specify the key by
ssh -i my_private_key_name x-anvilusername@anvil.rcac.purdue.edu.
Link to section 'Windows:' of 'SSH Keys' Windows:
| Programs | Instructions |
|---|---|
| MobaXterm | Open a local terminal and follow Linux steps |
| Git Bash | Follow Linux steps |
| Windows 10 PowerShell | Follow Linux steps |
| Windows 10 Subsystem for Linux | Follow Linux steps |
| PuTTY | Follow steps below |
PuTTY:
-
Launch PuTTYgen, keep the default key type (RSA) and length (2048-bits) and click Generate button.
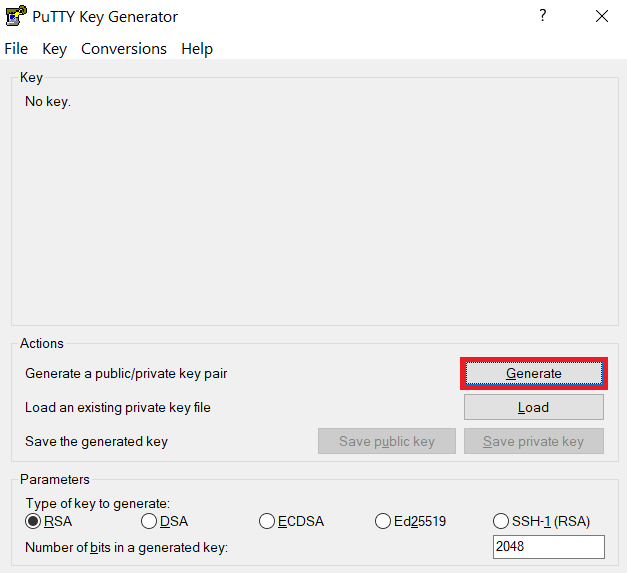
The "Generate" button can be found under the "Actions" section of the PuTTY Key Generator interface. -
Once the key pair is generated:
Use the Save public key button to save the public key, e.g.
Documents\SSH_Keys\mylaptop_public_key.pubUse the Save private key button to save the private key, e.g.
Documents\SSH_Keys\mylaptop_private_key.ppk. When saving the private key, you can also choose a reminder comment, as well as an optional passphrase to protect your key, as shown in the image below. Note: If you do not protect your private key with a passphrase, anyone with access to your computer could SSH to your account on Anvil.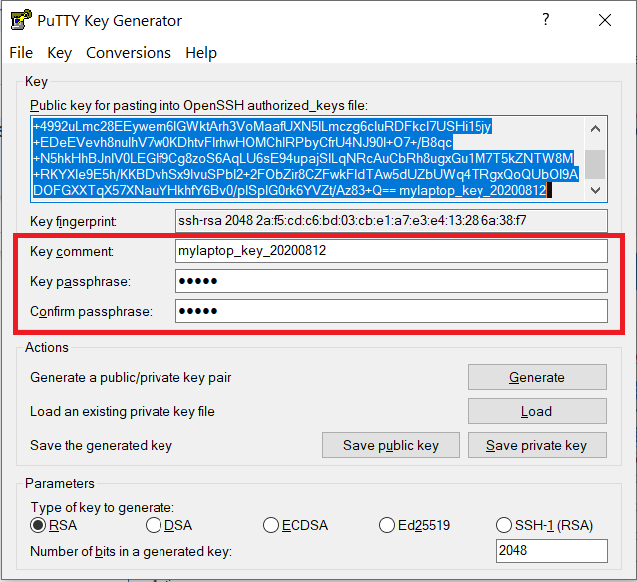
The PuTTY Key Generator form has inputs for the Key passphrase and optional reminder comment. From the menu of PuTTYgen, use the "Conversion -> Export OpenSSH key" tool to convert the private key into openssh format, e.g.
Documents\SSH_Keys\mylaptop_private_key.opensshto be used later for Thinlinc. -
Configure PuTTY to use key-based authentication:
Launch PuTTY and navigate to "Connection -> SSH ->Auth" on the left panel, click Browse button under the "Authentication parameters" section and choose your private key, e.g. mylaptop_private_key.ppk
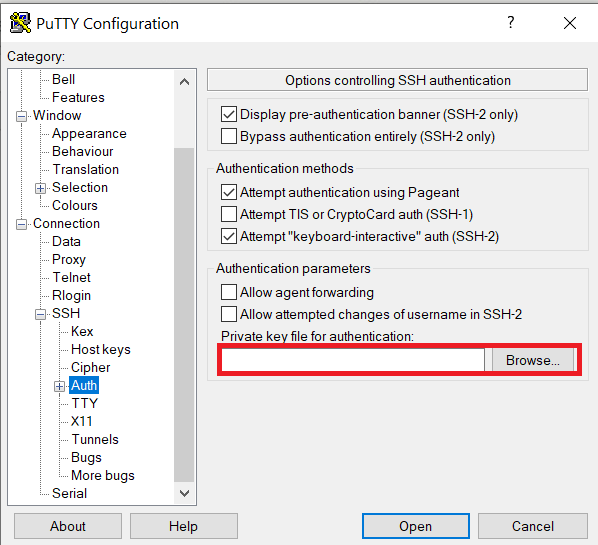
After clicking Connection -> SSH ->Auth panel, the "Browse" option can be found at the bottom of the resulting panel. Navigate back to "Session" on the left panel. Highlight "Default Settings" and click the "Save" button to ensure the change is in place.
-
For your first time login to Anvil, please log in to Open OnDemand ondemand.anvil.rcac.purdue.edu using your ACCESS username and password.
-
Once logged on to OnDemand, go to the
Clusterson the top toolbar. ClickAnvil Shell Accessand you will be able to see the terminal.============================================================================= == Welcome to the Anvil Cluster == …… ============================================================================= ** DID YOU KNOW? ** …… ***************************************************************************** x-anvilusername@login04.anvil:[~] $ pwd /home/x-anvilusername -
Under the home directory on Anvil, make a
.sshdirectory usingmkdir -p ~/.sshif it does not exist.
Create a file~/.ssh/authorized_keyson the Anvil cluster and copy the contents of the public keyid_rsa.pubin your local machine into~/.ssh/authorized_keys.
and copy the contents of public key from PuTTYgen as shown below and paste it intox-anvilusername@login04.anvil:[~] $ pwd /home/x-anvilusername x-anvilusername@login04.anvil:[~] $ cd ~/.ssh x-anvilusername@login04.anvil:[.ssh] $ vi authorized_keys # copy-paste the contents of the public key id_rsa.pub in your local machine (as shown in step 2) to authorized_keys here and save the change of authorized_keys file. Then it is all set! #~/.ssh/authorized_keys. Please double-check that your text editor did not wrap or fold the pasted value (it should be one very long line).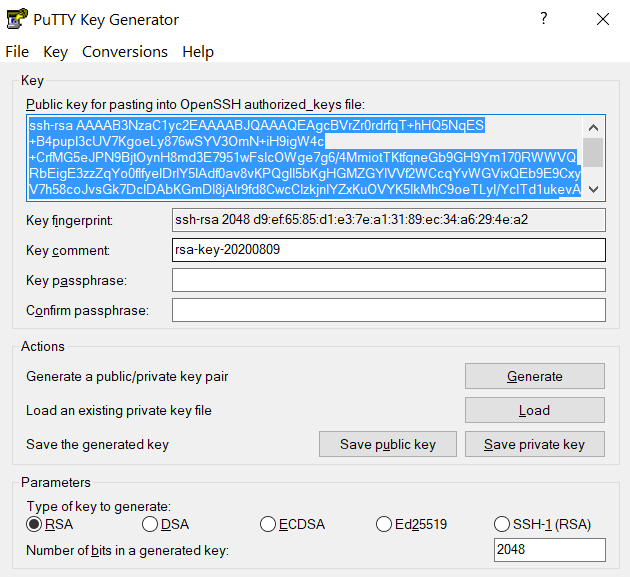
The "Public key" will look like a long string of random letters and numbers in a text box at the top of the window. - Test by connecting to the cluster and the login should now complete without asking for a password. If you chose to protect your private key with a passphrase in step 2, you will be prompted to enter the passphrase when connecting.