Accessing the System
Link to section 'Accounts on Anvil' of 'Accessing the System' Accounts on Anvil
Obtaining an Account
As an ACCESS computing resource, Anvil is accessible to ACCESS users who receive an allocation on the system. To obtain an account, users may submit a proposal through the ACCESS Allocation Request System.
For details on how to go about requesting an allocation, refer to How do I get onto Anvil through ACCESS.
Interested parties may contact the ACCESS Help Desk for help with an Anvil proposal.
Link to section 'Joining an Existing Project' of 'Obtaining an Account' Joining an Existing Project
If you are trying to join an existing ACCESS project please talk to that project's PI. The PI has the ability to add their team through the ACCESS portal.
How do I get onto Anvil through ACCESS
Link to section 'What is ACCESS?' of 'How do I get onto Anvil through ACCESS' What is ACCESS?
Advanced Cyberinfrastructure Coordination Ecosystem: Services & Support (ACCESS) is an NSF-funded program that manages access to the national research cyberinfrastructure (CI) resources. Any researcher who seeks to use one of these CI resources must follow ACCESS processes to get onto these resources.
Link to section 'What resources are available via ACCESS?' of 'How do I get onto Anvil through ACCESS' What resources are available via ACCESS?
ACCESS coordinates a diverse set of resources including Anvil and other traditional HPC resources suited for resource-intensive CPU workloads, modern accelerator-based systems (e.g., GPU), as well as cloud resources. Anvil provides both CPU and GPU resources as part of ACCESS. A comprehensive list of all the ACCESS-managed resources can be found here along with their descriptions and ideal workloads: https://allocations.access-ci.org/resources
Link to section 'How do I request access to a resource?' of 'How do I get onto Anvil through ACCESS' How do I request access to a resource?
The process of getting onto these resources is broadly:
- Sign up for an ACCESS account (if you don’t have one already) at https://allocations.access-ci.org.
- Prepare an allocation request with details of your proposed computational workflows (science, software needs), resource requirements, and a short CV. See the individual “Preparing Your … Request” pages for details on what documents are required: https://allocations.access-ci.org/prepare-requests.
- Decide on which allocation tier you want to apply to (more on that below) and submit the request.
Link to section 'Which ACCESS tier should I choose?' of 'How do I get onto Anvil through ACCESS' Which ACCESS tier should I choose?
As you can gather from https://allocations.access-ci.org/project-types, there are four different tiers in ACCESS. Broadly, these tiers provide increasing computational resources with corresponding stringent documentation and resource justification requirements. Furthermore, while Explore and Discover tier requests are reviewed on a rolling basis as they are submitted, Accelerate requests will be reviewed monthly and Maximize will be reviewed twice a year. The review period reflects the level of resources provided, and Explore and Discover applications are generally reviewed within a week. An important point to note is that ACCESS does not award you time on a specific computational resource (except for the Maximize tier). Users are awarded a certain number of ACCESS credits which they then exchange for time on a particular resource. Here are some guidelines on how to choose between the tiers:- If you are a graduate student, you may apply for the Explore tier with a letter from your advisor on institutional letterhead stating that the proposed work is being performed primarily by the graduate student and is separate from other funded grants or the advisor's own research.
- If you would just like to test out a resource and gather some performance data before making a large request, Explore or Discover is again the appropriate option.
- If you would like to run simulations across multiple resources to identify the one best suited for you, Discover will provide you with sufficient credits to exchange across multiple systems.
- One way of determining the appropriate tier is to determine what the credits would translate to in terms of computational resources. The exchange calculator (https://allocations.access-ci.org/exchange_calculator) can be used to calculate what a certain number of ACCESS credits translates to in terms of “core-hours” or “GPU-hours” or “node-hours” on an ACCESS resource. For example: the maximum 400,000 ACCESS credits that you may be awarded in the Explore tier translates to ~334,000 CPU core hours or ~6000 GPU hours on Anvil. Based on the scale of simulations you would like to run, you may need to choose one tier or the other.
Link to section 'What else should I know?' of 'How do I get onto Anvil through ACCESS' What else should I know?
- You may request a separate allocation for each of your research grants and the allocation can last the duration of the grant (except for the Maximize tier which only lasts for 12 months). Allocations that do not cite a grant will last for 12 months.
- Supplements are not allowed (for Explore, Discover, and Accelerate tiers), instead you will need to move to a different tier if you require more resources.
- As noted above, the exchange rates for Anvil CPU and Anvil GPU are different so be sure to check the exchange calculator.
- Be sure to include details of the simulations you would like to run and what software you would like to use. This avoids back and forth with the reviewers and also helps Anvil staff determine if your workloads are well suited to Anvil.
- When your request is approved, you only get ACCESS credits awarded. You still need to go through the step of exchanging these credits for time on Anvil. You need not use up all your credits and may also use part of your credits for time on other ACCESS resources.
- You will also need to go to the allocations page and add any users you would like to have access to these resources. Note that they will need to sign up for ACCESS accounts as well before you can add them.
- For other questions you may have, take a look at ACCESS policies here: (https://allocations.access-ci.org/allocations-policy)
Logging In
Anvil supports the SSH (Secure Shell), ThinLinc, and Open OnDemand mechanisms for logging in. The first two of these use SSH keys. If you need help creating or uploading your SSH keys, please see the Managing SSH Public Keys page for that information.
ACCESS requires that you use the ACCESS Duo service for additional authentication, you will be prompted to authenticate yourself further using Duo and your Duo client app, token, or other contact methods. Consult Manage Multi-Factor Authentication with Duo for account setup instructions.
Link to section 'With SSH' of 'Logging In' With SSH
Anvil accepts standard SSH connections with public keys-based authentication to anvil.rcac.purdue.edu using your Anvil username:
localhost$ ssh -l my-x-anvil-username anvil.rcac.purdue.edu
Please note:
- Your Anvil username is not the same as your ACCESS username (although it is derived from it). Anvil usernames look like
x-ACCESSusernameor similar, starting with anx-. - Password-based authentication is not supported on Anvil (in favor of SSH keys). There is no "Anvil password", and your ACCESS password will not be accepted by Anvil's SSH either. SSH keys can be set up from the Open OnDemand interface on Anvil
ondemand.anvil.rcac.purdue.edu. Please follow the steps in Setting up SSH keys to add your SSH key on Anvil.
When reporting SSH problems to the help desk, please execute the ssh command with the -vvv option and include the verbose output in your problem description.
Link to section 'Additional Services and Instructions' of 'Logging In' Additional Services and Instructions
Open OnDemand
Open OnDemand is an open-source HPC portal developed by the Ohio Supercomputing Center. Open OnDemand allows one to interact with HPC resources through a web browser and easily manage files, submit jobs, and interact with graphical applications directly in a browser, all with no software to install. Anvil has an instance of OnDemand available that can be accessed via ondemand.anvil.rcac.purdue.edu.
Link to section 'Logging In' of 'Open OnDemand' Logging In
To log into the Anvil OnDemand portal:
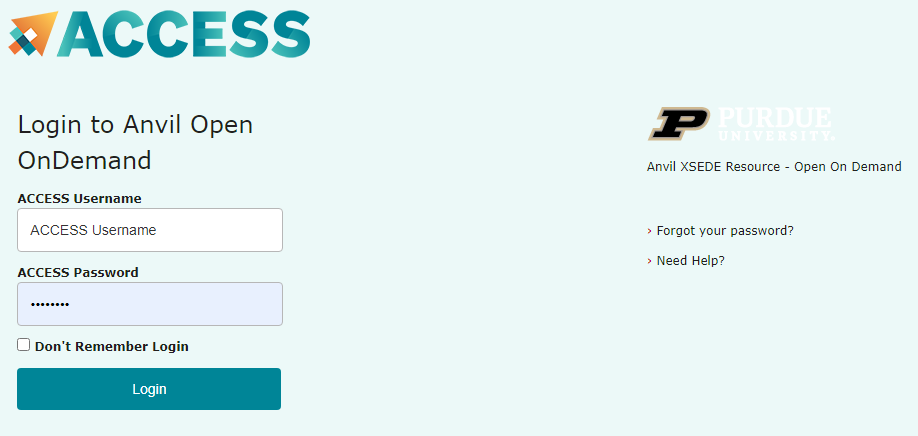
- Navigate to ondemand.anvil.rcac.purdue.edu
- Log in using your ACCESS username and password
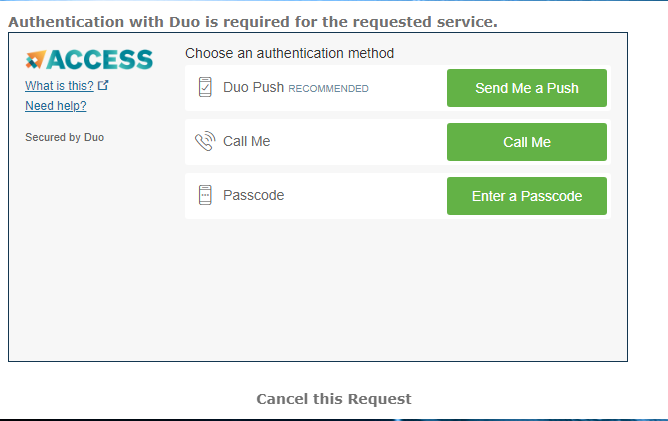
- ACCESS Duo authentication is required to login to OnDemand. Consult Manage Multi-Factor Authentication with Duo for account setup instructions
The Anvil team continues to refine the user interface, please reach out to us in case of any queries regarding the use of OnDemand.
SSH Keys
Link to section 'General overview' of 'SSH Keys' General overview
To connect to Anvil using SSH keys, you must follow three high-level steps:
- Generate a key pair consisting of a private and a public key on your local machine.
- Copy the public key to the cluster and append it to
$HOME/.ssh/authorized_keysfile in your account. - Test if you can ssh from your local computer to the cluster directly.
Detailed steps for different operating systems and specific SSH client software are given below.
Link to section 'Mac and Linux:' of 'SSH Keys' Mac and Linux:
-
Run
ssh-keygenin a terminal on your local machine.localhost >$ ssh-keygen Generating public/private rsa key pair. Enter file in which to save the key (localhost/.ssh/id_rsa):You may supply a filename and a passphrase for protecting your private key, but it is not mandatory. To accept the default settings, press Enter without specifying a filename.
Note: If you do not protect your private key with a passphrase, anyone with access to your computer could SSH to your account on Anvil.Created directory 'localhost/.ssh'. Enter passphrase (empty for no passphrase): Enter same passphrase again: Your identification has been saved in localhost/.ssh/id_rsa. Your public key has been saved in localhost/.ssh/id_rsa.pub. The key fingerprint is: ... The key's randomart image is: ...By default, the key files will be stored in
~/.ssh/id_rsaand~/.ssh/id_rsa.pubon your local machine. -
Go to the
~/.sshfolder in your local machine andcatthe key information in theid_rsa.pub file.localhost/.ssh>$ cat id_rsa.pub ssh-rsa XXXXXXXXXXXXXXXXXXXXXXXXXXXXXXXXXXXXXXXXXXXXXXXXXXXXXXXXXXXXXXXXXXXXXXXXXXXXXXXXXXXXXXXXXXXXXXXXXXXXXXXXXXXXXXXX XXXXXXXXXXXXXXXXXXXXXXXXXXXXXXXXXXXXXXXXXXXXXXXXXXXXXXXXXXXXXXXXXXXXXX= localhost-username@localhost -
For your first time login to Anvil, please log in to Open OnDemand ondemand.anvil.rcac.purdue.edu using your ACCESS username and password.
-
Once logged on to OnDemand, go to the
Clusterson the top toolbar. ClickAnvil Shell Accessand you will be able to see the terminal.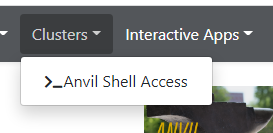
============================================================================= == Welcome to the Anvil Cluster == …… ============================================================================= ** DID YOU KNOW? ** …… ***************************************************************************** x-anvilusername@login04.anvil:[~] $ pwd /home/x-anvilusername -
Under the home directory on Anvil, make a
.sshdirectory usingmkdir -p ~/.sshif it does not exist.
Create a file~/.ssh/authorized_keyson the Anvil cluster and copy the contents of the public keyid_rsa.pubin your local machine into~/.ssh/authorized_keys.x-anvilusername@login04.anvil:[~] $ pwd /home/x-anvilusername x-anvilusername@login04.anvil:[~] $ cd ~/.ssh x-anvilusername@login04.anvil:[.ssh] $ vi authorized_keys # copy-paste the contents of the public key id_rsa.pub in your local machine (as shown in step 2) to authorized_keys here and save the change of authorized_keys file. Then it is all set! # -
Test the new key by SSH-ing to the server. The login should now complete without asking for a password.
localhost>$ ssh x-anvilusername@anvil.rcac.purdue.edu ============================================================================= == Welcome to the Anvil Cluster == ... ============================================================================= x-anvilusername@login06.anvil:[~] $ -
If the private key has a non-default name or location, you need to specify the key by
ssh -i my_private_key_name x-anvilusername@anvil.rcac.purdue.edu.
Link to section 'Windows:' of 'SSH Keys' Windows:
| Programs | Instructions |
|---|---|
| MobaXterm | Open a local terminal and follow Linux steps |
| Git Bash | Follow Linux steps |
| Windows 10 PowerShell | Follow Linux steps |
| Windows 10 Subsystem for Linux | Follow Linux steps |
| PuTTY | Follow steps below |
PuTTY:
-
Launch PuTTYgen, keep the default key type (RSA) and length (2048-bits) and click Generate button.
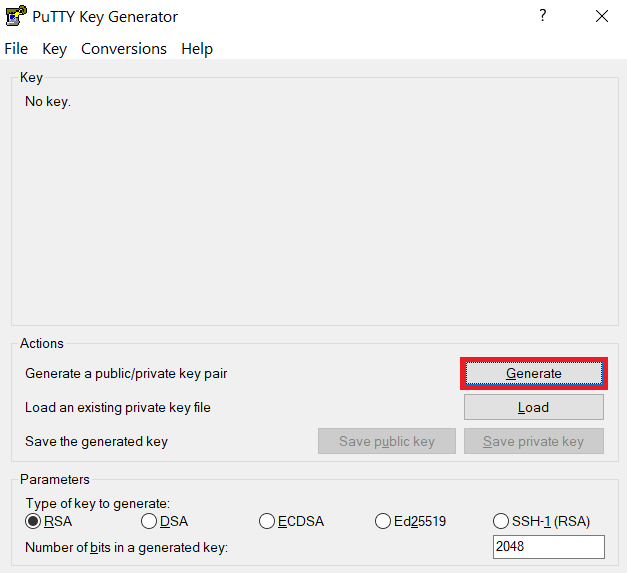
The "Generate" button can be found under the "Actions" section of the PuTTY Key Generator interface. -
Once the key pair is generated:
Use the Save public key button to save the public key, e.g.
Documents\SSH_Keys\mylaptop_public_key.pubUse the Save private key button to save the private key, e.g.
Documents\SSH_Keys\mylaptop_private_key.ppk. When saving the private key, you can also choose a reminder comment, as well as an optional passphrase to protect your key, as shown in the image below. Note: If you do not protect your private key with a passphrase, anyone with access to your computer could SSH to your account on Anvil.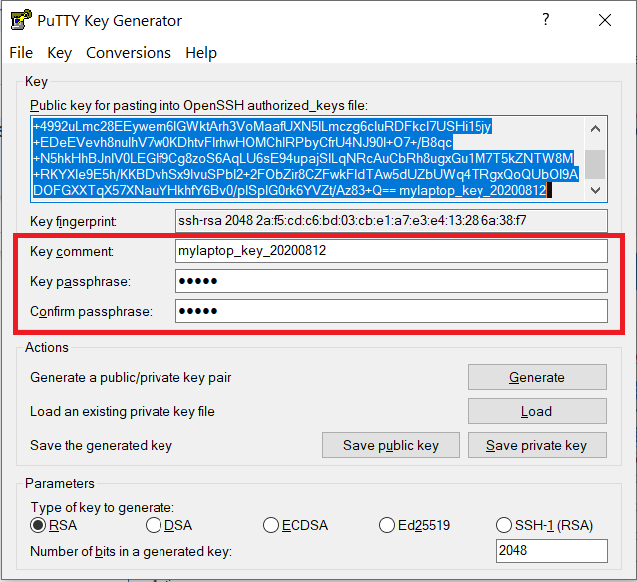
The PuTTY Key Generator form has inputs for the Key passphrase and optional reminder comment. From the menu of PuTTYgen, use the "Conversion -> Export OpenSSH key" tool to convert the private key into openssh format, e.g.
Documents\SSH_Keys\mylaptop_private_key.opensshto be used later for Thinlinc. -
Configure PuTTY to use key-based authentication:
Launch PuTTY and navigate to "Connection -> SSH ->Auth" on the left panel, click Browse button under the "Authentication parameters" section and choose your private key, e.g. mylaptop_private_key.ppk
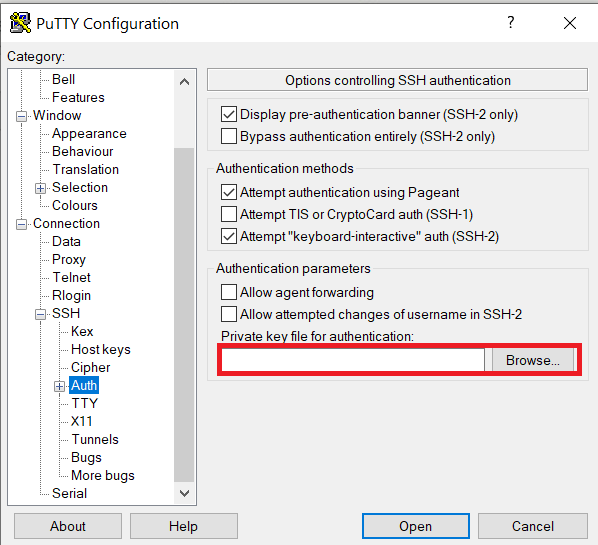
After clicking Connection -> SSH ->Auth panel, the "Browse" option can be found at the bottom of the resulting panel. Navigate back to "Session" on the left panel. Highlight "Default Settings" and click the "Save" button to ensure the change is in place.
-
For your first time login to Anvil, please log in to Open OnDemand ondemand.anvil.rcac.purdue.edu using your ACCESS username and password.
-
Once logged on to OnDemand, go to the
Clusterson the top toolbar. ClickAnvil Shell Accessand you will be able to see the terminal.
============================================================================= == Welcome to the Anvil Cluster == …… ============================================================================= ** DID YOU KNOW? ** …… ***************************************************************************** x-anvilusername@login04.anvil:[~] $ pwd /home/x-anvilusername -
Under the home directory on Anvil, make a
.sshdirectory usingmkdir -p ~/.sshif it does not exist.
Create a file~/.ssh/authorized_keyson the Anvil cluster and copy the contents of the public keyid_rsa.pubin your local machine into~/.ssh/authorized_keys.
and copy the contents of public key from PuTTYgen as shown below and paste it intox-anvilusername@login04.anvil:[~] $ pwd /home/x-anvilusername x-anvilusername@login04.anvil:[~] $ cd ~/.ssh x-anvilusername@login04.anvil:[.ssh] $ vi authorized_keys # copy-paste the contents of the public key id_rsa.pub in your local machine (as shown in step 2) to authorized_keys here and save the change of authorized_keys file. Then it is all set! #~/.ssh/authorized_keys. Please double-check that your text editor did not wrap or fold the pasted value (it should be one very long line).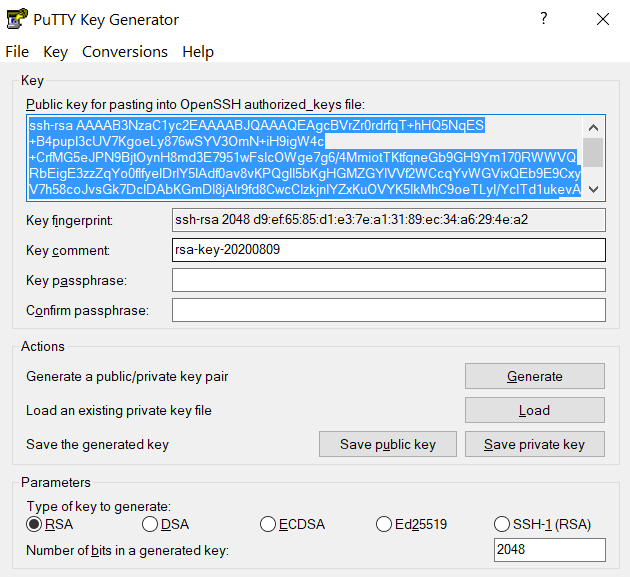
The "Public key" will look like a long string of random letters and numbers in a text box at the top of the window. - Test by connecting to the cluster and the login should now complete without asking for a password. If you chose to protect your private key with a passphrase in step 2, you will be prompted to enter the passphrase when connecting.
ThinLinc
For your first time accessing Anvil using ThinLinc client, your desktop might be locked after it has been idle for more than 5 minutes. It is because in the default settings, the "screensaver" and "lock screen" are turned on. To solve this issue, please refer to the FAQs Page.
Anvil provides Cendio's ThinLinc as an alternative to running an X11 server directly on your computer. It allows you to run graphical applications or graphical interactive jobs directly on Anvil through a persistent remote graphical desktop session.
ThinLinc is a service that allows you to connect to a persistent remote graphical desktop session. This service works very well over a high latency, low bandwidth, or off-campus connection compared to running an X11 server locally. It is also very helpful for Windows users who do not have an easy to use local X11 server, as little to no setup is required on your computer.
There are two ways in which to use ThinLinc: preferably through the native client or through a web browser.
Browser-based Thinlinc access is not supported on Anvil at this moment. Please use native Thinlinc client with SSH keys.
Link to section 'Installing the ThinLinc native client' of 'ThinLinc' Installing the ThinLinc native client
The native ThinLinc client will offer the best experience especially over off-campus connections and is the recommended method for using ThinLinc. It is compatible with Windows, Mac OS X, and Linux.
- Download the ThinLinc client from the ThinLinc website.
- Start the ThinLinc client on your computer.
- In the client's login window, use desktop.anvil.rcac.purdue.edu as the Server and use your Anvil username
x-anvilusername. - At this moment, an SSH key is required to login to ThinLinc client. For help generating and uploading keys to the cluster, see SSH Keys section in our user guide for details.
Link to section 'Configure ThinLinc to use SSH Keys' of 'ThinLinc' Configure ThinLinc to use SSH Keys
-
To set up SSH key authentication on the ThinLinc client:
-
Open the Options panel, and select Public key as your authentication method on the Security tab.
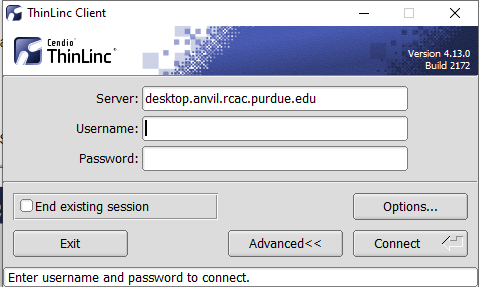
The "Options..." button in the ThinLinc Client can be found towards the bottom left, above the "Connect" button. -
In the options dialog, switch to the "Security" tab and select the "Public key" radio button:
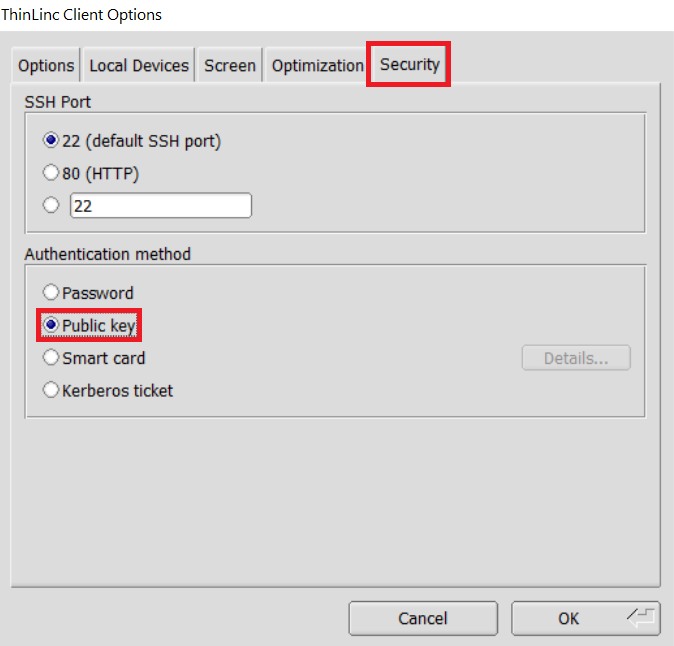
The "Security" tab found in the options dialog, will be the last of available tabs. The "Public key" option can be found in the "Authentication method" options group. - Click OK to return to the ThinLinc Client login window. You should now see a Key field in place of the Password field.
-
In the Key field, type the path to your locally stored private key or click the ... button to locate and select the key on your local system. Note: If PuTTY is used to generate the SSH Key pairs, please choose the private key in the openssh format.
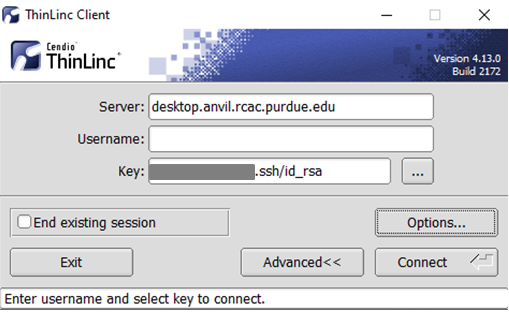
The ThinLinc Client login window will now display key field instead of a password field.
-
- Click the Connect button.
- Continue to following section on connecting to Anvil from ThinLinc.
Link to section 'Connecting to Anvil from ThinLinc' of 'ThinLinc' Connecting to Anvil from ThinLinc
- Once logged in, you will be presented with a remote Linux desktop running directly on a cluster login node.
- Open the terminal application on the remote desktop.
- Once logged in to the Anvil login node, you may use graphical editors, debuggers, software like Matlab, or run graphical interactive jobs. For example, to test the X forwarding connection issue the following command to launch the graphical editor geany:
$ geany - This session will remain persistent even if you disconnect from the session. Any interactive jobs or applications you left running will continue running even if you are not connected to the session.
Link to section 'Tips for using ThinLinc native client' of 'ThinLinc' Tips for using ThinLinc native client
- To exit a full-screen ThinLinc session press the F8 key on your keyboard (fn + F8 key for Mac users) and click to disconnect or exit full screen.
- Full-screen mode can be disabled when connecting to a session by clicking the Options button and disabling full-screen mode from the Screen tab.
Check Allocation Usage
To keep track of the usage of the allocation by your project team, you can use mybalance:
x-anvilusername@login01:~ $ mybalance

Allocation          Type  SU Limit   SU Usage  SU Usage  SU Balance
Account                             (account)    (user)
===============  =======  ========  ========= =========  ==========
xxxxxxxxx           CPU    1000.0       95.7       0.0       904.3
You can also check the allocation usage through ACCESS allocations page.
See SU accounting section for detailed description of the way SUs are charged on Anvil.
